Wednesday, December 25, 2013

Zombies Ate My Motherland Walkthrough Guide

Zombies Ate My Motherland
Zombies Ate My Motherland Logo

Play Online: Zombies Ate My Motherland
Developer: Ilia Matrosov & Naram
Genre: Action, Shooter

Zombies Ate My Motherland Guide
List of Weapons in Zombies Ate My Motherland
Makarov Pistol - Nice and simple.
Type: First Weapon
Cost: 1

Axe - Kills weak zombies instantly.
Type: Second Weapon
Cost: 1

Grenade - The best choice for killing groups of zombies.
Type: Third Weapon
Cost: 1

Compass - Shows the direction to the box.
Type: Optional
Cost: 10

Brown Bear - Defends the house. Ex-soviet commander.
Type: Optional
Cost: 30

Minefield - Minefield near the house.
Type: Optional
Cost: 50

AK-47 - It's the world most popular assault rifle.
Type: First Weapon
Cost: 100

Kuvalda Hammer - Damages two zombies. Kills weak zombies instantly
Type: Second Weapon
Cost: 100

Molotov Coctail - Burn em down!
Type: Third Weapon
Cost: 50

Dragunov Rile - Semi-automatic sniper developed in the soviet union. Bullets hurt three zombies.
Type: First Weapon
Cost: 200

Balalayka - Russian folk instructment. Kills weak zombie instantly. Stuns zombies around.
Type: Second Weapon
Cost: 300

Naram Bomb - Nice for covering your back.
Type: Third Weapon
Cost: 50

Matrosov - The most powerful weapon in the game. Horde isn't a problem.
Type: First Weapon
Cost: 3000

List of Upgrades in Zombies Ate My Motherland
Amount of Health - Cost: 1 / 5 / 10 / 20 / 20 / 20 / 20 / 20 / 20
Amount of Grenades - Cost: 1 / 5 / 10 / 20 / 20 / 20 / 20 / 20 / 20
Amount of Crates - Cost: 10 / 20 / 30 / 40
Crate Open Time - Cost: 1 / 50 / 100

Recommended Build in Zombies Ate My Motherland
1. Crate Open Time
2. Amount of Crates
3. Amount of Grenades
4. Amount of Health
5. Repeat 1-4 until you maxed all of them.
6. Compass
7. Brown Bear
8. MineField
9. AK-47
10. Molotov Coctail
11. Naram Bomb
12. Kuvalda Hammer
13. Balalayka
14. Dragunov Rifle
15. Matrosov

Zombies Ate My Motherland Walkthrough
A solid home defense game, even though there is almost no challenge imo. Why? Because you can earn the stars easily and within 7-10 runs, you should almost gotten all the upgrades already. Please note that all the third weapon aka grenades are capped to only hold 10 bombs. Let's say you have 8 left... When a box drops 3-in-a-one bomb, it does not pick it up. Instead, when you get lower than 8, it will then be picked up. To capitalize your star count, spend your grenades wisely then replenish.

Pro-tip: Spend all your grenades and collect the stars before entering the house, during the "THE HORDE IS COMING" phase. You should notice yourself able to slaughter zombies without any difficulty. Just be careful and not to overextend. Going back home alive will grant you another 25% stars! :)

Tuesday, December 24, 2013

The Everloom Walkthrough Guide

The Everloom
The Everloom Logo

Play Online: The Everloom
Developer: Lucas Paakh
Genre: Adventure

The Everloom Guide
Solution to The Everloom
1. String - The first thing you'll need is to find String. You can get it from Fatts McGruf located in the area left of the Weaver by the Sphinx.

2. Scythe - Next, get the scythe from Toadpad in the village area above the Weaver.

3. Tethers - Now you'll need to take a bit of a journey to get tethers from Draco. He is located at the airship area right of the Weaver where Izabel is and go all the way down. There's another exit to the left of the waterfall. That room will be a short little jaunt around and that'll take you into the airship area. You need to go all the way to the end of it to find Draco, who will tie your string into tethers.

4. Ballons - By now, you will have your strings tied into tethers. You can now harvest the little bobbing water cactus and tun them into ballons. You need 13 of them which you will give to Izabel. (If you already wiped out the water cactus population - don't worry, they spawn like rabbits.)

5. Izabel Hair - Izabel will drop a strand of hair and you bring that to Cadmus, who is in the area above the Weaver.

6. Confidence - Cadmus will give you confidence, which you can now use to get past the Sphinx.

7. Fire Gate Key - Search for the Bad Cultist above the sphinx hiding behind the trees who will give you a key to the fire gates down south of the Weaver.

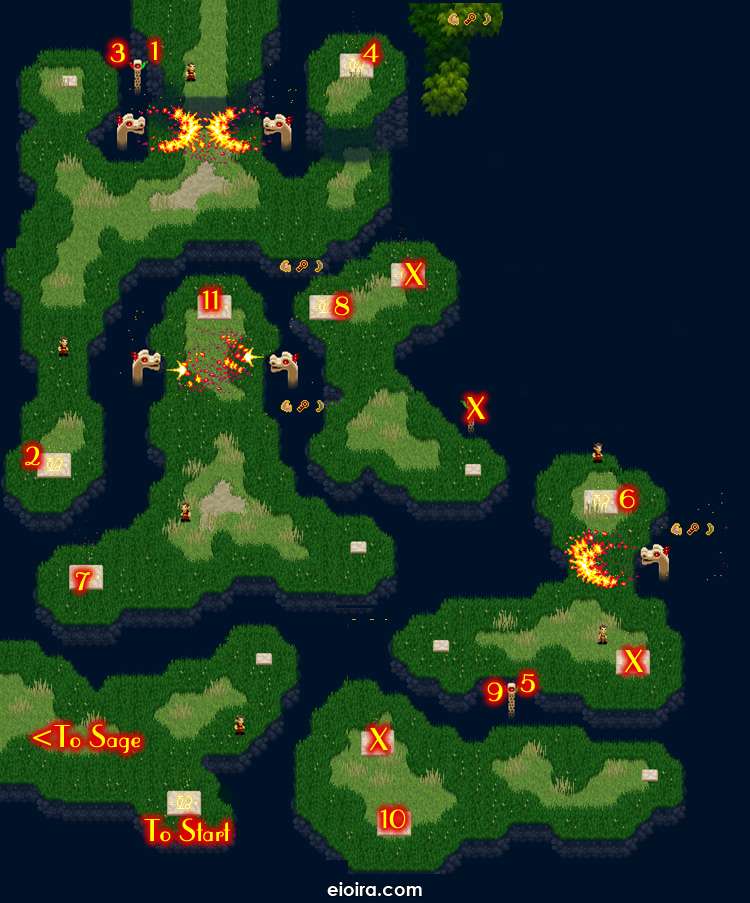
8. Solving Fire Gate Maze - Follow the numbers in the picture below and those marked with X must be avoided. Some things need to be done twice.

9. Egg - After completing the maze, proceed left and go to the very bottom until you find the meditating sage. The Sage will give you an Egg after getting all philosophical for a bit.

10. Revealing Eye - You want to go back to the area above the weaver. Go back to the fire gate maze and enter the last teleporter to be taken back to the beginning of the maze, from there just head up. Now go back to the area above the Weaver until you reach the tall building then go left and then up where the Cultist are doing the rituals. Talk to Lazarus and he'll take the egg and and in return he will let you use his Revealing Eye. To get to the eye, go to the right of the Weaver then go all the way down and to the left. It's standing on the cliff there.

11. Ring Hunt - Now you can use the eye to find the ring. It's in 4 pieces to make a complete set. The first fragment is just right below the revealing eye. The second is located in a puddle in the pathway to the airship area. The third is on the pathway below the cultists in the area above the Weaver. The fourth and final fragment is on the scenic overlook above the Sphinx.

12. Cash - Upon getting the last fragment the ring will be restored. You can now give it to Rich Uptight von Wealthson located left of the Weaver. The guy right below the Sphynx. You will receive Cash from him.

13. Ice Cream - Buy ice cream from the ice cream truck parked on a cliff near the airship.

14. Stone - Bring the ice cream to Martha by Toadpad in the area above the Weaver. You will get a rock.

15. Switch - Head towards the Sphinx and find the switch. The switch to open the lighting barrier above the Sphinx and to the right.

16. Blue Fire Puzzle - Get past the lighting gate... After a few more cinematics, you'll have to solve a puzzle with blue fire. The easy way to solve it is to simply touch each rune once in a circle. If you've already triggered some, don't worry, just keep hitting them.

The Everloom Fire Gate Maze

Sunday, December 22, 2013

Upgradaroids Walkthrough Guide

Upgradaroids
Upgradaroids TripLogo

Play Online: Upgradaroids
Developer: CuriousGaming
Genre: Shooter, Upgrades

Upgradaroids Guide
List of Upgrades in Upgradaroids
Multishot
No. of Bullets: 1 / 2 / 3
Cost: $ 0 / 2000 / 4500

Extra Lives
No. of Lives: 2 / 3 / 4 / 5 / 6
Cost: $ 0 / 500 / 900 / 1500 / 2100

Rate of Fire
Rate: 150 / 180 / 200 / 220 / 250 / 275 / 300
Cost: $ 0 / 300 / 800 / 1600 / 2500 / 3500 / 5000

Coin Magnet Range
Range: 40 / 60 / 80 / 100 / 120 / 150
Cost: $ 0 / 200 / 500 / 1000 / 1400 / 1800

Shield Duration
Duration: 2.0 / 3.0 / 4.0 / 6.0 / 8.0 Secs
Cost: $ 0 / 250 / 600 / 1100 / 2000

Recommended Build for Upgradaroids
1. Rate of Fire
2. Coin Magnet Range
3. Rate of Fire
4. Coin Magnet Range
5. Multishot
6. Rate of Fire
7. Extra Lives
8. Extra Lives
9. Multishot
10. Coin Magnet Range
11. Rate of Fire
12. Coin Magnet Range
13. Rate of Fire
14. Coin Magnet Range
15. Shield Duration
16. Shield Duration
17. Shield Duration
18. Rate of Fire
19. Shield Duration
20. Extra Lives
21. Extra Lives

Upgradaroids Walkthrough
Upgradaroids is a good and a fun little flash game, however I find the control a little awkward. The best way to overcome the control is not to move around a lot. Generally I'll shoot at a direction and your bullets will clear a path for you, then move forward to gather all the coins. Don't worry if you fail to collect all the coins. The truth is coins don't disappear and you'll collect them automatically when the level ends. Basically, destroying as many asteroids and surviving the level is all you need to do. ^^

Take note of the red alien ship too. They love to come fires directly at you, so shoot them down quickly. They always drop a shield or rapid fire after being destroyed. Pick them up and use them wisely especially the shield! Pro-Tip: Use up your shield first before picking another shield, since it refreshes every time.

Thursday, December 19, 2013

Deadly Road Trip Walkthrough Guide

Deadly Road Trip
Deadly Road TripLogo

Play Online: Deadly Road Trip
Developer: NoNameLab
Genre: Shooter, Upgrades

Deadly Road Trip Guide
List of Upgrades in Deadly Road Trip
Armor - Increases players vehicle hit points.
Cost: 0 / 200 / 350 / 950 / 1500 / 2800
Hit Points: 47 / 60 / 80 / 96 / 108 / 116
+ 50% hit points to captured enemy transport

Weapons - Increases players weapons damage.
Cost: 0 / 200 / 350 / 900 / 1500 / 2800
Hit Points: 6 / 7 / 10 / 11 / 13 / 15
+ 100% damage to picked weapons

Hook - Increases chances to capture enemy's transport.
Cost: 0 / 200 / 400 / 950 / 1600 / 2900
Chance to capture Transport: 10 / 15 / 20 / 25 / 40 / 50

Luck - Increases chances to find bonuses and weapons.
Cost: 0 / 200 / 350 / 900 / 1400 / 2600
Bonus Drop Chance: 15 / 20 / 25 / 30 / 37 / 44

Expansion - Increases number of equipment slots.
Cost: 0 / 150 / 280 / 600 / 1100 / 1800
Expansion Slots: 0 / 1 / 2 / 3 / 4 / 5

Transport - Buy new vehicles.
Cost: 0 / 400 / 800 / 1400 / 2000 / 10000
Base Hit Points: 40 / 50 / 70 / 80 / 230 / 200
Speed: 8 / 9 / 10 / 11.5 / 15 / 16
Fuel Capacity: 30 / 40 / 60 / 65 / 80 / 80

List of Expansion Perks in Deadly Road Trip
+ 20% Main weapon damage. Cost: 1500
- 15% Fuel consumption. Cost: 1000
+ 15% Driving speed. Cost: 1000
+ 30% Nitro effect time. Cost: 1000
+ 10% Collected gold. Cost: 3000
- 20% Damage received from enemies. Cost: 2000
Nuetralizes land mines. Cost: 5000
+ 15% coins collecting radius. Cost: 1500
Allows to capture trucks. Cost: 7000

Recommended Build for Deadly Road Trip
Upgrades
1. Weapon
2. Transport
3. Armor
4. Luck
5. Hook
6. Expansion
7. Repeat!

Perks
1. - 20% Damage received from enemies.
2. + 20% Main weapon damage.
3. + 15% Driving speed.
4. Nuetralizes land mines.
5. Allows to capture trucks.

Deadly Road Trip Walkthrough
Deadly Road Trip is a fairly challenging flash game, but progressively gets easier as you upgrade your character. The number one rule is to dodge the land mines as much as possible. It normally comes in four or five and can deal quite a ton of damage to your vehicle. I suggest getting Neutralizes Land Mine expansion as soon as possible if it troubles you. Otherwise, the game is pretty straightforward; dodge bullets, pickup fuel & bonuses, and with a little perseverance you'll win the game! :D

Saturday, December 14, 2013

Flash Element TD Walkthrough Guide

Flash Element TD
Flash Element TD Logo

Play Online: Flash Element TD
Developer: David Scott
Genre: Defense

Flash Element TD Guide
List of Towers in Flash Element TD
Basic Towers
Arrow
Description: Low damage but very fast fire rate.
Type: Land + Air
Cost: 7 / 13 / 32 Gold
Dmg: 6 / 16 / 39
Range: 100 / 110 / 125
Rate: Very fast / Very fast / Very fast

Cannon
Description: Slow but with good damage and splash.
Type: Land only
Cost: 9 / 15 / 26 Gold
Dmg: 9 / 24 / 50
Range: 70 / 70 / 70
Rate: Very fast / Very fast / Very fast

Air
Description: Good damage and rate and range.
Type: Air only
Cost: 12 / 20 / 56 Gold
Dmg: 20 / 35 / 50
Range: 120 / 120 / 120
Rate: Very fast / Very fast / Very fast

Elemental Towers
Water
Description: Medium damage with high fire rate, slows, can be upgraded to splash.
Type: Land + Air
Cost: 50 / 25 / 25 / 25 Gold
Dmg: 25 / 30 / 35 / 40
Range: 75 / 75 / 75 / 75
Rate: Very fast/ Very fast / Very fast / Very fast

Earth
Description: Huge damage, slow fire rate.
Type: Land only
Cost: 50 / 75 / 100 / 150 Gold
Dmg: 144 / 288 / 576 / 1152
Range: 100 / 110 / 120 / 130
Rate: Very slow / Very slow / Very slow / Very slow

Fire
Description: Large damage, slow fire rate, splash.
Type: Land + Air
Cost: 50 / 75 / 100 / 150 Gold
Dmg: 75 / 175 / 300 / 400
Range: 100 / 100 / 100 / 100
Rate: Fast / Fast / Fast / Fast

Combo Towers
Rocket
Description: Fire + Earth + Water. Huge range and damage.
Type: Land + Air
Cost: 200 / 190 Gold
Dmg: 2000 / 2000
Range: 170 / 170
Rate: Slow / Fast

List of Research in Flash Element TD
Water Element
Description: Buy to build water towers.
Cost: 1 Wood

Earth Element
Description: Buy to build warth towers.
Cost: 1 Wood

Fire Element
Description: Buy to build fire towers.
Cost: 1 Wood

+5% Interest rate
Description: Buy to increase your interest rate to 15%.
Cost: 1 Wood

PANIC! Buy 1 extra life
Description: Buy to increase your lives by 1
Cost: 40 Gold

List of Levels in Flash Element TD
Level 1 Sheep - 10 HP, worth 1g each.
Level 2 Rabid Dogs - 42 HP, worth 1g each.
Level 3 Small Boys - 65 HP, worth 1g each.
Level 4 Peasants - 75 HP, worth 1g each.
Level 5 Firework Throwers - 101 HP, worth 1g each.
Level 6 Drug Runners [Fast] - 87 HP, worth 1g each.
Level 7 Greedy Pigs - 136 HP, worth 2g each.
Level 8 Flying Machines [Air] - 158 HP, worth 1g each.
Level 9 Stags - 189 HP, worth 1g each.
Level 10 Trolls [Immune] - 212 HP, worth 2g each.
Level 11 Angry Critters [Boss] - 2000 HP, worth 45g each.
Level 12 Water Elementals - 246 HP, worth 2g each.
Level 13 Drug Runners [Fast] - 212 HP, worth 2g each.
Level 14 Lizards - 331 HP, worth 2g each.
Level 15 Battle Goldems - 284 HP, worth 2g each.
Level 16 Harpy Rogue - 445 HP, worth 2g each.
Level 17 Albatross [Air] - 580 HP, worth 2g each.
Level 18 Fat Pigs - 695 HP, worth 2g each.
Level 19 Drug Runners [Fast] - 599 HP, worth 2g each.
Level 20 Goblins again - 806 HP, worth 3g each.
Level 21 Trolls [Immune] - 1125 HP, worth 2g each.
Level 22 Angry Critters [Boss] - 14000 HP, worth 55g each.
Level 23 Goblins Again?! - 1075 HP, worth 3g each.
Level 24 Dark Minions - 1265 HP, worth 4g each.
Level 25 Cannons - 1468 HP, worth 4g each.
Level 26 Drug Runners [Fast] - 1265 HP, worth 4g each.
Level 27 Albatross [Air] - 1615 HP, worth 4g each.
Level 28 Cryptic Fiends - 1935 HP, worth 4g each.
Level 29 Sludge Monstrosity - 2165 HP, worth 5g each.
Level 30 Ghouls - 2405 HP, worth 5g each.
Level 31 Goblins - 2655 HP, worth 5g each.
Level 32 Trolls [Immune] riding Drug Runners [Fast] - 2500 HP, worth 2g each.
Level 33 Angry Critters [Boss] - 35000 HP, worth 100g each.
Level 34 Damn hard - 5000 HP, worth 5g each.
Level 35 OMG, so hard! - 7000 HP, worth 10g each.
Level 36 gg - 10000 HP, worth 15g each.
Level 37 HOW ARE YOU STILL ALIVE?! - 15000 HP, worth 20g each.
Level 38 THE LAST LEVEL - 20000 HP, worth 25g each.
Level 39 U B PRO - 250001 HP, worth 30g each.

Flash Element TD Walkthrough
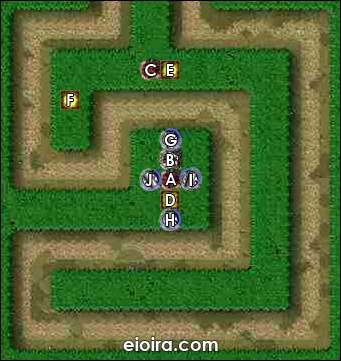
Note: Every tower is given a alphabet within the square brackets. Please refer to the picture below for tower placement.
Level 1 - Build 1 Arrow Tower[A] and Cannon Tower[B]. Upgrade Cannon Tower[B] to Lv 2.
Level 2 - Upgrade Arrow Tower[A] to Lv 2.
Level 3 - Upgrade Canon Tower[B] to Lv 3.
Level 4 - Build 1 Arrow Tower[C] and upgrade to Lv 2.
Level 5 - Sit back and start level.
Level 6 - Upgrade Arrow Tower[C] to Lv 3
Level 7 - Sit back and start level.
Level 8 - Research on Fire Element. Build 1 Fire Tower [D].
Level 9 - Sit back and start level.
Level 10 - Sit back and start level.
Level 11 - Build 1 Fire Tower[E].
Level 12 - Sit back and start level.
Level 13 - Build 1 Fire Tower[F].
Level 14 - Sit back and start level.
Level 15 - Research on Water Element. Upgrade 1 Fire Tower[E] to Lv 2.
Level 16 - Sit back and start level.
Level 17 - Sit back and start level.
Level 18 - Upgrade 1 Fire Tower[D] to Lv 2.
Level 19 - Sit back and start level.
Level 20 - Upgrade 1 Fire Tower[F] to Lv 2.
Level 21 - Sit back and start level.
Level 22 - Research on Earth Element. Build 1 Combo Tower[G].
Level 23 - Sit back and start level.
Level 24 - Sit back and start level.
Level 25 - Sit back and start level.
Level 26 - Build 1 Combo Towers[H].
Level 27 - Sit back and start level.
Level 28 - Sit back and start level.
Level 29 - Research on +5% Interest Rate.
Level 30 - Sit back and start level.
Level 31 - Sit back and start level.
Level 32 - Build 2 Combo Towers[I,J].
Level 33 - Sit back and start level.
Level 34 - Upgrade all Combo Towers[G,H,I,J] to Lv 2.
Level 35 - Build as many Combo Towers as you like! :D
Level 36 - Research on +5% Interest Rate. Build as many Combo Towers as you like! :D
Level 37 - Build as many Combo Towers as you like! :D
Level 38 - Build as many Combo Towers as you like! :D
Level 39 - Build as many Combo Towers as you like! :D

Flash Element TD Recommended Placement
Flash Element TD Map Build

Tuesday, December 10, 2013

Battalion Commander 2 Walkthrough Guide

Battalion Commander
Battalion Commander 2 Logo

Play Online: Battalion Commander 2
Developer: Iriysoft
Genre: Upgrades, Action

Battalion Commander 2 Guide
List of Upgrades in Battalion Commander 2
Private
Weapon: Double Pistols - The leader wields two pistols.
Ally: Rifleman - Unlocks allied Rifleman. Riflemen shoot bullets straight forward.
Skill: Adrenaline Injection - Makes enemies and enemy bullets move slower.

Corporal
Weapon: Double SMGs - The leader wields two sub machine guns.
Ally: Grenadier - Unlocks allied Grenadier. Grenadiers throw grenades which explode either when hitting the enemy or after the timeout.
Logistics - + 100% to the money and XP magnet radius.

Sergeant
Skill: Napalm Wave - Every ally launches a burst of fire straight forward.
Ally Upgrade: Automatic Rifleman - Equops Riflemen with Automatic Rifles. Automatic Rifle shoots burst fire.
Fireteam: Rifleman - The game starts with one Rifleman in the squad.

Master Sergeant
Weapon: Shotgun - The leader shots 7 bullets.
Ally: Marksman - Unlocks allied Marksman. Marksmen shoot right in the target.
Fireteam: Grenadier - The game starts with one Grenadier in the squad.

2nd Lieutenant
Weapon: Jackhammer - The leader shots bursts of bullets.
Ally Upgrade: Flamethrower - Equips Grenadiers with Flamethrowers. Flamethrowers spray out burning fuel.
Battle Experience - Enemies drop 20% more money and XP.

1st Lieutenant
Weapon: Minigun - The leader fires 6-bullets bursts.
Ally: Rocketeer - Unlocks allied Rocketeer. Rocketeers launch rockets straight forward.
Fireteam: Marksman - The game starts with one Marksman in the squad.

Captain
Skill: Airstrike - Launches deadly air strike which hits every enemy on the screen.
Ally Upgrade: Advanced Sniper Rifle - Marksmen shoot two bullets.
Inspiration - Skills reload 30% faster.

Major
Weapon: Heavy Minigun - The leader fires 6-bullets bursts and throws grenades.
Weapon Training - All weapons reload 30% faster.
Fireteam: Rocketeer - The game starts with one Rocketeer in the squad

Lieutenant Colonel
Weapon: Rocket Launcher - The leader launches 3 rockets.
Ally Upgrade: Homing Missiles - Rocketeers launch homing missiles.
War Supplies - + 30% to bonuses drop rate.

Colonel
Weapon: Missile Launcher - The leader launches 1 rocket and 2 homing missiles.
Skill: AirSupport: Allied battle helicopter comes to support your squad.
Drilling - All the allies get 50% fire rate boost.

List of Perks in Battalion Commander 2
Complete those brown current missions to unlock perks.
Splinter Shells - Explosives produce Splinters.
APC Vehicle - The squad starts the game in the car.
Uranium Core Bullets - Bullets cause more damage.
Fire Bullets - Bullets set fire to target.
Napalm Core - Explosives are loaded with napalm.
Medi Kit - Leader can heal allies.
Fireproof Spray - Squad members do not burn.
Armor - Reduces damage.
U.A.V - UAVs will support the team.
Military Boots - + 20% squad movement speed.
Nano Bots - Leader regenerates.
Salvation - Restores 50% health when skill is activated.
M.R.E Pack - + 100% to all allies.
Grenades - Allies throw grenades.
Energy Shield - Grants temporary shield when skill is activated.
X-Ray Glasses - Unveils hidden enemies.

Recommended Build for Battalion Commander 2
Upgrades
1. Weapon: Double SMGs
2. Logistics
3. Ally: Grenadier
4. Ally Upgrade: Automatic Rifleman
5. Skill: Napalm Wave
6. Weapon: Shotgun
7. Ally: Marksman
8. Battle Experience
9. Weapon: Jackhammer
10. Ally Upgrade: Flamethrower
11. Ally: Rocketeer
12. Inspiration
13. Ally Upgrade: Advance Sniper Rifle
14. Weapon Training
15. War Supplies
16. Ally Upgrade: Homing Missiles
17. Drilling
18. Weapon: Missile Launcher
19. Fireteam: Rifleman
20. Fireteam: Grenadier
21. Fireteam: Marksman
22. Fireteam: Rocketeer
23. Skill: AirStrike
24. Weapon: Rocket Launcher
25. Weapon: Heavy Minigun
26. Skill: AirSupport
27. Weapon: Minigun

Perks
1. Military Boots
2. Armor
3. Uranium Core Bullets
4. Energy Shield or Fireproof Spray

Battalion Commander 2 Walkthrough
Battalion Commander 2 is pretty much similar if compared to the very first game, Battalion Commander. My strategy and guide are almost the same except there are slight changes. This time round, I will equip myself with Jackhammer and Napalm Wave for the most part. Jackhammer is an upgraded version of a shotgun that shoots 3 bursts of bullets in a spread effect. Super effective in killing when the map is wide and do tons of damage! Napalm Wave destroys anything in a straight path which is good at clearing clustering and perfect for its fairly short cooldown time.

The recommended build worked well for me, I completed the game after upgrading War Supplies. I'd only unlock those upgrades, I feel is necessary... Like Jackhammer, Advance Sniper Rifle and Weapon Training. These are very overpowered upgrades; Definitely must get as soon as you can! While Minigun, AirSupport and Rocket Launcher are kinda useless imho. They don't feel right for me.

For the final boss, it can be divided into three parts/stage. The first stage should be easy, basically activate napalm and start running around with a full squad. Second stage is the flamethrower and missiles part. The simplest way to counter is to pick fireproof spray perk. Just laugh when it dealt no damage to you and your squad. >:D In the third stage, since the bullets are in a patter just dodging them by moving back and forth. Your allies will most likely die but don't stop here! Keep dodging and launch napalm whenever possible. Tada, you win!

Sunday, December 8, 2013

Idle Mine Walkthrough Guide

Idle Mine
Idle Mine Flash Game Logo

Play Online: Idle Mine
Developer: Crovie
Genre: Simulation, Upgrades

Idle Mine Guide
List of Mines in Idle Mine
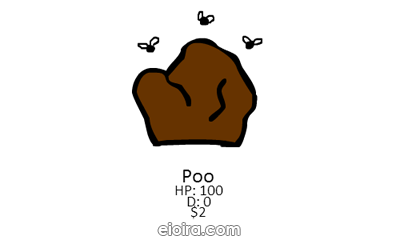
Poo - HP: 100 | D: 0 | $2
Paper - HP: 400 | D:2 | $10
Salt - HP:700 | D:15 | $22
Clay - HP:1400 | D:35 | $50
Rock - HP:2200 | D:90 | $120
Coal - HP:4000 | D:200 | $275
Bone - HP:7000 | D:380 | $580
Lead - HP:12,400 | D:700 | $1,100
Iron - HP:16,000 | D:1,140 | $1,850
Copper - HP:25,000 | D:1,600 | $3,200
Carbonite - HP:40,000 | D:2,500 | $5,200
Quartz - HP:64,000 | D:3,800 | $8,600
Spooky Bone - HP:92,000 | D:5,400 | $14,000
Silver - HP:128,000 | D:7,200 | $20,000
Crystal - HP:200,000 | D:9,999 | $42,000
Topaz - HP:500,000 | D:13,500 | $140,000
Amethyst - HP:1,400,000 | D:18,000 | $480,000
Aquamarine - HP:4,800,000 | D:24,500 | $2,200,000
Emerald - HP:13,000,000 | D:34,000 | $7,200,000
Ruby - HP:42,000,000 | D:50,000 | $25,500,000
Sapphire - HP:120,000,000 | D:80,000 | $85,000,000
Haunted Bone - HP:200,000,000 | D:130,000 | $190,000,000
Gold - HP:360,000,000 | D:200,000 | $400,000,000
Platinum - HP:500,000,000 | D:295,000 | $760,000,000
Diamond - HP:700,000,000 | D:440,000 | $1,600,000,000
Mithril - HP:1,000,000,000 | D:680,000 | $2,800,000,000
Obsidian - HP:1,400,000,000 | D:1,050,000 | $4,800,000,000
Earth Essence - HP:2,000,000,000 | D:1,400,000 | $8,200,000,000
Orbium - HP:2,600,000,000 | D:2,000,000 | $13.50b
Novalite - HP:3,500,000,000 | D:2,800,000 | $24.50b
Magic Crystal - HP:4,900,000,000 | D:4,000,000 | $42.00b
Darkstone - HP:7,200,000,000 | D:5,800,000 | $70.00b
Adamantium - HP:10.00b | D:8,500,000 | $125.00b
Fire Essence - HP:14.00b | D:12,000,000 | $200.00b
Lunalite - HP:20.00b | D:17,000,000 | $340.00b
Mysterium - HP:30.00b | D:24,000,000 | $580.00b
Cursed Bone - HP:45.00b | D:33,500,000 | $1,050.00b
Wind Essence - HP:68.00b | D:48,000,000 | $1,700.00b
Unobtanium - HP:100.00b | D:69,000,000 | $3,000.00b
Sollite - HP:130.00b | D:95,000,000 | $4,800.00b
Water Essence - HP:175.00b | D:138,000,000 | $7,200.00b
Absurdium - HP:240.00b | D:205,000,000 | $12,000.00b
Cosmolite - HP:320.00b | D:300,000,000 | $20,000,00b
Shadow Essence - HP:435.00b | D:440,000,000 | $30,000.00b
Demonite - HP:590.00b | D:640,000,000 | $48,000.00b
Eternium - HP:780.00b | D:95,000,000 | $72,000.00b
Mysticite - HP:1,050.00b | D:1,400,000,000 | $110,000.00b
Light Essence - HP:1,350,00b | D:2,000,000,000 | $170,000.00b
Soulstone - HP:1,800.00b | D:3,100,000,000 | $270,000.00b
Arcanium - HP:2,400.00b | D:4,800,000,000 | $420,000.00b
Hellstone Lv. 1 - HP:3,200.00b | D:7,000,000,000 | $680,000.00b
Hellstone Lv. 2 - HP:3,840.00b | D:10.50b | $1,020,000.00b
Hellstone Lv. 3 - HP:4.608.00b | D:15.75b | $1,530,000.00b
Hellstone Lv. 4 - HP:5,529.60b | D:23.62b | $2,295,000.00b
Hellstone Lv. 5 - HP:6,635.52b | D:35.43b | $3,442,500.00b
Hellstone Lv. 6 - HP:7,962.62b | D:53.15b | $5,163,750.00b
Hellstone Lv. 7 - HP:9,555.14b | D:79.73b | $7,745,625.00b
Hellstone Lv. 8 - HP:11,466.17b | D:119.60b | $11,618,437.50b
Hellstone Lv. 9 - HP:13,759,41b | D:179.40b | $17,427,656.25b
Hellstone Lv. 10 - HP:16,511.29b | D:269.10b | $26,141,484.37b
Hellstone Lv. 11 - HP:19,813.55b | D:403.65b | $39,212,226.56b
Hellstone Lv. 12 - HP:23,776.26b | D:605.48b | $59,818,339.84b
Hellstone Lv. 13 - HP:28,531.52b | D:908.22b | $88,227,509.76b
Hellstone Lv. 14 - HP:34,237.82b | D:1,362.33b | $132,341,264.64b
Hellstone Lv. 15 - HP:41,085.39b | D:2,043.50b | $198,511,896.97b
Hellstone Lv. 16 - HP:49,301.46b | D:2,452.20b | $267,991,060.91b
Hellstone Lv. 17 - HP:59,162.96b | D:2,942.64b | $361,787,932.23b
Hellstone Lv. 18 - HP:70,995.55b | D:3,531.17b | $488,413,708.51b
Hellstone Lv. 19 - HP:85,194.66b | D:4,237.41b | $659,358,506.49b
Hellstone Lv. 20 - HP:102,233.59b | D:5,084.89b | $890,133,983.76b
Hellstone Lv. 21 - HP:122,680.31b | D:6,101.87b | $1,201,680,878.08b
Hellstone Lv. 22 - HP:147,216.38b | D:7,322.24b | $1,622,269,185.41b
Hellstone Lv. 23 - HP:176,659.66b | D:8,786.69b | $2,190,063,400.31b
Hellstone Lv. 24 - HP:211,991.59b | D:10,522.03b | $2,956,585,590.41b
Hellstone Lv. 25 - HP:254,389.91b | D:12,652.84b | $3,991,390,547.06b

Calculation for Hellstone
Here the calculations:
Multiple 1.2 to the HP of the previous, 1.2 to the previous defense and 1.35 to the previous money.

Example
1. To calculate Hellstone Lv.26, take the values from previous level.
Hellstone Lv. 25 - HP:254,389.91b | D:12,652.84b | $3,991,390,547.06b

2. Multiply Accordingly
Hellstone Lv. 26 - HP:254,389.91b * 1.2 | D:12,652.84b * 1.2 | $3,991,390,547.06b * 1.35

3. Tada!
Hellstone Lv. 26 - HP:305,267.89b | D:15,183.41b | $5,388,377,238.53b

List of Upgrades in Idle Mine
Upgrade Blacksmith - Makes the blacksmith sightly better, increasing the base power of the pickaxes he produces.
Blacksmith Skill - Increases the general quality of crafted gear.
Blacksmith Expertise - Increases the likelihood of crafting with + bonuses.
Blacksmith Efficiency - Small chance the Blacksmith will not use a gem while crafting.
Gem Waster - Allows you to use several gems at once to ensure crafting a higher tier of pic. But it's not really worth it.
Manual Click Power - Increases the power of manual clicking.
Auto-Click Power - Increases the power of automatic clicks.
Auto-Click Faster - Increases the frequency of automatic clicks.
Idle Power - Can earn gold even when the game is closed.
Gem Finder - Increases odds of finding a gem.

Recommended Build for Idle Mine
1. Upgrade Blacksmith
2. Manual Click Power
3. Repeat 1 & 2 ten times
4. Craft New Pickaxe
5. Gem Waster
6. Blacksmith Skill
7. Blacksmith Expertise
8. Gem Finder
9. Blacksmith Efficiency
10. Auto-Click Faster
11. Auto-Click Power
12. Idle Power
13. Repeat from 1

Idle Mine Walkthrough
There is no wrong/right way to upgrade in Idle Mine. In my opinion, I would prefer to craft a stronger pickaxe, therefore Upgrade Blacksmith than to slowly stack the Manual Click Power. Mainly because the power from the pickaxe is a leading factor for your overall damage output, while Manual Click Power is a percentage multiplied onto the power. The best way for me is to level up Upgrade Blacksmith first, until you are almost in the same price range as Manual Click Power. Then upgrade both Manual Click Power and Upgrade Blacksmith 7-10 times each. Here's the moment of truth... Try your luck by crafting a new pickaxe! Most of the time you will success with your first try however, craft several times to get the highest quality ones. Continue follow the recommended build above and unlock those upgrades you can afford. Finally, repeat the entire process again!

Gem waster is an extremely useful upgrade later on when you're mining high level hellstone, at least in my experience. Don't worry about wasting gems... The simple way to farm for a decent amount is by attacking the strongest mine that you can one hit auto with, and still earn a fair amount of money. Poo is just the first one you can do this at and not the best. A good way to figure out the most efficient ore to manually click is to find the one with the highest auto g/s. The g/s is more of a representation of earnings than an actual cash producer. It just calculates how long it takes to fully mine an ore, and divides the reward by the amount of seconds it take to mine that ore by idling alone. That's how it comes to that value. This should output a highest average amount of damage and earn you the most amount of gold in any second.

Pro-Tip: Hit alt-shift-num lock and activate the ease keys. Then press and hold '5' & '+' on the num pad. Every time you hit '5' it counts as one click, every time you hit the '+' it counts as two clicks... You'll save yourself from carpal tunnel syndrome and your mouse won't go bad. :D

Monday, November 18, 2013

Madville Walkthrough Guide

Madville
Madville Flash Game Logo

Play Online: Madville
Developer: Umat Dervis
Genre: Shooter, Upgrades

Madville Guide
List of Upgrades in Madville
Close-Range
Tazor - Cost: 1 point.
Saw - Cost: 1 point, Requirement: Spend 2 points on close-range to unlock.
Flame Thrower - Cost: 1 point, Requirement: Spend 8 points on close-range to unlock.
Plasma Sphere - Cost: 1 point, Requirement: Spend 8 points on close-range to unlock.

Mid-Range
Nail Gun - Cost: 3 points.
Shotgun - Cost: 3 points, Requirement: Spend 5 points on mid-range to unlock.
Grenade Launcher - Cost: 3 points, Requirement: Spend 14 points on mid-range to unlock.
Auto Shotgun - Cost: 3 points, Requirement: Spend 14 points on mid-range to unlock.

Long-Range
Pistol - Cost: 5 points.
Automatic Rifle - Cost: 5 points, Requirement: Spend 8 points on long-range to unlock.
Minigun - Cost: 5 points, Requirement: Spend 20 points on long-range to unlock.
Blade Thrower - Cost: 5 points, Requirement: Spend 20 points on long-range to unlock.

Armor Upgrade
Armor Level 1 - Cost: 2 points.
Armor Level 2 - Cost: 2 points, Requirement: Unlock Armor Level 1 first.
Armor Level 3 - Cost: 2 points, Requirement: Unlock Armor Level 2 first.
Armor Level 4 - Cost: 2 points, Requirement: Unlock Armor Level 3 first.

Other Upgrades
Collect Money with Magnet - Cost: 3 points, Requirement: Reach level 3 to unlock.
Increase Amount of Supply Drops - Cost: 3 points, Requirement: Reach level 3 to unlock.
Increase your Default Weapon's Fire Rate - Cost: 3 points, Requirement: Reach level 3 to unlock.
Increase your Default Weapon's Damage - Cost: 3 points, Requirement: Reach level 3 to unlock.

Recommended Build for Madville
1. Unlock Tazor
2. Spend a point on Tazor's Ammo
3. Unlock Saw
4. Spend 3 points on Saw's Ammo
5. Spend 2 Points on Tazor's Ammo
6. Unlock Flame Thrower
7. Unlock Plasma Sphere
8. Unlock Collect Money with Magnet
9. Increase your Default Weapon's Fire Rate
10. Increase your Default Weapon's Damage
11. Armor Level 1
12. Nail Gun
13. Spend 2 Points on Nail Gun's Ammo
14. Unlock Shotgun
15. Spend 3 points on Shotgun's Ammno and another 3 points on Damage
16. Unlock Auto ShotGun
17. Unlock Grenade Launcher
18. Armor Level 2
19. Increase Amount of Supply Drops
20. Armor Level 3
21. Armor Level 4
22. Unlock Pistol
23. Spend 3 points on Pistol's Ammno and another 1 points on Damage
24. Unlock Automatic Rifle
25. Spend 3 points on Automatic Rifle's Ammno and another 3 points on Damage
26. Unlock Minigun
27. Unlock Blade Thrower
28. Upgrade the remaining Ammo and Damage in any order.

Madville Walkthrough
You start off every stage with this default boxing weapon... Punch punch punch! It's weak and useless. Bear with it until a generous alien starts dropping weapons. Pick it up and you should not have any problem clearing the stage anymore because weapon drops are so abundant. Basically, just learn to move and dodge projectiles, also avoid alien clustering; it can deal quite a ton of damage and get you killed quickly. You still gain research points after being killed nonetheless, so don't give up. Remember to spend those points wisely or follow my build above... Pro-Tip: Because enemies only drop the guns you've bought, you can choose not to buy some bad guns. Some bad picks are grenade launcher and blade thrower, In my opinion. You can still choose to buy and test them out! :)

Next, always pick 2x damage whenever possible and don't aim to pick up the random buff/effect, unless you don't have anything besides close range weapons. The random effect may sometimes put you at a disadvantage, like the ones where you drop land mines, or grabbing aliens then throw into the drill pit... What can I say? Hehes, good luck!

Saturday, November 16, 2013

Pocket Ninja Walkthrough Guide

Pocket Ninja
Pocket Ninja Flash Game Logo

Play Online: Pocket Ninja
Developer: Meetreen Games
Genre: Strategy, Upgrades

Pocket Ninja Guide
List of Characters in Pocket Ninja
Ninja - Melee unit.
Archer - Ranged unit, require 2 ninjas to form.
Caster - Ranged unit, require 3 ninjas to form.
Warrior - Melee unit, require 4 ninjas to form.
Mage - Ranged unit, require 5 ninjas to form.
Axeman - Melee unit, require 6 ninjas to form.
Alchemist - Ranged unit, require 7 ninjas to form.

List of Upgrades in Pocket Ninja
Passive Skills
Ninja - Increases chance of critical attack. Price: 200
Archer - Increases attack speed. Price: 300
Caster - Increases splash damage. Price: 400
Warrior - Increases chance of stunning enemy. Price: 500
Mage - Increases chance of explosion. Price: 600
Axeman - Decreases health and attack speed boost. Price: 700
Alchemist - Raises defeated enemy as a zombie. Price: 800

Characteristics
Attack - Increases attack skills for all teammates. Price: 120 / 260 / 400 / 540 / 680 / 820 / 960 / 1100 / 1240 / 1380
Defense - Increases defense skills for all teammates. Price: 100 / 220 / 340 / 460 / 580 / 700 / 820 / 940 / 1060 / 1180

Active Skills
Freeze - Reduces cool-down and increases duration. Price: 150 / 150 / 150 / 150 / 150
Explosion - Reduces cool-down and increases attack. Price: 250 / 250 / 250 / 250 / 250
Health - Reduces cool-down and increases health. Price: 300 / 300 / 300 / 300/ 300
Speedup - Reduces cool-down and increases duration. Price: 150 / 150 / 150 / 150 / 150

Recommended Build for Pocket Ninja
1. Upgrade Ninja
2. Upgrade Archer
3. Upgrade Caster
4. Upgrade Warrior
5. Upgrade Axeman
6. Max Attack
7. Max Defense
8. Max Speedup
9. Max Freeze
10. Repeat step 6 to 9.
11. Upgrade the remaining at any order. ^^

Pocket Ninja Walkthrough
In this Pocket Ninja, there are a lot of ways and combinations to beat the game. Generally, I will use freeze and explosion to do as much AOE damage as I possibly could. Immediately use the speedup skill to clear the small enemies quickly. Then heal any injured ninjas after receiving a decent amount of damage. Speed makes a horde of small ninjas brutal... Watch the Boss's health point fly! Pewpew~

Stage 1: 3 Ninjas
Stage 2: 1 Ninja, 1 Archer
Stage 3: 1 Ninja, 1 Archer
Stage 4: 2 Archers
Stage 5: 2 Archers
Stage 6: 1 Caster, 1 Archer
Stage 7: 1 Caster, 1 Archer
Stage 8: 1 Warrior, 1 Archer
Stage 9: 1 Caster, 2 Archers
Stage 10: 2 Warriors
Stage 11: 2 Warriors
Stage 12: 2 Warriors
Stage 13: 2 Warriors, 1 Ninja
Stage 14: 2 Warriors, 1 Archer
Stage 15: 2 Warriors, 1 Caster
Stage 16: 3 Warriors
Stage 17: 3 Warriors, 1 Ninja
Stage 18: 1 Axeman, 2 Warriors
Stage 19: 3 Warriors, 1 Caster
Stage 20: 15 Ninjas
Stage 21: 8 Archers
Stage 22: 8 Archers
Stage 23: 8 Archers
Stage 24: 2 Axemen, 1 Warrior
Stage 25: 2 Axemen, 1 Warrior
Stage 26: 2 Axemen, 1 Warrior
Stage 27: 2 Axemen, 1 Warrior
Stage 28: 2 Axemen, 1 Warrior
Stage 29: 2 Axemen, 1 Warrior
Stage 30: 16 Ninjas

Sunday, November 10, 2013

Bloxorz Walkthrough Guide

Bloxorz
Bloxorz Flash Game Logo

Play Online: Bloxorz
Developer: DX Interactive
Genre: Puzzle

Bloxorz Guide
Solutions to Bloxorz
Stage 1
Right2, Down, Right3, Down

Stage 2
Up, Right, Down, Right3, Up3, Right, Down2, Right4, Up, Left, Up

Stage 3
Right, Up, Right3, Up, Left, Down, Right, Up2, Right3, Down3, Right, Up

Stage 4
Up, Left, Up, Right2, Up, Right6, Down, Right, Down5, Right, Up, Left6, Down

Stage 5
Left3, Right, Left5, Down, Right, Down2, Right4, Down, Right4, Left4, Down, Left6

Stage 6
Right3, Down2, Right, Down2, Right, Down, Right, Up, Left3, Up2, Left, Up3, Right3, Down2, Right, Down, Right, Down, Right, Up2, Left, Down, Right, Up, Left, Down, Right

Stage 7
Down, Left, Up, Right5, Down, Right, Left, Up, Left5, Down, Right, Down, Right, Down, Right3, Up2, Right, Down, Left, Up, Right, Up2, Right 3, Down, Right, Down, Right, Down, Left, Up

Stage 8
Right2, Down3, Right2, Spacebar, Up3, Right2

Stage 9
Right, Down, Right6, Up, Right, Down, Left5, Up, Spacebar, Down, Right5, Down

Stage 10
Right2, Left, Down3, Right, Down5, Left4, Up, Left3, Down, Up, Right3, Down, Right3, Up, Spacebar, Right2, Down3, Right, Down3, Left, Down, Up, Right, Up3, Left, Up2, Right, Spacebar, Right2, Left7

Stage 11
Right4, Up, Left, Down3, Right4, Up2, Left, Up2, Left3, Down, Right, Up, Right2, Down, Right, Up, Left3, Down2, Left3, Up2 , Right, Up2, Left, Down, Right, Up, Right, Down, Left

Stage 12
Left, Down, Right, Up, Right, Up, Right, Up, Right, Up, Left, Down, Right, Up, Right3, Down2, Left, Down, Right, Up, Left, Down, Right, Up, Left, Down, Left, Up, Right, Up3, Left3, Right3, Down3, Left, Down, Right, Up2, Right, Down, Left, Down, Right, Up3, Right, Up, Down, Left, Down3, Left, Up, Right, Up2, Left3, Up, Left, Down, Right2, Up, Left, Down3, Left

Stage 13
Up, Left, Down, Right, Down, Left, Up, Right2, Down, Left, Up4, Left7, Down3, Right, Up, Left, Down, Right, Down2, Right, Down2, Right, Up, Left2, Down, Right, Up2, Left, Down, Right, Up, Right2, Up2

Stage 14
Right3, Up2, Right, Down, Left2, Up, Right, Down2, Right2, Down4, Left3, Down, Right, Up, Right2, Up2, Down2, Left2, Down, Right, Down, Right2, Left2, Up, Left2, Up, Right3, Up4, Left6, Up, Right, Down, Left5, Down3, Right, Down, Right

Stage 15
Right4, Up2, Spacebar, Up5, Right3, Up2, Right4, Down2, Up2, Right2, Spacebar, Left2, Right, Left3, Up, Right, Down, Left2, Up, Right, Down, Left3, Down, Left3, Down4, Left, Up, Right, Down, Right7

Stage 16
Right4, Spacebar, Right, Down, Spacebar, Right, Up, Spacebar, Right, Left3, Spacebar, Right3, Spacebar, Right5, Left4, Right8, Spacebar, Down, Right9

Stage 17
Down5, Left, Up, Right5, Up, Right3, Left3, Down, Left4, Up6, Right4, Down, Right4, Up, Left, Down, Right2, Up, Left, Down2, Right, Up, Left, Down, Up, Right, Down, Left, Up2, Right, Down, Left2, Up, Right, Down, Left4, Up, Left4, Down6, Right4, Up, Right3 , Down2, Up, Left, Up, Left3, Down, Left3, Up, Left, Up3, Right5, Down, Right3

Stage 18
Right, Down, Left, Up, Right2, Down, Left, Up, Right3, Up2, Down2, Left3, Down, Right, Up, Left2, Down, Right, Up, Right3, Down2, Up2, Left3, Down, Left, Up, Right2, Down, Left, Up2, Right, Down, Left, Up, Left2, Down4, Right2, Left2, Up4, Right2, Down, Right, Up, Left, Down2, Right, Up, Left, Down, Right, Up, Right5, Down3, Right, Up, Left, Down2, Right, Up, Left, Down, Left, Up, Right

Stage 19
Right8, Down, Right, Up, Left6, Down, Right, Up, Right5, Down5, Left5, Down, Left, Up, Right6, Up, Left, Down, Left5, Down4, Right3 , Left6, Up2

Stage 20
Down, Left, Down, Right, Down, Left, Up2, Right, Up2, Left4, Down2, Right, Up, Left2, Down3, Left, Down, Up, Right, Up2, Right, Up 2, Right3, Down3, Left, Up, Spacebar, Left, Up, Down, Right, Spacebar, Left5, Down5, Right5, Down

Stage 21
Right, Down, Left, Up, Left, Down, Right, Up, Right2, Up, Right3, Up, Left, Down3, Up3, Right, Down, Left3, Down, Left2, Down, Left, Up, Right, Down, Right, Up, Left, Down, Right, Up, Left, Down, Right, Down2, Right, Down2, Right3, Up2, Down2, Left2, Up, Left, Down, Right3, Up4, Right3

Stage 22
Right, Up, Left, Down, Left, Up, Right3, Up, Right2, Down, Right, Down, Right2, Up, Left, Down, Left, Up, Left, Down, Right2, Down3, Left, Down, Up, Right, Up3, Left2, Up, Right, Down, Right, Down, Right, Up, Left3, Up, Left3, Down, Left, Down, Left2, Up, Right, Down2, Left, Up, Right2, Down, Left, Up2, Right, Down, Left, Up, Right, Down, Left, Down3, Right, Down, Up, Left, Up3, Right, Up, Left, Down, Left, Up, Right3, Up, Right2, Down, Right2, Down2, Left, Up, Right3, Up

Stage 23
Down, Left, Up, Right, Down2, Right, Up, Right6, Up, Left, Down, Right, Left3, Up5, Right4, Up, Down, Left6, Down4, Left7, Up3, Right2, Up, Down, Left, Up, Right, Down2, Right, Down3, Right8, Up, Left, Down, Right, Left4, Up3, Spacebar, Down, Right2, Down3, Right 4, Up2

Stage 24
Down2, Right2, Up2, Right, Up, Right4, Up, Right, Down, Left2, Up, Right, Down, Left, Right, Up, Left, Down, Left, Up, Right, Down, Left4, Down, Left3, Down, Left, Down, Right, Down, Left, Up2, Down2, Right, Up, Left, Up, Right, Up, Right3, Up, Right4, Up, Left, Down, Right, Up, Right, Down, Left6, Down, Right, Left, Up, Right6, Up, Left, Down, Left, Up, Right, Down, Right, Spacebar, Down, Spacebar, Right, Down, Left, Right, Up, Right3

Stage 25
Up, Right, Down, Left, Up, Right, Down, Left2, Up, Right4, Up2, Left2, Up, Right, Left, Down, Right2, Down2, Left4, Down, Right2, Up, Right3, Up2, Right3, Up, Left, Down, Right, Up2, Left, Down, Right, Up, Right, Down, Left

Stage 26
Up2, Left3, Down, Left3, Down, Right, Up, Right2, Up2, Right2, Down, Right2, Down, Right2, Up2, Left2, Up, Left6, Down, Left3, Down3, Spacebar, Up3, Left6, Down, Left3, Down3, Up2, Right, Up, Left, Down, Right, Up, Right2, Up2, Right2, Down, Right2, Down, Right2, Up2, Left2, Up, Left4, Down5, Right3, Spacebar, Up3, Left4, Down5, Right2, Left

Stage 27
Right5, Up, Left, Down, Right, Up, Right, Down, Left6, Up, Right, Down, Left2, Up, Right, Down, Right4, Up, Right4, Down3, Left, Down3, Left3, Down, Left, Up4, Right, Down, Left7, Up, Left, Down2, Right, Up, Left, Down, Right, Up, Left

Stage 28
Left, Down3, Right, Down, Left, Up, Right, Down2, Right2, Down2, Right3, Up3, Left, Up, Left, Up, Left, Up, Left, Down, Right2, Down, Right, Down, Right, Down, Right2, Down, Left, Down, Left2, Up3, Left, Up, Left, Up, Left2, Up, Left2, Down, Left, Up, Right3, Down, Right, Down, Right, Down, Right, Down, Right, Left4, Down3, Left5, Up2, Left3, Down, Spacebar, Left7, Up2, Left3, Up

Stage 29
Left, Down, Right, Up, Right2, Down, Left, Up, Right, Down2, Right2, Left2, Up2, Left, Down, Right, Up, Left, Down, Left, Up, Left, Up2, Left2, Right2, Down2, Right, Down, Right, Up, Right, Down, Left, Up, Right, Up2, Right2, Left2, Down6, Right2, Left2, Up4, Left, Down, Left, Up, Left, Down, Right, Up, Right5, Left5, Down, Right, Up, Left2, Down, Right, Up, Left5, Right5, Up, Left, Down, Left, Down3, Left3, Up, Right, Down, Left2, Up, Right, Down2, Left, Up, Right, Down, Right, Up, Left

Stage 30
Down, Right, Down2, Right2, Up, Right2, Down, Right4, Up, Down, Left4, Up, Left3, Down2, Left, Up, Right6, Up3, Right3, Up, Right, Down3, Left2, Down, Left, Down, Right, Up2, Right, Down, Left, Down, Left4, Up, Left2, Down, Left2, Up, Left, Down, Left, Up, Right, Up, Down, Left, Down, Right, Up, Right, Down, Right2, Up, Left, Down2, Left, Up, Right7, Up, Left, Up3, Right3, Up, Right, Up , Left5, Down, Left

Stage 31
Up, Left, Down, Left2, Up4, Down4, Right3, Up, Left, Down, Right, Up4, Right, Up, Left, Down2, Left6, Down, Left, Up, Right2, Down, Left, Up, Right4, Down3, Left, Down2, Up2, Right, Up3, Left4, Up, Right, Down, Left2, Up, Right, Down2, Left, Up, Right, Down4, Left, Down, Right, Up2, Left, Down, Right, Up, Left, Down, Right, Left, Down, Right, Up, Left, Down, Right, Up2, Left, Down, Left, Up, Right4, Up, Right2, Down, Right3, Up, Left, Down, Right, Up5, Right, Down, Left

Stage 32
Up2, Left, Down, Right, Up, Right, Up, Right, Down, Left, Right, Up, Left, Down, Left, Down, Left, Up, Right, Down, Left, Up, Right, Up, Right, Up, Right, Down, Left2, Down4, Left4, Up, Right, Down, Right3, Up5, Right, Up, Right2, Up, Down, Left2, Down, Left, Down5, Left4, Up, Right, Left, Down, Right4, Up5, Right, Up, Right2, Up, Down, Left2, Down, Left, Down5, Left3, Up, Left, Down, Right4, Up4, Right2, Up, Left, Down, Left, Down, Left, Down, Right, Up, Left2, Up, Left5, Down

Stage 33
Right4, Up, Left, Down3, Right2, Up, Left, Up, Left, Up2, Right2, Down, Right, Down, Right, Up, Left2, Up, Right, Down, Right, Down2, Right, Down, Left, Down2, Right2, Up, Down, Left2, Up4, Left, Up, Left, Down, Right, Down, Right, Up, Left, Up, Left3, Down3, Left , Down, Left2, Down, Left, Up

Passcode in Bloxorz
Stage 1 - Passcode: 780464
Stage 2 - Passcode: 290299
Stage 3 - Passcode: 918660
Stage 4 - Passcode: 520967
Stage 5 - Passcode: 028431
Stage 6 - Passcode: 524383
Stage 7 - Passcode: 189493
Stage 8 - Passcode: 499707
Stage 9 - Passcode: 074355
Stage 10 - Passcode: 300590
Stage 11 - Passcode: 291709
Stage 12 - Passcode: 958640
Stage 13 - Passcode: 448106
Stage 14 - Passcode: 210362
Stage 15 - Passcode: 098598
Stage 16 - Passcode: 000241
Stage 17 - Passcode: 683596
Stage 18 - Passcode: 284933
Stage 19 - Passcode: 119785
Stage 20 - Passcode: 543019
Stage 21 - Passcode: 728724
Stage 22 - Passcode: 987319
Stage 23 - Passcode: 293486
Stage 24 - Passcode: 088198
Stage 25 - Passcode: 250453
Stage 26 - Passcode: 426329
Stage 27 - Passcode: 660141
Stage 28 - Passcode: 769721
Stage 29 - Passcode: 691859
Stage 30 - Passcode: 280351
Stage 31 - Passcode: 138620
Stage 32 - Passcode: 879021
Stage 33 - Passcode: 614955


Saturday, November 9, 2013

Diggy Walkthrough Guide

Diggy
Diggy Flash Game Logo

Play Online: Diggy
Developer: Vogd & Assaulter
Genre: Adventure, Upgrades

Diggy Guide
List of Upgrades in Diggy
Driller
Drill Device - Just an ordinary drill device
Energy: 10 / 10 / 10 / 10 / 10, Efficiency: 50 / 52 / 55 / 58 / 60

Large Funnel - Creates more wide hole in the Earth
Energy: 10 / 10 / 10 / 10 / 10, Efficiency: 80 / 85 / 90 / 95 / 100

Additional Capacitor - One shot can make twice deeper tunnel, but it will use more energy.
Energy: 20 / 20 / 20 / 20 / 20, Efficiency: 120 / 125 / 130 / 135 / 140

Spectral Compensator - Now your device can drill all kind of ground with a same efficiency, but not the giant granite stones
Energy: 30 / 30 / 30 / 30 / 30, Efficiency: 200 / 210 / 220 / 235 / 250

Emitter of Neutrinos - Finally! The giant stones will no longer be a problem!
Energy: 30 / 30 / 30 / 30 / 30, Efficiency: 500 / 520 / 540 / 560 / 700

Battery
Ordinary Battery - Allows to make few shots from a drill device.
Energy: 100 / 105 / 110 / 115 / 120

Solar Battery - The solar battery is added you can recharge the whole battery on the surface but only once.
Energy: 150 / 155 / 160 / 165 / 170

Rechargable Battery - Every found item recharge 1 - 3 points of energy
Energy: 200 / 205 / 210 / 215 / 220

Seimic Upgrade - Dynamite explosion recharge 50 of your battery.
Energy: 250 / 255 / 260 / 265 / 270

Diggillium - Nuclear battery gives maximum energy, and warming your back
Energy: 300 / 305 / 310 / 315 / 320

Radar
Simple Radar - Shows the location of items underground
Energy Cost: 3 / 2 / 1 / 1 / 1, Radius 200 / 205 / 210 / 215 / 220

Lucky Radar - Detection radius increased
Energy Cost: 5 / 4 / 3 / 2 / 1, Radius 250 / 255 / 260 / 265 / 270

Navy Radar - Military technology, reveal more hidden objects
Energy Cost: 10 / 7 / 5 / 3 / 2, Radius 300 / 305 / 310 / 315 / 320

Price Radar - Option "Detection" of a price of an object is added.
Energy Cost: 15 / 12 / 8 / 5 / 3, Radius 400 / 405 / 410 / 415 / 420

Doppler Radar - Only this radar can detect the wandering truffle and slow it down
Energy Cost: 20 / 15 / 10 / 7 / 5, Radius 500 / 505 / 510 / 515 / 520

Minerals
Iron Ore - The cheapest and the most widely spread one
Depth: 30 - 1000, Sell Price: 5 / 7 / 10 / 15 / 25 / 50, Amount on Map: 40 / 45 / 47 / 49 / 52 / 55

Copper Ore - Copper ore uses for alloys, wires and processors
Depth: 1000 - 2000, Sell Price: 10 / 15 / 20 / 30 / 50 / 100, Amount on Map: 40 / 45 / 47 / 49 / 52 / 55

Bones - Bones of a strange creature, it's anatomy is not like yours
Depth: 200 - 3000, Sell Price: 30 / 40 / 60 / 100 / 160 / 250, Amount on Map: 40 / 45 / 47 / 49 / 52 / 55

Silver Ore - Silver has a good value, it uses for making bijouteries
Depth: 2000 - 3000, Sell Price: 50 / 60 / 75 / 100 / 140 / 200, Amount on Map: 40 / 45 / 47 / 49 / 52 / 55

Egg - The huge egg of ancient big dino
Depth: 100 - 1500, Sell Price: 40 / 50 / 65 / 85 / 120 / 200, Amount on Map: 20 / 23 / 25 / 27 / 29 / 31

Oil - A barrel of an oil, strange finding, but it's only the beginning.
Depth: 200 - 4000, Sell Price: 200 / 220 / 250 / 300 / 370 / 470, Amount on Map: 20 / 22 / 24 / 26 / 28 / 30

Gold Ore - Precious metal, can attract women like a magnet, very good future.
Depth: 3000 - 4000, Sell Price: 250 / 270 / 300 / 350 / 420 / 500, Amount on Map: 40 / 45 / 47 / 49 / 52 / 55

Accum - Battery can slightly increase your energy
Depth: 2000 - 5000, Energy: 20 / 30 / 40 / 50 / 60 / 70, Amount on Map: 5 / 10 / 12 / 14 / 16 / 20

Coins - Real treasure, every coin has a significant value!
Depth: 2000 - 3000, Sell Price: 300 / 350 / 420 / 500 / 600 / 750, Amount on Map: 10 / 13 / 15 / 17 / 19 / 31

Emerald - Green like an egyptian cat eye, big like a while egyptian cat
Depth: 3000 - 3500, Sell Price: 500 / 550 / 620 / 700 / 800 / 1000, Amount on Map: 5 / 7 / 9 / 11 / 13 / 15

Ruby - Nice ruby, can be used in some lasers
Depth: 3500 - 4000, Sell Price: 700 / 750 / 850 / 1000 / 1200 / 1050, Amount on Map: 5 / 7 / 9 / 11 / 13 / 15

Diamond - King of all stones, the Dream of treasure seekers, the root of many crimes.
Depth: 4000 - 4500, Sell Price: 1000 / 1100 / 1250 / 1450 / 1700 / 2000, Amount on Map: 5 / 7 / 9 / 11 / 13 / 15

Truffle - This is a mushroom for gourmands, it is served in best restaurants, diggy love them
Depth: 4000 - 5000, Sell Price: 1500 / 1600 / 1800 / 2100 / 2500 / 3000, Amount on Map: 10 / 12 / 14 / 16 / 18 / 20

Dynamite - Dynamite, after the special upgrade of a battery can restore some of your energy
Depth: 300 - 5000, Amount on Map: 10 / 13 / 15 / 17 / 19 / 21

Recommended Build for Diggy
1. Battery
2. Driller
3. Radar
4. Minerals*
5. Repeat!

Minerals Build for Diggy*
1. Bones
2. Iron Ore
3. Silver Ore
4. Gold Ore
5. Coins
6. Accum
7. Egg
8. Oil
9. Truffle
10. Emerald
11. Ruby
12. Diamond
13. Dynamite
14. Copper Ore

Diggy Walkthrough
Here's a small guide for success in the flash game, Diggy. Firstly, upgrade the bones/fossil in the mineral shop as quickly as possible. Fully upgraded bones is worth as much as a unupgraded gold ore. Which always appears on the surface, great for getting some quick money before the 4th drill upgrade makes gold much easier to get. Never drill straight down or up if you have the solar battery upgrade, a full recharge means you can do double the mining in one run! Zig zag downwards, this is your best chance of climbing back to the top for a refill. Once you recharge though, feel free to drill straight down to save power as you don't need to go back up.

Never neglect your radar, it may seem slightly useless at the start, but it gets way more useful once you start digging deeper. In fact it's essential for beating the game! You have to find a wandering truffle using the radar! The upgraded radar slow down the mushroom. Lastly, battery upgrades are expensive and don't give you that much considering the price, use the solar battery at least until you find the truffle...

Monday, November 4, 2013

Royal Offense Walkthrough Guide

Royal Offense
Royal Offense Logo

Play Online: Royal Offense
Developer: Badim & DN
Genre: Defense, Strategy

Royal Offense Guide
List of Units in Royal Offense
Taxman
Health: 60, Mage Armor: 0, Magic Resist: 0, Dodge: 0
Tax: Collect money from nearest buildings

Warrior
Health: 110, Melee Attack: 20, Heavy Armor: 10, Magic Resist: 0, Dodge: 0

Paladin
Health: 230, Melee Attack: 32, Heavy Armor: 15, Magic Resist: 10, Dodge: 0
Holy: x2 damage against undead
Can Cast: Shield (Returns 50% of incoming damage as magic damage for 15 seconds)

Zealot
Health: 200, Melee Attack: 30, Heavy Armor: 10, Magic Resist: 10, Dodge: 10
Can Cast: Curse (Grants - 15 damage and - 50% speed to 2 enemy units for 10 seconds)

Ranger
Health: 90, Ranged Attack: 15, Light Armor: 5, Magic Resist: 0, Dodge: 0
Hunter: x2 damage against animals

Wizard
Health: 80, Magic Attack: 5, Mage Armor: 0, Magic Resist: 20, Dodge: 0
Holy: x2 damage against undead
Can Cast: Heal (Heals 30hp to ally unit)

Warlock
Health: 80, Magic Attack: 50, Mage Armor: 0, Magic Resist: 20, Dodge: 0
Can Cast: Meteor (Inflicts 100 magic damage to 9 enemy units)

Necromancer
Health: 80, Magic Attack: 40, Mage Armor: 0, Magic Resist: 30, Dodge: 0
Life Steal: Restore 4 hp every attack
Can Cast: Plague (Inflicts 60% of enemy units maximum hp as damage to 3 units over 6 second)

Dwarf
Health: 150, Melee Attack: 25, Heavy Armor: 20, Magic Resist: 40, Dodge: 0
Might: x2 damage against goblins

Elf
Health: 80, Ranged Attack: 30, Light Armor: 0, Magic Resist: 0, Dodge: 15
Might: x2 damage against goblins

List of Enemies in Royal Offense
Giant Rat
Type: Animal Creature, Health: 70, Attack: 14, Armor: 0, Magic Resist: 0, Dodge: 0
Can Cast: Haste (Grants +50% speed boost for 2 seconds when damaged)

Skeleton
Type: Undead Creature, Health: 110, Attack: 20, Armor: 0, Magic Resist: 0, Dodge: 10

Zombie
Type: Undead Creature, Health: 180, Attack: 25, Armor: 0, Magic Resist: 0, Dodge: 0

Spider
Type: Animal Creature, Health: 350, Attack: 25, Armor: 0, Magic Resist: 0, Dodge: 0
Poison: Inflicts 50% of enemy unit maximum hp as damage over 5 seconds

Vampire
Type: Undead Creature, Health: 400, Attack: 30, Armor: 0, Magic Resist: 30, Dodge: 0
Life Steal: Restore 12 Hp every attack

Medusa
Type: Normal Creature, Health: 350, Attack: 35, Armor: 40, Magic Resist: 60, Dodge: 0

Harpy
Type: Normal Creature, Health: 400, Attack: 40, Armor: 0, Magic Resist: 0, Dodge: 50
Life Steal: Restore 12 Hp every attack
Can Cast: Haste (Grants +50% speed boost for 2 seconds when damaged)

Peasant
Type: Goblin Creature, Health: 200, Attack: 30, Armor: 0, Magic Resist: 0, Dodge: 10

Green Arrow
Type: Goblin Creature, Health: 110, Attack: 20, Armor: 0, Magic Resist: 0, Dodge: 20

Shaman
Type: Goblin Creature, Health: 230, Attack: 30, Armor: 0, Magic Resist: 0, Dodge: 5
Can Cast: Heal (Heals 30 hp to ally unit), Meteor (Inflicts 100 magic damage to 0 enemy units)

Highborn
Type: Goblin Creature, Health: 320, Attack: 40, Armor: 20, Magic Resist: 0, Dodge: 5

Heretic
Type: Undead Creature, Health: 400, Attack: 50, Armor: 10, Magic Resist: 10, Dodge: 0
Life Steal: Restore 5 HP every attack
Can Cast: Plague (Inflicts 60% of enemy units maximum hp as damage to 3 units over 6 seconds)

List of Upgrades in Royal Offense
Warriors Guild
Warriors Guild - + 10 / 20 / 30 / 40 / 50 to units HP

Melee Expertise - + 10 / 20 / 30 / 40 / 50 melee units damage
Heavy Armor - + 10 / 20 / 30 / 40 / 50 melee units defense
Siege Shield - + 5 / 10 / 15 / 20 / 25 % melee units block chance

Ranged Expertise - + 10 / 20 / 30 / 40 / 50 ranged units damage
Light Armor - + 10 / 20 / 30 / 40 / 50 ranged units defense
Aimed Shot - + 5 / 10 / 15 / 20 / 25 % ranged units crit chance

City Hall
City Hall - + 100 / 200 / 300 / 400 / 500 silver at mission start

Market - + 10 / 20 / 30 / 40 / 50 silver per 1.5 second
Healing Potions - Units restores 1 / 2 / 3 / 4 / 5 HP per second
Brotherhood - Returns 5 / 10 / 15 / 20 / 25 % of unit cost after his death

Bounty Hunt - + 5 / 10 / 15/ 20 / 25 silver per kill
Black Market - - 5 / 10 / 15 / 20 / 25 % units build cost
Free Trade - + 2 / 4 / 6 / 8 / 10 to units limit on mission

Wizards Tower
Wizards Tower - + 10 / 20 / 30 / 40 / 50 to units magic resist

Heal - Heals 100 / 120 / 130 / 140 / 150 HP to 1/2/3/4/5 ally units
Bless - Grants + 10 damage, +20 armor, +20 dodge, + 20 resist to 5 / 6 / 7 / 8 / 9 ally units for 10 / 11 / 12 / 13 / 14 seconds
Revive - Revives 1 / 2 / 3 / 4 / 5 ally unit with 50 / 60 / 70 / 80 / 90 % of his maximum HP

Lightning - Inflicts 200 / 250 / 300 / 350 / 400 magic damage to 1 / 2 / 3 / 4 / 5 enemy unit
Curse - Grants - 15 damage and - 50 % speed to 2 / 3 / 4 / 5 / 6 enemy units for 10 seconds
Storm - Creates storm cloud for 6 / 8 / 10 / 12 / 14 seconds that inflicts 50 / 100 / 150 / 200 / 250 magic damage to enemy units every 0.8 second

Recommended Build for Royal Offense
1. Warriors Guild
2. Ranged Expertise
3. Light Armor
4. Aimed Shot
5. City Hall
6. Market
7. Bounty Hunt
8. Black Market
9. Healing Potions
10. Brotherhood
11. Free Trade
12. Repeat!

Royal Offense Walkthrough
Ranged units just dominate the game no matter what, really... Especially when you unlock the elf. Start off by buying 2-3 taxmen, click them and drag them near the buildings then to castle for quick money. Afterwards, I was able to complete every level on hard without doing anything but buying 2 rangers then 1 elf, and repeat. With around 20 archers, they destroy anything from enemies to buildings. This flash game can be beaten completely effortlessly within half an hour. This is the most effective method to beat the game. However if you like challenges, play the game with melee units and perhaps no dragging! :)

Good spells include heal, revive and both lightning spells. Please note that spells doesn't have a cooldown! It looks like they do in the interface but you can spam them to your heart's content if you have the extra money. Pro-Tip: If you have reached the unit limit you can just sacrifice a few men, train some new to reach the limit and then resurrect those sacrificed. You can increase your limit artificially by 5 in this way.

Saturday, November 2, 2013

Bit Battles Walkthrough Guide

Bit Battles
Bit Battles Logo

Play Online: Bit Battles
Developer: Boarding Party
Genre: Action, Defense

Bit Battles Guide
List of Items in Bit Battles
Bomb - Average blast and damage.
Ice Bomb - Slows enemies and increases push.
Fire Bomb - Damage over time, no push.
Push Bomb - Small blast, huge push and damage.
Bertha Bomb - Biggest of the booms.
Cap UP (1) - Increase unit by 25.
Cap UP (2) - Increase unit by 25.
Health Max - Vastly increase max health.
Mana Max - Vastly increase max mana.
Mana Regen - Vastly increase mana regeneration.

Recommended Build for Bit Battles
1. Ice Bomb
2. Fire Bomb
3. Push Bomb
4. Bertha Bomb
5. Mana Regen
6. Mana Max
7. Cap UP (1)
8. Cap UP (2)
9. Health Max

Bit Battles Walkthrough
Found myself using the same tactic to win every battle. In Bit Battles, Knights are good at handling enemies in the top row. Spearmen are better at beating middle rows by spamming their ability. Mages are superb against the bottom row due to the later suiciding enemies. Every wins will grant you gold and you should upgrade all the bombs first. I've found it better to just zerg every battle to win. When battle begins, click once across my line for defense and then spam click in one spot where enemy is thinnest and send all my troops down that one path. Then spam bombs to clear their way before they can reach your defenses. Use the bombs (ice especially) to slow down the enemies if needed.

After clearing a battle, level the stat attack on the mages and knights. For spearmen, add the stat push; It is really overpowering in the later game. For the final boss, it was beaten by my spearmen using the rush tactics and with the push bombs alone. Or else, you can also use mages! They are good at clearing massive waves of enemies due to their fullscreen laser ability.

Tuesday, October 29, 2013

10 More Bullets Game Review & Walkthrough Guide

10 More Bullets
10 More Bullets Logo

Play Online: 10 More Bullets
Developer: Michel Gerard
Genre: Shooter

Game Review
Well, for today's review I decided to introduce a game that was just released a few days ago. The flash game is called 10 More Bullets. 10 More Bullets is apparently a sequel to its older game aka, 10 Bullets, where the objective remains the same. After playing this, I see the game went beyond just a sequel and made a near completely different game while still standing by the original concept.

At its core, this game is a very simple chain reaction game. Where you have 10 bullets to destroy as many flying ships in a huge chain reaction explosion as you possibly could. It is a very simple concept, but there is a lot more going on in 10 More Bullets. For those who had tried 10 Bullets, you will notice there is an upgrade system implemented to 10 More Bullets. Which you can upgrade various aspects of your cannon or even buy more than 10 bullet shots. The downside is there is still some skill involved in shooting those bullets correctly to trigger a great chain reaction. I personally think is an awesome feature for those who are aiming to set high scores.

The design is simple but solid. Another worth highlighting is the different ship types. Now, some better looking ships occasionally drop items/booster which you have little grabber helpers that pick up these and bring them to your gun base. These items have effects which typically help your score, such as from sending special ship waves to 2x score multiplier and more.

Never thought pressing 1 button could be so satisfying. I bet this little flash game is going to be one of those good old games that reminds you that a concept can be very simple and yet so intensely fun at the same time. I played this game for almost nearly 2 hours (still playing) and I enjoy it every time. Great flash game, must try!

10 More Bullets Guide
List of Upgrades in 10 More Bullets
Max Combo - You set bigger explosions.
Combo: 6 / 10 / 15 / 20 / 25
Boosters - More boosters at the same time.
No. Slot: 1 / 2 / 3 / 4 / 5
Grabbers - They grab stuff on the ground for you.
No. Grabbers: 1 / 2 / 3 / 4 / 5
Special Waves - Big wave with lots of ships.
No. Ships per Wave: 10 / 15 / 20 / 30 / 50

Recommended Build for 10 More Bullets
1. Max Combo
2. Special Waves
3. Boosters
4. Grabbers
5. Repeat!

10 More Bullets Walkthrough
At the start of every round, wait for the small fast brown ship to come. You won't always be able to hit it, but if you do, it'll give you a huge explosion like 15 shots and always drop a bonus. This will help bring in massive amounts of gold if you manage to get a good combo from it. Do not even really worry about shooting the bigger ships with your main shot, you are just wasting your precious bullets! Just save it to trigger a massive combo, that's the most effective way to spend your bullet.

For new players, you can follow the recommended build above. I suggest you buy the first max combo as your first buy then buy the special wave upgrade. This will help you make tons more points which in turn makes you even more gold. Also, extra booster slots are key for more scores. However, you should never have more grabbers than slots, although both are important. Note that, when you have 3 grabbers the little gold ship becomes a good thing to aim for as ships on screen will become gold worth like 20 gold each. This can give a huge amount of money, especially if a special wave is in progress. Have fun!

Saturday, October 26, 2013

Zombo Buster Game Review & Walkthrough Guide

Zombo Buster
Zombo Buster Logo

Play Online: Zombo Buster
Developer: FireBeastStudio
Genre: Defense, Upgrades

Game Review
Zombo Buster is the latest tower defense game brought to you by FireBeastStudio, aka the maker of Evilgeddon Spooky Max and Bois D'Arc. This time round it's about killing incoming hordes of zombies. Which involves a lot of explosions, lightning, lasers and rapid firing. Are you ready to protect Medan City from the awful zombification?

The goals are straightforward in Zombo Buster. Eliminate any zombies coming from the right trying get into the doors on the left, by leading the anti-zombie squad in groups of three... Camping in elevators! These elevators can be swapped back and forth between different floors which is required in the later part of the game. For those who find micromanaging objects isn't your thing. A quick solution would be to purchase new ones. Afterward click the walkie-talkies to call in any soldiers you can afford to hold them off. The cost of different soldiers varies slightly, as does their strengths and weaknesses. If you've got the coin to spare, you can even upgrade them to a higher tier which makes even more powerful than previous. Basically, implementing the right strategies and unit management is crucial, else you will find difficult to repel stronger and stubborn zombies.

The game is pretty unique, a kind reminiscent of Plant vs Zombies, with horizontal alignment. Overall, it's a fresh approach to the genre especially the lane-based defense gameplay felt really solid. The only downside is the difficulty/progression. After the first level or two the difficulty spikes enormously simply because of how many zombies begin swarming you. Some may find it punishing then get stuck in a matter of minutes. Firstly because the unit upgrades do not compliment the increase in difficulty, and there are a limited number of gems. You basically can't grind for upgrades... Can be pretty frustrating to some, however I see nothing wrong with a challenge. I enjoyed the game. :)

A neat game. Keep up the great work! I hope to see more soon.

Zombo Buster Guide
List of Units in Zombo Buster
Gunner Squad
Private Gunner (Tier 0)
Description: A Regular shooter with ordinary handgun. Very good for one on one.
Damage: 15 - 20, Firing Rate: Normal, Special: None

Sergeant Gunner (Tier 1)
Description: A trained shooter with better shooting experience. Getting stronger...
Damage: 20 - 25, Firing Rate: Normal, Special: None

Captain Lethal (Tier 2)
Description: Trained with the abillity to hit enemy wiht superb damage. Ready zombies?
Damage: 25 - 30, Firing Rate: Normal, Special: Critical Lv1

Colonel Lethal (Tier 3)
Description: Just promoted and also stronger critical.
Damage: 30 - 50, Firing Rate: Normal, Special: Critical Lv2

Chief Lethal (Tier 4)
Description: Highest rank, highest critical rate, death to zombies!
Damage: 50 - 70, Firing Rate: Normal, Special: Critical Lv3

Captain Immobilize (Tier 2)
Description: ANalternae evolution, armed with speical ministun gun. Halt zombies!
Damage: 20 - 30, Firing Rate: Fast, Special: Ministun Lv1

Colonel Immobilize (Tier 3)
Description: Gun Upgraded! Get ready to see some laggy zombies!
Damage: 30 - 40, Firing Rate: Fast, Special: Ministune LV2

Chief Immobilize (Tier 4)
Description: The leader of squad equipped with the best stun gun ever!
Damage: 40 - 50, Firing Rate: Fast, Special: Ministun Lv3

Agent Squad
Private Agent (Tier 0)
Description: Young, fast and dangerous with high firing rate.
Damage: 4 - 5Firing Rate: Fast, Special: None

Sergeant Agent (Tier 1)
Description: Better firing rate, last hit stealer!
Damage: 5 - 6, Firing Rate: Fast, Special: None

Captain Assault (Tier 2)
Description: Specialize in vital shooting that causes a mini push to a single zombie.
Damage: 6 - 8, Firing Rate: Fast, Special: Minipush Lv1

Colonel Assault (Tier 3)
Description: Trained with special tactic and able to push zombies with better distance.
Damage: 8 - 10, Firing Rate: Fast, Special: Minipush Lv2

Chief Assault (Tier 4)
Description: One and only shooter with superb protective pushing skills. Don't touch my door!
Damage: 10 - 12, Firing Rate: Fast, Special: Minipush Lv3

Captain Tesla (Tier 2)
Description: Armed with the discovery of electric gun that pierce through enemies.
Damage: 10 - 20, Firing Rate: Normal, Special: Lightning Lv1

Colonel Tesla (Tier 3)
Description: Improved guns and sutis, let's put some more shocks to the party.
Damage: 20 - 40, Firing Rate: Normal, Special: Lightning Lv2

Chief Tesla (Tier 4)
Description: Fance and excellent for line of zombies in various distance. Feel the zap!
Damage: 40 - 60, Firing Rate: Normal, Special: Lightning Lv3

Bombard Squad
Private Bombard (Tier 0)
Description: An ex-stunman from action movies. Very talented and experienced dead man walking
Damage: 10 - 20 , Firing Rate: Slow, Special: None

Sergeant Bombard (Tier 1)
Description: Equipped with safety helmet to cover the exploding parts of zombies.
Damage: 20 - 30,
Firing Rate: Slow,
Special: None

Captain Stun (Tier 2)
Description: Extreme version and loves to create stunning effect as well as stunning zombies.
Damage: 30 - 50, Firing Rate: Slow, Special: Area Stun Lv1

Colonel Stun (Tier 3)
Description: Level Up! Zombies are meant to be stopped with improved stun duration.
Damage: 50 - 75, Firing Rate: Slow, Special: Area Stun Lv2

Chief Stun (Tier 4)
Description: An extreme professional who uses mini nurclear for his daily routine.
Damage: 75 - 125, Firing Rate: Slow, Special: Area Stun Lv3

Captain Repulsor (Tier 2)
Description: Being a true fans of the iron armor, he invetned a gun that shoots alike. Prefers knockback than stun.
Damage: 15 - 20, Firing Rate: Slow, Special: Force Back Lv1

Colonel Repulsor (Tier 3)
Description: Added some upgrades for the gun. Thanks to serach engines, zombies get ready!
Damage: 20 - 25, Firing Rate: Slow, Special: Force Back Lv2

Chief Repulsor (Tier 4)
Description: Maybe he'll never be able to create iron armor but at least he got this jet powered beam cannon.
Damage: 25 - 30, Firing Rate: Slow, Special: Force Back Lv3

List of Zombies in Zombo Buster
Zombie
Description: Normal zombie in normal situation. Quite cute and not deadly.
Health: 60, Speed: Normal, Damage: 1

Girlhopper
Description: They don't walk, they hop and take very short time to reach any door.
Health: 70, Speed: Fast, Damage: 1

Big Lud
Description: Quite slow and quite strong, at least they can cover their friends behind.
Health: 260, Speed: Slow, Damage: 1

Fencer
Description: A little bit smarter than other, they bring fences to block special effect.
Health: 190, Speed: Normal, Damage: 1

Megaphone
Description: Comes in person but if you let them walk too long, they'll call friends.
Health: 180, Speed: Normal, Damage: 1

Azdol and Mevda
Description: Big one is slow but small one aims for elevator, don't let your guard down!
Health: 280, Speed: Slow, Damage: 1

Giganzom
Description: A friend of Big Dude in rugby costume. Nice defense and blocks more damage.
Health: 400, Speed: Slow, Damage: 1

Zwat Squad
Description: Infected special forces squad, they block special effect much long with their special shield.
Health: 350, Speed: Normal, Damage: 1

Zomhee
Description: Use both hands and feet to move, super quick and threatening.
Health: 160, Speed: Fast, Damage: 1

Gargantuan
Description: Mutated version with super defense, better get this one down first!
Health: 1450, Speed: Slow, Damage: 2

Daywalker
Description: Mutated version of zombie and much stronger than before.
Health: 120, Speed: Normal, Damage: 1

Ladyjumper
Description: Mutated version of Girlhopper, faster and more threatening.
Health: 140, Speed: Fast, Damage: 1

Gigaphone
Description: Mutated version of Megaphone, with superb cowardly skill.
Health: 230, Speed: Normal, Attack: 1

Zomhee Q
Description: Mutated version of Zomhee, seems like the most annoying enemy.
Health: 250, Speed: Fast, Damage: 1

Mevda
Description: Aim for the rightest unit and self destruct when collides army!
Health: 110, Speed: Fast, Damage: 1

Steady Gang
Description: Makes you feel excited or bad anytime with the rhythm of the evil guitar!
Health: Unknown, Speed: Slow, Attack: Status Effect

Zakaki Davinci
Description: An imaginist zombie, can do almost anything with his magical dead tablet.
Health: Unknown, Speed: Slow, Attack: Death Journal

Picici
Description: Usually zombies are brainless but not this one. Manipulates everyone including you!
Health: Unknown, Speed: Slow, Attack: Malfunction

Pokeaang
Description: A maniac of the red-white ball series! Beware of the balls!
Health: Unknown, Speed: Slow, Attack: Zomball

Hyper Genezuz
Description: The boss of zombies... NO INFORMATION, EXTRA CAUTION PLEASE!
Health: Unknown, Speed: Slow, Attack: Doom Rocket

List of Upgrades in Zombo Buster
Gunner Squad
Tax Free - Reduce base Gunner Squad's hiring fee by 10.
Alien Gun - Increase Gunner Squad's damage by 20%.
Headshot - Increase both squad chance to inflict critical/ministun.
Antizombie Bullet - Increase Lethal Squad's critical damage and Immobilize Squad's ministun last a little bit longer. Freeze or die?

Agent Squad
Physical Training - Extra 25% damage to every bullet shot by Agent Squad.
Gunplay - Increase Agent Squad's firing speed slightly.
Focus - Increase both squad chance to inflict lightning/minipush.
Turbo Mode - Improve Tesla Squad's lightning by 3 enemies and extra minipush distance for Assault Squad. Get away from my door!

Bombard Squad
Demon Gunpowder - Increase Bombard's Squad's hit radius.
Outrage - Increase Bombard Squad's damage by 20%.
Berserk - Increase chance to inflict stun/force back for both squad.
Heavy Buster - Stun Squad stuns for extra 0.5 sec and Repulsor Squad knocks even further. Go home zombies!

Utilities
Bounty Cash - Earn 30% bonus cash from calling next wave.
Organization Treasury - Start up with extra 20% fund.
Leftover - Enemies killed will happily drop a little amount of bonus cash.
Life Insurance - Get extra 5 life points for all stages, thanks Firebeast!

Bomb of Duty
Bomb Crafting - The art of bomb crafting, reduce cooldown by 5 secs.
Radiation - Increase explosion radius.
Explosive Gas - Increase explosion damage by 25%.
Pyrotechnic - Add bonus stun effect for 1 sec, feel lagging zombies!

Time Machine
Stop + - Increase stop duration by 1 sec.
Turbo Battery - Reduce cooldown by 10 secs.
Stop ++ - Increase stop duration by 2 secs.
Hypnosis - All stopped enemies receive 10% extra damage dealt, fever time!

Flamebot
Flamethrower + - Increase flamethrower damage by 25%.
Turbo Mechanic - Reduce cooldown by 10 secs.
Flamethrower ++ - Increase flamethrower damage by 50%.
Burning floor - Cooking zombies? Impossible is nothing! Use this and you'll see the floor in fire as well as zombies on fire!

Recommended Build for Zombo Buster
1. Bounty Cash
2. Organization Treasury
3. Leftover
4. Demon Gunpowder
5. Outrage
6. Berserk
7. Heavy Buster
8. Bomb Crafting
9. Radiation
10. Explosive Gas
11. Pyrotechnic
12. Stop +
13. Turbo Battery
14. Stop ++
15. Hypnosis
16. Flamethrower +
17. Turbo Mechanic
18. Flamethrower ++
19. Burning floor
20. Life Insurance
21. Upgrade the rest in random order!

Zombo Buster Walkthrough
The only effective unit in the game goes to Bombard's Squad! Thanks to its area damage, it can clear swarm of zombies quickly unlike other solo targeted units. Simple math, if there are three zombies (there are usually a lot more), and the bombard unit does 10 damage, then it does 30 damage with every hit. On the other hand, the other two units shoot only one zombie at a time. For them to keep up, they'd need to do around 30 damage in the time it takes the bombard unit to shoot once. Bombard squad is OP!

Generally, you will build as many Bombards as possible, until all the elevators are full. Slowly and steady upgrade them until you have 2 Chief Stun and 1 Repulsor in each elevator. This will work with all stages, only if you follow my recommended build above! Else, you can also try 1 Bombard and 2 Agents. They are good except for the last stage. ;)

Pro-Tip: Clicking a zombie lowers its health a small bit. Get an auto clicker from the internet to click 100 times a second and bosses are a cakewalk.

Friday, October 11, 2013

An Epic Minimalistic Adventure Game Review

An Epic Minimalistic Adventure
An Epic Minimalistic Adventure Logo

Play Online: An Epic Minimalistic Adventure
Developer: Monster Brain Inc
Genre: Puzzle

Game Review
Great, original, weird, and quirky... This are some of the words how I'm going to describe on this flash game called, An Epic Minimalistic Adventure. It is a very well done 5 minute game; Simple and first of its kind which I actually enjoyed it quite a bit.

According to the description, the game is made entirely using the GUI components of a UI library called MinimalComps. Basically, it is a set of ActionScript 3.0 User Interface Components for Flash. I am neither a programmer nor a software person, but in simple terms I think is some sort of add-ons or language. Don't blame if I'm wrong, I don't know what am I saying too. I'm just trying to make myself look smart by making a wise guess/explanation! At its core, An Epic Minimalistic Adventure is filled with puzzles and several interesting experimental game play. They're sort of cool, but can be oddly complicated too. I was stuck at first, quickly get how it works afterwards.

Everything was pretty much minimal, which goes to show that you don't need great graphics, premium content, endless loading screens or all those other features of "big" games to deliver outstanding entertainment. Please sir, I want some more! My princess is in another castle. :D

Tuesday, October 8, 2013

Pre-Civilization: Stone Age Game Review & Walkthrough Guide

Pre-Civilization: Stone Age
Pre Civilization Stone Age Logo

Play Online: Pre-Civilization: Stone Age
Developer: Mikhail Vasilyev & Andrew Schmitt
Genre: Simulation, Strategy

Game Review
Let's briefly talk more about the genre, simulation. I realize I am not playing and exploring the genre enough. Till date, I only have three game reviews on the genre shows that I lack exposure to it. It's time, I shall do more. Pre-Civilization: Stone Age is a simulation and strategy flash game that I really enjoyed this great game for what it is.

In Pre-Civilization: Stone Age, you are to create and lead your own tribe from the first human primates lived 4 million years ago to the first civilizations of Ancient Egypt and Mesopotamia. Your primary objective of the game is to develop your primitive encampment to a full city in the least amount of 100 turns. There is a lot need to be done... Like sustaining a steady food production for a growing population, getting enough resources to build houses and palaces and defending the village by ward off enemy attacks. You need to be very effective with your management skills and do expect the unexpected events.

The game itself seems pretty well thought out, was more complex than I thought it would be. Great game, however could be better. Winning seems more a matter of luck than skill, either you will encounter enough random events that benefit you in the right ways at the right times to increase population and such or you won't. Because you can only upgrade technology and build so fast, all of this is based on population. Meanwhile, the population grows way too slow to be meaningful beating the game. Any one or two random disasters can ruin you the whole game. Basically, it's challenging especially when playing in chieftain or deity mode.

The game has so much potential and half of me wants to dive back into the game right now to beat deity mode. A creative game that I had a good time trying to beat. In my opinion, this is fun, hope to see a second one someday!

Pre-Civilization: Stone Age Guide
List of Techs in Pre-Civilization: Stone Age
4000 - 1000k Years B.C.
Gathering
Description: Unlocks the activity 'Gathering': Each person makes 2 food, 10 people max.
Requirements: Nothing

Knowledge of Plants
Description: Gathering + 10 people max and + 1 food per person.
Requirements: Research Points 1, Gathering

Use of Fire
Description: Population + 5 maximum.
Requirements: Research Points 1.

Crude Stone Tools
Description: Unlocks the activity 'Stoneworking': Each person makes 3 production, 5 people max. Unlocks the building of dwelling.
Requirements: Research Points 1.

Fur Clothing
Description: Population + 10 maximum.
Requirements: Research Points 1, Crude Stone Tools.

Improved Stone Tools
Description: Stoneworking + 10 people max. Unlocks the building of workshop.
Requirements: Research Points 1, Crude Stone Tools

Hunting
Description: Unlocks the activity 'Hunting': Each person makes 3 food, 5 people max. Strength + 20%.
Requirements: Research Points 1.

Primitive Weapons
Description: Strength + 30%.
Requirements: Research Points 1, Hunting

1000 - 50k Years B.C.
Advanced Gathering
Description: Gathering + 30 people max.
Requirements: Research Points 1, 1000k Years B.C. and Knowledge of Plants.

Religion
Description: Unlocks the activity 'Worship': Each person makes 3 culture, 10 people max. Unlocks the building of Burial Place.
Requirements: Research Points 1, 1000k Years B.C. and Use of Fire.

Art
Description: Worship + 15 Pwople Max
Requirements: Research Points 1, 1000k Years B.C. and Religion.

Building of Fire
Description: Population + 20 maximum.
Requirements: Research Points 1, 1000k Years B.C. and Use of Fire.

Shelter
Description: Population + 100 maximum.
Requirements: Research Points 1, 1000k Years B.C. and Building of Fire.

Advanced Stone Tools
Description: Stonework + 20 people max.
Requirements: Research Points 1, 1000k Years B.C. and Improved Stone Tools.

Thrown Weapons
Description: Strength + 50%.
Requirements: Research Points 1, 1000k Years B.C. and Primitive Weapons.

Trapping
Description: Hunting + 5 people max, and + 1 food per person. Unlocks the building of hunting camp.
Requirements: Research Points 1, 1000k Years B.C. and Hunting.

Captive Animals
Description: Hunting + 10 people max. Unlocks the building Storage.
Requirements: Research Points 1, 1000k Years B.C. and Trapping.

Fishing
Description: Unlocks the activity 'Fishing': Each person makes 3 food, 20 people max.
Requirements: Research Points 1, 1000k Years B.C. and Hunting.

50 - 4k Years B.C.
Agritculture
Description: Unlocks the activity 'Food Production', + 2 food per person, 200 people max.
Requirements: Research Points 1, 50k Years B.C. and Advanced Gathering.

Barter
Description: Passive growth of culture and production + 20%.
Requirements: Research Points 1, 50k Years B.C. and Agriculture.

Adornment
Description: Worship + 50 people max.
Requirements: Research Points 1, 50k Years B.C. and Art.

Pottery
Description: Population + 400 maximum.
Requirements: Research Points 1, 50k Years B.C. and Shelter

Architecture
Description: Population + 200 maximum. Unlocks the building Megalith.
Requirements: Research Points 1, 50k Years B.C., Shelter and Component Tools.

Cloth Outfit
Description: Population + 1000 maximum.
Requirements: Research Points 1, 50k Years B.C. and Fur Clothing

Component Tools
Description: Stoneworking +174 people max. Unlocks the building Palisades.
Requirements: Research Points 1, 50k Years B.C. and Stone Tools.

Ranged Weapons
Description: Strength + 100%.
Requirements: Research Points 1, 50k Years B.C. and Thrown Weapons.

Domestication
Description: Hunting + 100 Maximum.
Requirements: Research Points 1, 50k Years B.C. and Captive Animals.

Animal Husbandry
Description: Unlocks the activity 'Food Production', +3 food per person, 200 people max.
Requirements: Research Points 1, 50k Years B.C. and Domestication.

Fish Hooks
Description: Fishing + 40 people max, and + 1 food per person.
Requirements: Research Points 1, 50k Years B.C. and Fishing.

Fishing Nets
Description: Fishing + 120 people max and + 2 food per person.
Requirements: Research Points 1, 50k Years B.C. and Fishing Nets.

Social class
Description: Unlocks the building palace and possibility to win the game.
Requirements: Research Points 1, 50k Years B.C., Barter and Architecture.

List of Buildings in Pre-Civilization: Stone Age
Dwelling
Description: Population + 10 maximum, + 20% to passive growth of culture and production.
Requirements: Technology: Crude Stone Tools, Production Points: 100.

Workshop
Description: Stonework production + 1 per person.
Requirements: Technology: Improved Stone Tools, Production Points: 400.

Hunting Camp
Description: Hunting + 10 people maximum, + 1 food per person to hunting.
Requirements: Technology: Trapping, Production Points: 800.

Burial Place
Description: Culture + 1 per person for worship.
Requirements: Technology: Religion, Production Points: 1400.

Storage
Description: Passive Growth of culture and production + 20%.
Requirements: Technology: Captive Animals, Production Points: 3000.

Palisade
Description: Strength + 200%.
Requirements: Technology: Component Tools, Production Points: 5400.

Megalith
Description: Worship + 125 people maximum stonework production + 2 per person.
Requirements: Technology: Architecture, Production Points: 7000.

Palace
Description: Beat the game.
Requirements: Technology: Social class, Production Points: 15000.

List of Evolution in Pre-Civilization: Stone Age
Australopithecus
Description: Basic type of human-primate, no bonuses.
Requirements: None.

Homo Habilis
Description: Improved form of human-primate, culture bonus 20%.
Requirements: Production points 50.

Homo Erectus
Description: Improved form of human-primate, culture bonus 40%.
Requirements: Production points 1000.

Homo Heidelbergensis
Description: Primative people, culture bonus 60%.
Requirements: Production points 2500.

Homo Sapiens
Description: Modern Humans, culture bonus 100%.
Requirements: Production points 12000.

Pre-Civilization: Stone Age Walkthrough
Notes
- First off, if the first event is an ice age, you aren't gonna win, so restart if ice hits early (finding a nut grove, on the other hand, is badass to put it bluntly).
- You can ignore risk for at least most of the first age which means have no guards if you have population space, growth is much more important, but try not to underestimate the Barbarians later on, as they will wreck you if their stats are high.
- Cheat dumb barbarians when you can, as it results in no loss, which is quite precious.
- Despite the above tip, its actually safe to have risk up to around 30-35%.
- The strength of your guards has nothing to do with neither the stats of barbarians or storms, nor your odds of winning a fight against barbarians.
- Don't bother getting fishing. I'm not sure if it gets better than farming for a per worker rate, but you can grow fast enough without fishing.
- Once you hit a new age, you normally get a new boost in pop cap, so get everyone on food jobs if you can once the pop cap increase comes.
- As a last resort against strong barbarians, if they're after your forest, maybe your desert, it's worth it to just surrender those lands, as the forest will be useless once you get farming (get both the techs for farming). You'll need the mountains though, so do not let them take that, as barbarian land grabs are permanent and every bit counts when your shooting for palace building.
- If the barbians eat your people, you may actually be able to recover if you have a lightning fast population growth speed.
- Other than that, victory rides heavily on luck, mostly the lack of an Ice Age, so one of the only ways to get victory is keep trying and hope for better luck.

Strategy
The first tech you should get is the gathering boost (2 cherries). Getting hunting seems like a decent idea, but only opens 5 work slots instead of 10, so hold off on that for a little. The next most important thing to population growth is cultural growth for technology, but you don't unlock the desert until the next age, so you'll have to make due with getting Use Of Fire next for a higher pop. cap. I've tried stone tools early instead, but having more people earlier pays off later, not to mention each person generates culture and production on their own, even guards. Stone tools is pretty important too though, so get that as your third tech.

Once you start mining, work straight towards building Dwellings as soon as possible for an extra, much needed pop cap increase, and build up population from there. Cloth clothing can very much be worth it, so you might want to get Fur Clothing, but not if its right when the next age is about to happen, you'll want to save it for Religion. Then once hitting the next age, get Religion to boost your tech a lot, then Building of Fire for a pop cap boost, followed by getting Trapping asap since hunting becomes more effective than gathering in the second age. You may also want to skip building a Workshop so you can build a Hunting Camp, it can help a ton.

From there, the idea is to grow as fast as possible, but do not totally neglect production, as starting early can be the difference between victory and failure. You know you should be doing well if you evolve to Homo-Erectus before the third age. Quick note about the third age: if you have spare tech points from not getting fishing which you shouldn't fish, then you should get Architecture right away to both heavily boost production cap and have a nice pop cap boost, which should be well needed by now.

If you're doing a wonderful job, you'll possibly have a totem pole in the desert, and have the farm fully staffed by turn 85 or earlier, which is when you should work exclusively towards the palace. Keep upping mining tech if mountains are full. Also, you should consider boosting farming further level up Agriculture, that's what I did.