Thursday, May 29, 2014

Swarm Defender Walkthrough Guide

Swarm Defender
Swarm Defender Logo

Play Online: Swarm Defender
Developer: Violatorgames
Genre: Defense, Strategy

Swarm Defender Guide
List of Towers in Swarm Defender
Grunt
Description: The core unit of the Swarm Defenders. Cheap, higly versatile, and always ready to battle.
Damage: 1, Attack Speed: 0.2s, Range: 110, Target: Land & Air, Cost: $15, Research: 0R
Upgrades
$15 - HV Rounds
High-Velocity Rounds do more damage to the target.
$10 - Improved Sights
Improved Rifle Sights increase. Grunt range considerably.
$15 - MHV Rounds
Mega High-Velocity Rounds do even more damage to the target.
$20 - Holographic Targeting
Holographic Targeting system increases range even more.
$15 - UHV Rounds
Ultra High-Velocity Rounds do the most damage to the target.
$15 - Penetrator V1
Penetrator casings increase armor piercing.
$15 - Muzzle Cooler
Muzzle cooling allows the Grunt to fire quicker.
$15 - Penetrator V2
The next level of Penetrator casings.
$15 - Titanium Barrel
Titanium Rifle Barrel further decreases Grunt firing speed.
$15 - Penetrator V3
The final level of Penetrator casings.

Boomer
Description: A mechanized soldier that shoots heavy grenade projectiles that slow down the enemy.
Damage: 12, Attack Speed: 1s, Range: 90, Target: Land, Cost: $80, Research: 25R
Upgrades
$20 - Reloader
An improved Reloading system that allows the Boomer to fire faster.
$20 - Fragger V1
Fragger-type Grenades that increase damage done to the target.
$20 - Autoloader
An Automatic Loading system that allows the Boomer the fire even faster.
$20 - Fragger V2
Improved Fragger Grenades do even more damage.
$15 - Shredder Nades
Shredder Grenades spray razor sharp shrapnel damaging the targets armor.
$15 - Stun Nades
Stun Grenades improve the slowing effect enemies experience when hit.
$10 - Launcher V1
The Launcher upgrade gives the Boomer a larger firing range.
$15 - Concussion Nades
Concussion Grenades impact the enemy harder slowing them even more.
$20 - Launcher V2
The improved Launcher increases range even further.
$15 - Crippler Nades
Crippler Grenades debilitate the target cutting their speed in half.

Sharpshooter
Description: Specializes in taking out high armor targets. Has the ability to make critical hits.
Damage: 24, Attack Speed: 2.5s, Range: 200, Target: Land & Air, Cost: $100, Research: 50R
Upgrades
$15 - HP Rifle
The High-Powered Rifle upgrade increases armor piercing.
$15 - Ranger Scope
The Ranger Scope increases the Sharpshooter range.
$15 - UHP Rifle
The Ultra High-Powered Rifle further increases piercing.
$15 - Debilitating Rounds
Debilitating Rounds do devastating damage to the targets armor.
$25 - Spectre Optics
Spectre Optics increases range even further.
$10 - Hot Shots
Hot Shot rounds increase the chance of critical hits.
$15 - .44 Caliber
.44 Caliber rounds make a bigger hole in the target causing more damage.
$15 - High Precision
High Precision rifling increase critical chance even further.
$15 - .50 Caliber
.50 Caliber rounds increase damage even further.
$20 - Death Strike
The Death Strike system increases critical hit chance to its maximum level.

Laser Tower
Description: Ancient technology that enemies with a focused beam of light
Damage: 0.75, Attack Speed: 0.03s, Range:120 , Target: Land, Cost: $150, Research: 100R
Upgrades
$150 - Duo-Emitter
The Duo-Emitter adds a second laser beam that can target another enemy.
$10 - Pulse Beam
The Pulse Beam increases laser armor piercing.
$120 - Tri-Emitter
The Tri-Emitter adds a third beam.
$10 - Ionizer Beam
The Ionizer Beam increases piercing even further.
$100 - Quad-Emitter
The Quad-Emitter adds a fourth beam
$10 - Focuser V1
A Focuser upgrades that increases Laser Tower range.
$10 - Focuser V2
A Focuser upgrades that increases Laser Tower range.
$10 - Focuser V3
A Focuser upgrades that increases Laser Tower range.
$10 - Focuser V4
A Focuser upgrades that increases Laser Tower range.
$10 - Focuser V5
A Focuser upgrades that increases Laser Tower range.

Missile Tower
Description: Fires missiles that do explosive damage over a small area. Great for grouped up enemies.
Damage: 20, Attack Speed: 1.67s, Range: 150, Target: Land & Air, Cost: $200, Research: 150R
Upgrades
$20 - Frag Missiles
Grag Missiles do more damage than non-upgraded missiles.
$15 - Ballistics B1
A ballistics upgrade that increase armor piercing.
$20 Hunter Missiles
Hunter missiles increase the damage even further.
$15 Ballistics V2
Improved Ballistics that increases piercing further.
$25 - Seeker Missiles
Seeker Missiles will find another nearby target if their current target is killed.
$15 - Triangulator
Triangulator Sensors increase Missile Tower range.
$25 - Craterize V1
Craterize Explosives increase the radius of explosions.
$15 - GPS Targeting
GPS Targeting further increases range.
$25 - Craterize V2
Improved Craterize explosives increase explosion radius further.
$30 - Hellfire
Hellfire Missiles leave a burning area on the land if they explode on a non-flying enemy.

Flamethrower
Description: Sprays fiery death upon any enemies within its short range.
Damage: 1.25, Attack Speed: 0.17s, Range: 80, Target: Land, Cost: $125, Research: 175R
Upgrades
$15 - Pressurized V1
A Pressurization upgrade that increases Flamethrower range.
$15 - Pressurized V2
A Pressurization upgrade that increases Flamethrower range.
$15 - Pressurized V3
A Pressurization upgrade that increases Flamethrower range.
$15 - Pressurized V4
A Pressurization upgrade that increases Flamethrower range.
$15 - Pressurized V5
A Pressurization upgrade that increases Flamethrower range.
$15 - Sprayer Nozzle
The Sprayer Nozzle allows the Flamethrower to fire faster.
$10 - Melter Flames
The Melter Flames do more damage than normal flames.
$15 - Jet Nozzle
The Jet Nozzle decreases firing speed further.
$10 - Incinerator Flames
The Incinerator Flames do more damage than Melter Flames.
$15 - Volcano Nozzle
The Volcano Nozzle decreases firing speed to the minimum.

Flak Cannon
Description: Fires a spread of burning metal shards. Shards have a chance to pass through enemies.
Damage: 20, Attack Speed: 2s, Range: 130, Target: Land & Air, Cost: $175, Research: 175R
Upgrades
$15 - Devastating Shrapnel
Devastating Shrapnel damages enemy armor when hit.
$40 - Shards V1
Shards V1 increases the number of shards fired by 1.
$25 - 88mm Barrel
The 88mm Barrel increases damage done per shard.
$80 - Shards V2
Shards V2 increases the number of shards fired by 2.
$25 - 100mm Barrel
The 100mm Battel further increases damage per shard.
$10 - Light Shrapnel
Light Shrapnel increases armor piercing.
$15 - LR Sensors
Long Range Sensors increase firing range.
$10 - Medium Shrapnel
Medium Shrapnel increases piercing further.
$15 - ULR Sensors
Ultra Long Range Sensors increase range further.
$10 - Heavy Shrapnel
Heavy Shrapnel increases piercing even more.

Plasma Cannon
Description: Ancient technology that fires highly damaging balls of plasma at enemies.
Damage: 40, Attack Speed: 1.5s, Range: 150, Target: Land, Cost: $175, Research: 200R
Upgrades
$15 - Aerial Targeting
Aerial Targeting allows the Plasma Cannon to hit flying targets.
$25 - Blast Radius V1
A Blast Radius upgrades that increase the explosive radius of each hit.
$15 - Plasma Containment
Plasma containment allows the Plasma Cannon to fire at further away targets increasing range.
$25 - Blast Radius V2
Another Blast Radius upgrade further increasing explosive radius
$15 - Improved Containment
Improved containment increases range even more.
$20 - Mk1 Generator
The Mark1 Generator allows the Plasma Cannon to fire faster.
$25 - Destructor
The Destructor upgrade increases Plasma Cannon damage.
$20 - Mk2 Generator
The Mark2 Generator further decreases firing speed.
$25 - Vaporizer
The Vaporizer increase the damage even more.
$20 - Mk3 Generator
The Mark3 Generator decreases firing speed to the minimum.

Waste Spewer
Description: Spews waste in the path of the enemy slowing down those that move through it.
Damage: 10, Attack Speed: 1.5s, Range: 80, Target: Land, Cost: $125, Research: 225R
Upgrades
$10 - Deteriorating Goo
Deteriorating Goo damages enemy armor while effected.
$30 - Blobification V1
the Blobification upgrade increases waste splash radius.
$20 - Corroding Goo
Corroding Goo further damages enemy armor.
$30 - Blobification V2
Blobification V2 increases splash radius even further.
$20 - Rotting Goo
Rotting Goo damages enemy armor even more.
$20 - Stickiness
Stickiness makes enemies effected by waste move slower.
$20 - LR Spewer
The Long Range Spewer increases Waster Spewer range.
$20 - Choking Fumes
choking Fumes slows down enemies even more.
$30 - Improved Spewer
The Improved Spewer further increases range.
$20 - Cementing Goo
Cementing Goo slows down enemies almost to a halt.

Artillery
Description: Rains powerful long-range explosions down upon the enemy.
Damage: 40, Attack Speed: 40s, Range: 200, Target: Land, Cost: $300, Research: 250R
Upgrades
$25 - Howitzer V1
The Howitzer upgrade increases Artillery range.
$20 - Heavy Rounds
Heavy rounds do more damage to the enemy.
$40 - Stunning Impact
Stunning Impact casuses enemies hit by the Artillery blast to be slowed.
S25 - Howitzer V2
Howitzer V2 increas range even further.
$20 - Super Heavy Rounds
Super Heavy Rounds increase damage even more.
$25 - Wider Blast
Wider Blast increases the explosion radius of each shot.
$15 - Reload Training
Reload Training allows the Artillery to fire faster.
$25 - Devastating Blast
Devastating Blast increases the explosion radius even further.
$15 - Mech Reloader
The Mech Reloader decreases firing speed even further.
$50 - Scorched Earth
Scorched Earth causes each explosion to leave behind a smoldering crater that damaging nearby enemies.

Particle Beam
Description: Ancient technology that fires a particle beam, charging up to do more damage the longer it is focused on an enemy.
Damage: 0.75, Attack Speed: 0.03s, Range: 150, Target: Land & Air, Cost: $250, Research: 220R
Upgrades
$25 - Power Matrix V1
The Power Matrix upgrade increases maximum weapon charge.
$25 - Power Matrix V2
The Power Matrix upgrade increases maximum weapon charge.
$25 - Power Matrix V3
The Power Matrix upgrade increases maximum weapon charge.
$25 - Power Matrix V4
The Power Matrix upgrade increases maximum weapon charge.
$25 - Power Matrix V5
The final Power Matrix upgrade increases maximum weapon charge.
$15 - Anti-Matter V1
Anti-Matter V1 increases Particle Beam armor piercing.
S10 - Improved Focus
Improved Focus increases the range of the Particle Beam.
$15 - Anti-Matter V2
Anti-Matter V2 further increases piercing.
410 - Maximum Focus
maximum Focus increases range even more.
$15 - Anti-Matter V3
Anti-Matter V3 increases armor piercing to the max.

Seismic Thumper
Description: Slams the ground creating a localize earthquake that slows nearby enemies.
Damage: 20, Attack Speed: 2s, Range: 90, Target: Land, Cost: $235, Research: 350R
Upgrades
$10 - Magnitude 5
Magnitude 5 slows effected enemies.
$20 - Magnitude 6
Magnitude 5 further slows effected enemies.
$30 - Magnitude 7
Magnitude 5 slows effected enemies even more.
$40 - Magnitude 8
Magnitude 5 massively slows effected enemies.
$50 - Magnitude 9
Magnitude 5 slows effected enemies to a halt.
$20 - Seismic Shift
Seismic Shift makes Seismic Thumper to do more damage to enemies.
$15 - Bedrock Buster
Bedrock Buster increases the range of each quake.
$10 - Shockwave
The Shockwave upgrade increases the piercing of each quake.
$15 - Crust Cruncher
Crust Cruncher further increases the range of each quake.
$30 - Seismic thrust
Seismic Thrust causes even more damage.

Tesla Tower
Description: Creates bolts of electricity that do massive damage to enemies that are hit.
Damage: 60, Attack Speed: 2.5s, Range: 180, Target: Land & Air, Cost: $300, Research: 375R
Upgrades
$10 - Electrocute
Electrocute increasesthe critical chance of each strike.
$250 - Double Strike
Double Strike causes the Tesla Tower to unleash two electrical strikes.
$10 - Discharge
Discharge further increases critical chance.
$200 - Multi Strike
Multi Strike increases the number of strikes to three.
$10 - Lightning Bolt
Lightning Bolt maximizes the critical chance of each strike.
$30 - Megavolt
The Megavolt upgrade increases Tesla Tower damage.
$15 - Conductor V1
Conductor V1 increases electrical strike armor piercing.
$15 - Conductor V2
Conductor V2 further increases piercing.
$15 - Conductor V3
Conductor V3 increases piercing to the max.
$40 - Gigavolt
The Gigavolt upgrade further increases damage.

Weather Control
Description: Charges to summon a devastating electrical storm over a desired area.
Damage: 1, Attack Speed: 15s, Range: 1, Target: Land & Air, Cost: $300, Research: 400R
Upgrades
$15 - Thunderstorm
Thunderstorm increases the size of the storm.
$25 - Severe class
Severe Class increases the damage the storm does to enemies.
$15 - Supercell
Supercell further increases the size of the storm.
$25 - Destructive Class
Destructive Class increases the damage even more.
$15 - Storm of the Century
Storm of the Century increases the size of the storm to the max.
$25 - Extended Duration
Extended Duration increases the duration the storm exists.
$15 - Shocking V1
Shocking V1 increases the armor piercing of the storm.
$25 - Storm Chain
Storm Chain increases the duration of the storm even more.
$15- Shocking V2
Shocking V2 increases piercing even more.
$25 - Neverending
Neverending increases storm duration to the max.

Nuke Silo
Description: Charges to launch an annihilating thermonuclear missile.
Damage: 300, Attack Speed: 30s, Range: 1, Target: Land & Air, Cost: $400, Research: 500R
Upgrades
$25 - 1MT
1 Megaton increases the explosion radius of the nuclear strike.
$25 - Nuclear Summer
Nuclear Summer massively slow down surviving enemies.
$25 - 2MT
2 Megatons increases the explosion radius further.
$25 - Nuclear Winter
Nuclear Winter temporarily brings surviving enemies to a halt.
$25 - 3MT
3 megatons increases explosion radius to the max.
$25 - Neptunium-237
Neptunium-237 increases damage done by the nuclear strike.
$25 - Fallout v1
The Fallout upgrade increases the armor piercing of a nuclear strike.
$25- Plutonium-239
Plotonium-239 further increases damage.
$25 - Fallout V2
Fallout V2 increases piercing even more.
$25 - Uranium-235
Uranium-235 increases damage even more.

Research Lab
Description: Generates additional research over time.
Damage: 0, Attack Speed: 1s, Range: 0, Cost: $150, Research: 100R

Bank
Description: Earns additional money over time.
Damage: 0, Attack Speed: 1s, Range: 0, Cost: $150, Research: 100R

List of Upgrades in Swarm Defender
More Cash - Get 10% more money for every enemy you kill!, Research: 100R
More Research - get a small amount of research for every enemy you kill!, Research: 100R
Passive Cash - Increase your passive cash gain by $1 per second!, Research: 100R
Passive Research - Increase your passive research gain by 1R per second!, Research: 100R
Core HP - Increase your Core by 500 points!, Research: 250R
Core Damage - Increase your Core damage to 30 per shot!, Research: 300R
Core Regen - Add HP regeneration to your Core!, Research: 250R

Swarm Defender Walkthrough
Level 1 - Unlock Boomer. Build 3 Grunts and 1 Boomer.
Level 2 - Unlock and build 8 Sharpshooters.
Level 3 - Unlock Missile Tower. Build 1 Missile Tower and 6 Sharpshooters
Level 4 - Unlock Flak Cannon. Build 3 Flak Cannons and 6 Sharpshooters
Level 5 - Build 3 Flak Cannons.
Level 6 - Build 4 Flak Cannons.
Level 7 - Build 6 Flak Cannons.
Level 8 - Build 18 Flak Cannons.
Level 9 - Build 8 Flak Cannons.
Level 10 - Build 10 Flak Cannons.
Level 11 - Unlock Artillery. Build 6 Flak Cannons and 6 Artilleries.
Level 12 - Build 10 Flak Cannons and 15 Artilleries.
Level 13 - Unlock Waste Spewer. Build 2 Waste Spewers and 10 Flak Cannons.
Level 14 - Build 1 Waster Spewer, 7 Flak Cannons and 4 Artilleries.
Level 15 - Build 2 Waster Spewer, 16 Flak Cannons and 11 Artilleries.
Level 16 - Unlock Nuke Silo. Build 2 Waster Spewer, 16 Flak Cannons, 13 Artilleries and 5 Nuke Silo. >:D

Flak Cannons, Flak Cannons, Flak Cannons. Flak cannons seem unimpressive at first, but they do a ton of damage per shot, and if they shoot at something big and/or close to them, it's like a shotgun... Multiple shards hit it, doing multiple hits of damage and imagine a couple more waste spewer to handle swarms. Really, you can't go wrong with Flak Cannons! Please be noted that all upgrades are temporary. If you find it are too expensive for you early on then don't buy them. Later in the game when you have tons of research and no new towers to unlock, they will be extremely cheap.

>> Download Swarm Defender Level Guide Now!

Monday, May 26, 2014

Ernesto - A Quick RPG Walkthrough Guide

Ernesto - A Quick RPG
Ernesto A Quick RPG Logo

Play Online: Ernesto - A Quick RPG
Developer: Daniel Benmergui
Genre: Adventure, RPG

Ernesto - A Quick RPG Guide
Ernesto - A Quick RPG Walkthrough
For Any Floor: Reveal All Traps.
Reach the oracle safely, watch carefully and remember the traps. Start over and chose another entry if required, or you choose to trial and error. All you need is at least 3 health points to check for traps. Just remember that you can redo any action, so just click the space before the pit to reverse the damage.

First Floor: Immune to Poison.
Level up by fighting a few bats, then grab a few health packs. Now fight against a snake, then get an antidote as soon as possible. You will be gaining immunity to all poisons. This effectively makes poison gas a non-issue, and it allows you to steamroll the otherwise scary snakes.

Second Floor: Time to Killing Spree!
Level up a bit, and get tools early. Doing this will allow you to walk through traps and better deal with later foes. Fight against the Golem with the Golem Killer preferably. You should be clearing as much of the map as possible in second stage.

Third floor: Prepared Well.
Don't get the disguise on this floor first. It's always better to fight Dungeon God Fanatics because they give lots of XP. Afterwards, make sure you have the Sereverance aka 'The God Killer' before you leave and have more than 6 health points. Try grabbing the Templar Outfit to dodge the fight against them in the fourth floor.

Final Floor: Nailed It!
Check if you have The God Killer, lots of health, and high attack power? Grab the healing potions if needed and you should be fine. ^^

Friday, May 23, 2014

Cerberus: Lord of the Underworld Walkthrough Guide

Cerberus: Lord of the Underworld
Cerberus Lord of the Underworld Logo

Play Online: Cerberus: Lord of the Underworld
Developer: Lance Knifehand
Genre: Upgrades, Shooter

Cerberus: Lord of the Underworld Guide
List of Upgrades in Cerberus: Lord of the Underworld
Vigor
Hide - Take 1 extra hit before dying or shrinking.
Bomb - Unleash a powerful explosion on click.
Hide II - Take 1 extra hit before dying or shrinking.
Spicy Meat - Unlock exploding fireballs.
Hide III - Take 1 extra hit before dying or shrinking.
Growth - Start off one size larger and faster with an extra shot.
Hide IV - Take 1 extra hit before dying or shrinking.
Nutritious Meat - Unlock homing fireballs.
Growth II - Start off one size larger and faster with an extra shot.
Bomb Invuln - Gain invulnerability for 2 seconds when using bomb.
Hide V - Take 1 extra hit before dying or shrinking.
Hide VI - Take 1 extra hit before dying or shrinking.
Growth III - Start off one size larger and faster with an extra shot.
Filling Meat - Unlock rapid-fire fireballs.
Hide VII - Take 1 extra hit before dying or shrinking.
Hide VIII - Take 1 extra hit before dying or shrinking.
Hide IX - Take 1 extra hit before dying or shrinking.
Bomb heal - Heal 50% of your max health every time bomb is used.

Tenacity
Fireball - Shoot 2 additional fireballs.
Sprint - Run like the wind! Run fast as you avoid damage.
More Souls - Enemies drop twice as many souls on death.
Soul Forge - Earn 1 soul every time you shoot.
Fireball II - Shoot 2 additional fireballs.
Bonus Souls - Each achievement gives a bonus + 3% to all souls gained.
Soul Efficiency - Earn 5% more souls and enemies spawn 5% faster.
Cheat Death - Earn free souls when you die.
Bonus Souls II - Each achievement gives a bonus + 5% to all souls gained.
Flock - Imps are worth 25 more when killed for each enemy upgrade.
Fast Shot - Your fireballs shoot faster.
Soul Efficiency II - Earn 10 more souls and enemies shoot 10% faster.
Hunger - Feeding frenzies appear 25% more often.
Bonus Souls III - Each achievement give a bonus + 8% to all souls gained.
Horde - Imps are worth 50 more when killed for each other enemy upgrade.
Fireball III - Shoot 2 additional fireballs.
Ravage - feeding frenzies appear 25% more often.
Soul Efficiency III - Earn 15% more souls.
Swarm - Imps are worth 125 more when killed for each other enemy upgrade.
Bomb Recharge - Bomb recharges 25% faster.

Prey
Imp - Imps are worth X souls.
2x/4x/8x Imp - Imps are worth double.
Medusa - Medusa are worth X souls.
2x/4x/8x Medusa - Medusas are worth double.
Magnet - Souls are drawn towards you and are worth 1 more.
Minotaur - Minotaurs are worth X souls.
2x/4x/8x Minotaur - Minotaur are worth double.
Charon - Charon are worth X souls.
2x/4x/8x Charon - Charon are worth double.
Magnara - More souls are drawn towards you and are worth 5 more.
Nightmare - Nightmare are worth X souls.
Erinyes - Erinyes are worth X souls.
2x/4x Cyclops - Cyclops are worth double.
2x/4x Erinyes - Erinyes and the souls earned from shooting are doubled.
Magnetaga - All souls are drawn towards you and are worth 25 more.
Cyclops - Cyclops are worth X souls.
2x/4x Nightmare - Nightmares are worth double.
Chimera - Chimera are worth X souls.
2x/4x Chimera - Chimeras are worth double.
Rampage - Destroy any enemy by running into them.

Recommended Build for Cerberus: Lord of the Underworld
Note: Buy the cheapest enemy's upgrade with any leftover souls.
1. Bomb
2. Sprint
3. 2x Imp
4. Fireball
5. Soul Forge
6. More Souls
7. Hide
8. Soul Efficiency
9. 4x Imp
10. Hide II
11. 8x Imp
12. Fireball II
13. Flock
14. Spicy Meat
15. Hide III
16. Growth
17. Bonus Souls
18. Bonus Souls II
19. Fast Shot
20. Cheat Death
21. Soul Efficiency
22. Magnet
23. Nutritious Meat
24. 2x Medusa
25. Hide IV
26. Hide V
27. 2x Minotaur
28. 4x Medusa
29. 8x Medusa
30. Growth II *Optional*
31. 4x Minotaur
32. 8x Minotaur
33. Growth III *Optional*
34. Filling Meat
35. Horde
36. Hide VI
37. Magnara
38. Magnetaga
39. Bomb Invuln
40. Hunger
41. Bonus Souls III
42. Fireball III
43. Soul Efficiency III
44. Swarm
45. Hide VII
46. Hide VIII
47. Hide IX
48. Ravage
49. 2x Charon
50. 4x Charon
51. 8x Charon
52. 2x Cyclops
53. 4x Cyclops
54. 2x Erinyes
55. 4x Erinyes
56. 2x Nightmare
57. 4x Nightmare
58. 2x Chimera
59. 4x Chimera
60. Rampage
61. Bomb Heal
62. Bomb Recharge

Cerberus: Lord of the Underworld Walkthrough
The different colors of meat represent different bonuses you get from them:
- Red/White meat = 1 normal bullet.
- Orangish tinted meat = 1 fireball bullet.
- Purple tinted meat = 3 normal bullets aka rapid fire.
- Blue/Black meat = 1 homing bullet.

The trick is to only grab the rapid fire or the homing bullet meat because those are the best bonuses. Think carefully when buying the 'Growth' ability because it starts you off with random bonuses which makes it harder to win the game. And sometimes I wish I grew smaller because I was such an easy target for the enemies. Also, try and break the rocks right when they show up on the screen, but stay near the middle of the screen. Make sure to stay away from the Minotaur because he can easily kill you at close range. Lastly, Bomb Invuln and Rampage seem to be good a combo against bosses! Just launch your bomb and ram into anything while still invulnerable. I hope this helps! :)

Tuesday, May 20, 2014

Dude and Zombies Walkthrough Guide

Dude and Zombies
Dude and Zombies Logo

Play Online: Dude and Zombies
Developer: FunCrow
Genre: Action, Shooter

Dude and Zombies Guide
List of Weapons in Dude and Zombies
Pistol - Ammo: 8, Cost: Free
Revolver - Ammo: 6, Cost: 50
Winchester - Ammo: 2, Cost: 200
Uzi - Ammo: 30, Cost: 500
Mossberg - Ammo: 6, Cost: 900
Ak-47 - Ammo: 30, Cost: 1400
M16 - Ammo: 30, Cost: 2000
Striker - Ammo: 12, Cost: 3000
Spitfire - Ammo: 60, Cost: 4500
Minigun - Ammo: 60, Cost: 6000
First Aid Kit - Restores your health by 50 / 75 / 100 / 150 HP, Cost: 100
Personal Mine - Injures zombies next to it, Cost: 200

List of Skills in Dude and Zombies
Regeneration I - Restores 2 HP once in 5 seconds, Cost: 1 point
Regeneration II - Restores 4 HP once in 5 seconds, Cost: 2 points
Regeneration III - Restores 6 HP once in 5 seconds, Cost: 3 points

Medicine I - First aid kit restores your health by 75 HP, Cost: 1 point
Medicine II - First aid kit restores your health by 100 HP, Cost: 2 points
Medicine III - First aid kit restores your health by 150 HP, Cost: 3 points

Accuracy I - Increases target accuracy by 30%, Cost: 1 point
Accuracy II - Increases target accuracy by 60%, Cost: 2 points
Accuracy III - Increases target accuracy by 100%, Cost: 3 points

Fast Reload I - Accelerates reloading by 0.6 seconds, Cost: 1 point
Fast Reload II - Accelerates reloading by 1.2 seconds, Cost: 2 points
Fast Reload III - Accelerates reloading by 1.8 seconds, Cost: 3 points

Businessman I - You get $5 more for killing a zombie, Cost: 1 point
Businessman II - You get $10 more for killing a zombie, Cost: 2 points
Businessman III - You get $15 more for killing a zombie, Cost: 3 points

Quick Learner I - You get 5 XP more for killing a zombie, Cost: 1 point
Quick Learner II - You get 10 XP more for killing a zombie, Cost: 2 points
Quick Learner III - You get 15 XP more for killing a zombie, Cost: 3 points

Repair I - Car repair increases by 30%, Cost: 1 point
Repair II - Car repair increases by 60%, Cost: 1 points
Repair III - Car repair increases by 100%, Cost: 1 points

Car Durability I - Durability of the car increases to 150, Cost: 1 point
Car Durability II - Durability of the car increases to 200, Cost: 2 points
Car Durability III - Durability of the car increases to 300, Cost: 3 points

Recommended Build for Dude Zombies
Skill
1. Businessman I
2. Quick Learner I
3. Businessman II
4. Quick Learner II
5. Businessman III
6. Quick Learner I
7. Regeneration I
8. Fast Reload I
9. Regeneration I
10. Fast Reload II
11. Regeneration I
12. Fast Reload III
13. Accuracy I
14. Accuracy II
15. Accuracy III
16. Add anything you like!

Weapon
1. Handgun
2. Uzi
3. M16
4. Minigun

Dude and Zombies Walkthrough
In Dude and Zombies, money is the key to survival. Leveling does not help you survive nearly as much as buying a better gun, more first aid kits, and land mines. Start the game by repairing the truck until the first rabbit gets near you. Fire the whole clip at him and immediately start repairing again, once you're reloading. Continue this process until you are either forced to flee from attackers or you need to get the parts. The hand gun will get you very far, if you use it right.

Once you have the door on the truck you should be able to afford the Uzi, if not, save your money until you can. Be sure to keep healing yourself as needed. Don't hesitate, just buy! Once you have the Uzi, you should be able to hold off on buying anything else until you can afford the M16. Then I didn't upgrade again until I had enough for the minigun, but normally I will complete the game without minigun.

Pro-Tip: If the big guys are giving you a hard time, take out their knees and they fall, making them much slower. Land mines also take out the legs, and can kill the birds at close range.

Saturday, May 17, 2014

Notebook Space Wars 2 Walkthrough Guide

Notebook Space Wars 2
Notebook Space Wars 2 Logo

Play Online: Notebook Space Wars 2
Developer: Francisco Ferreres
Genre: Action, Shooter

Notebook Space Wars 2 Guide
List of Spaceship in Notebook Space Wars 2
Tier 1
Ship 1 - Armor: 35, Speed: 4, Magnet: 50, Slots: 1, Price: 200

Tier 2
Ship 1 - Armor: 85, Speed: 5, Magnet: 80, Slots: 1, Price: 558
Ship 2 - Armor: 145, Speed: 2, Magnet: 110, Slots: 1, Price: 639
Ship 3 - Armor: 90, Speed: 5, Magnet: 95, Slots: 1, Price: 625

Tier 3
Ship 1 - Armor: 190, Speed: 5, Magnet: 150, Slots: 2, Price: 3135
Ship 2 - Armor: 270, Speed: 3, Magnet: 275, Slots: 3, Price: 6789
Ship 3 - Armor: 210, Speed: 4, Magnet: 230, Slots: 2, Price: 3356

Tier 4
Ship 1 - Armor: 570, Speed: 5, Magnet: 350, Slots: 4, Price: 34670
Ship 2 - Armor: 320, Speed: 7, Magnet: 290, Slots: 3, Price: 14356
Ship 3 - Armor: 430, Speed: 6, Magnet: 450, Slots: 3, Price: 16560

Tier 5
Ship 1 - Armor: 890, Speed: 8, Magnet: 520, Slots: 3, Price: 26568
Ship 2 - Armor: 730, Speed: 7, Magnet: 610, Slots: 4, Price: 64590

List of Addons in Notebook Space Wars 2
Magnet - Price: 75, Effect: Improves coin attraction by 30.
Metal Plate - Price: 250, Effect: Gives 20% more armor.
Turbo - Price: 135, Effect: Increment your speed by 1.
Money Printer - Price: 700, Effect: Enemies give 50% more money.
Damage Amplifier - Price: 1057, Effect: Your weapons do 15% more damage.
Fighter Drone - Price: 1200, Effect: Helps you shoot at enemies.
Healing Drone - Price: 1300, Effect: Slowly repairs you.

List of Weapons in Notebook Space Wars 2
Laser Gun - Price: 100
Level 1 - Damage: 5, Speed: 28, DPS: 11.36
Level 15 - Damage: 10, Speed: 28, DSP: 22.73

Machinegun - Price: 150
Level 1 - Damage: 5, Speed: 30, DPS: 12.5
Level 15 - Damage: 10, Speed: 30, DSP: 25

Plasma Gun - Price: 355
Level 1 - Damage: 10, Speed: 32, DPS: 22.78
Level 15 - Damage: 18, Speed: 32, DSP: 50

Snowball Canon - Price: 517, Effect: Freezes enemies.
Level 1 - Damage: 18, Speed: 20, DPS: 30
Level 15 - Damage: 34, Speed: 20, DSP: 56.67

ElectroNail Gun - Price: 496
Level 1 - Damage: 13, Speed: 30, DPS: 32.5
Level 15 - Damage: 24, Speed: 30, DSP: 60

Miniplasma Launcher - Price: 598
Level 1 - Damage: 14, Speed: 34, DPS: 43.75
Level 15 - Damage: 26, Speed: 34, DSP: 81.25

Titanium Machinegun - Price: 623
Level 1 - Damage: 17, Speed: 30, DPS: 42.5
Level 15 - Damage: 32, Speed: 30, DSP: 80

Incendiary Shrapnel - Price: 715, Effect: Puts enemies on fire.
Level 1 - Damage: 21, Speed: 22, DPS: 37.5
Level 15 - Damage: 40, Speed: 22, DSP: 71.43

High Energy Laser - Price: 1014, Effect: Instant laser!
Level 1 - Damage: 27, Speed: 28, DPS: 61.37
Level 15 - Damage: 50, Speed: 28, DSP: 113.64

Rocket Launcher - Price: 1023
Level 1 - Damage: 61, Speed: 5, DPS: 67.78
Level 15 - Damage: 114, Speed: 5, DSP: 126.67

Ultra Laser Gun - Price: 1567
Level 1 - Damage: 32, Speed: 30, DPS: 80
Level 15 - Damage: 60, Speed: 30, DSP: 150

Energy Canon - Price: 1735
Level 1 - Damage: 66, Speed: 10, DPS: 82.5
Level 15 - Damage: 124, Speed: 10, DSP: 155

Rocket Spreader - Price: 3200
Level 1 - Damage: 27, Speed: 38, DPS: 112.5
Level 15 - Damage: 50, Speed: 38, DSP: 208.33

Napalm Bombs - Price: 2350, Effect: Puts enemies in range in fire.
Level 1 - Damage: 42, Speed: 22, DPS: 75
Level 15 - Damage: 70, Speed: 22, DSP: 125

Gauss Gun - Price: 4168, Effect: Goes through enemies
Level 1 - Damage: 68, Speed: 20, DPS: 113.33
Level 15 - Damage: 128, Speed: 20, DSP: 213.33

Dark Matter Gun - Price: 11590
Level 1 - Damage: 107, Speed: 35, DPS: 356.67
Level 15 - Damage: 200, Speed: 35, DSP: 666.67

Sonic Wave Gun - Price: 3780
Level 1 - Damage: 50, Speed: 30, DPS: 125
Level 15 - Damage: 94, Speed: 30, DSP: 235

Grenade Launcher - Price: 4590, Effect: Explodes into shrapnel.
Level 1 - Damage: 43, Speed: 32, DPS: 119.44
Level 15 - Damage: 80, Speed: 32, DSP: 222.22

Plasma Spreader - Price: 5120
Level 1 - Damage: 45, Speed: 35, DPS: 150
Level 15 - Damage: 84, Speed: 35, DSP: 280

Homing Missiles - Price: 10050, Effect: They follow the enemies.
Level 1 - Damage: 103, Speed: 34, DPS: 321.88
Level 15 - Damage: 194, Speed: 34, DSP: 606.25

Meteor Canon - Price: 59800
Level 1 - Damage: 213, Speed: 40, DPS: 1065
Level 15 - Damage: 400, Speed: 40, DSP: 2000

Angry Pigs Gun - Price: 26500
Level 1 - Damage: 213, Speed: 28, DPS: 484.09
Level 15 - Damage: 400, Speed: 28, DSP: 909.09

Lighting Gun - Price: 31700
Level 1 - Damage: 160, Speed: 35, DPS: 533.33
Level 15 - Damage: 300, Speed: 35, DSP: 1000

Megaplasma Canon - Price: 32740, Effect: The explosion affects enemies in range.
Level 1 - Damage: 267, Speed: 20, DPS: 445
Level 15 - Damage: 500, Speed: 20, DSP: 833.33

Laser Spreader - Price: 12020
Level 1 - Damage: 61, Speed: 42, DPS: 381.25
Level 15 - Damage: 114, Speed: 42, DSP: 712.5

Lighting Spreader - Price: 21500
Level 1 - Damage: 69, Speed: 42, DPS: 431.25
Level 15 - Damage: 130, Speed: 42, DSP: 812.5

Gatlin Gun - Price: 42840
Level 1 - Damage: 107, Speed: 44, DPS: 891.67
Level 15 - Damage: 200, Speed: 44, DSP: 1666.67

Notebook Space Wars 2 Walkthrough
As far as weapons & ships go, I suggest buying 4 magnets for your starter ship. Save every coin you earn for High Energy Laser first, then buy the cheapest tier 3 ship with 3 weapon slots at 6.5k. Afterwards, your only focus is to buy Homing Missiles first and tier 5 ship with 4 weapon slots next. Only bosses pose some challenge even with 4 slots Homing Missiles. Just dodge any incoming projectiles and you will be fine. I suggest getting 4 Money Printer as add-ons. Once done, you can just buy whatever you want with a little farming.

For survival mode, it does get harder as you go on, each loop increases the HP of the enemies. Problem is a fully upgraded ship will pretty much destroy like 10+ loops before anything poses a problem. It's an extreme endurance test. I will highly recommend getting 2 Healing Drones and 2 Damage Amplifiers as add-ons. For Arcade mode, The key to Arcade mode is to be really, really aggressive early. Don't miss a single enemy, and use bombs on the meteors. The stronger you get early, the simpler it is as you progress.

Wednesday, May 14, 2014

Dead Zed 2 Walkthrough Guide

Dead Zed 2
Super Mega Ultra Battle Robot 2.0 Logo

Play Online: Dead Zed 2
Developer: 3KG Games
Genre: Defense, Shooter

Dead Zed 2 Guide
List of Locations in Dead Zed 2
Town 1
Warehouse - Abandoned Warehouse
Might Find: Survivors, Hunting Weapons | Cost: 15
Residence 1 - Looks like no-one's home.
Might Find: Survivors, Hunting Weapons | Cost: 25
Residence 2 - The windows are barricaded.
Might Find: Survivors | Cost: 40
Residence 3 - Luxury, 3-storey building, lights are on.
Might Find: Survivors, Rifle, Hunting Weapons | Cost: 70
Residence 4 - The house is on sale, though someone broke in.
Might Find: Survivors, Handguns | Cost: 90
Business Center - A small local office building.
Might Find: Survivors, Handguns | Cost: 100
Restaurant - Seems like no-one inside survived.
Might Find: Handguns, SMG | Cost: 130
Town Hall - Security guards had weapon, worth checking out.
Might Find: Survivors, Handguns | Cost: 130
Church - An old church, probably it was used as a shelter, might find some survivors.
Might Find: Survivors | Cost: 160
Mayor's Residence - A really nice place!
Might Find: Survivors, Rifle | Cost: 210
Convenience Store - Windows are barricaded. Could find people inside.
Might Find: Survivors, SMG | Cost: 250

Town 2
Hospital - Probably the place where it all started.
Might Find: Survivors | Cost: 220
Residence 1 - There was a shootout in the front yard.
Might Find: Assault Rifles, SMG | Cost: 250
Residence 2 - Looks like this one is a hoarder...
Might Find: Survivors, Rifles | Cost: 275
Residence 3 - The windows are boarded.
Might Find: Survivors | Cost: 280
Residence 4 - The swimming pool in the backyard trapped a few zombies.
Might Find: SMG, Assault Rifles, Survivors | Cost: 300
Residence 5 - A human body lays on the lawn, both legs missing.
Might Find: Survivors, SMG | Cost: 270
Residence 6 - A small place crash-landed right through the roof, I wonder if anyone survived.
Might Find: Assault Rifle | Cost: 360
Fire Station - The last fire was in 1959. If anyone survived, they probably bored to death.
Might Find: Survivors, SMG, Assault Rifles | Cost: 400
Weapon Store - This probably the first place that was looted in this town.
Might Find: Assault and Hunting Rifles | Cost: 330
Town Mall - A large building with lots of goods.
Might Find: Survivors, Hunting Rifle | Cost: 230
Police Station - Most officers had to deal with the first wave of attacks and were the first to turn.
Might Find: Assault Rifle | Cost: 325

Town 3
Residence 1 - A luxury house with a swimming pool on the roof.
Might Find: Survivors, Assault Rifles | Cost: 310
Residence 2 - A 3-storey building, why would you need so much space?
Might Find: Survivors | Cost: 350
Residence 3 - This one has a Helipad on the roof. No helicopter though...
Might Find: Assault Rifles | Cost: 370
Residence 4 - The door is barricaded from the outside. Something definitely tried to get out...
Might Find: Assault Rifle | Cost: 400
Residence 5 - This one was recently sold, the folks moved in just a few days ago.
Might Find: Grenade Launcher, Survivors | Cost: 410
Residence 6 - A car went right through the garage door.
Might Find: Weapons | Cost: 430
Residence 7 - Sheriff's residence worth checking out.
Might Find: Machinegun, Survivors | Cost: 435
Motel Suit 1 - Generic 1-storey building.
Might Find: Assault Rifle | Cost: 460
Motel Suit 2 - The lights are on and someone's moving inside.
Might Find: Machinegun | Cost: 470
Motel Suit 3 - Windows are broken, blood and bodies all over the place.
Might Find: Machinegun, Grenade Launcher | Cost: 490
Motel Suit 4 - Managers office.
Might Find: Machinegun | Cost: 495
Motel Suit 5 - A generic building.
Might Find: Survivors, Grenade Launcher | Cost: 500
Motel Suit 6 - The windows are boarded.
Might Find: Survivors | Cost: 505

List of Weapons in Dead Zed 2
Bow | Damage: 4, Fire Rate: 1, Recoil: 0, Accuracy: 2, Magazine Size: -, Fire Mode: -
Crossbow | Damage: 5, Fire Rate: 1, Recoil: 0, Accuracy: 3, Magazine Size: -, Fire Mode: -
M9 | Damage: 2, Fire Rate: 3, Recoil: 3, Accuracy: 1, Magazine Size: 15, Fire Mode: Semi
Colt Python | Damage: 4, Fire Rate: 3, Recoil: 4, Accuracy: 2, Magazine Size: 6, Fire Mode: Semi
Ingram | Damage: 2, Fire Rate: 5, Recoil: 4, Accuracy: 1, Magazine Size: 32, Fire Mode: Full Auto
MP5 | Damage: 2, Fire Rate: 3, Recoil: 2, Accuracy: 2, Magazine Size: 32, Fire Mode: Semi/Full Auto
Springfield | Damage: 4, Fire Rate: 1, Recoil: 3, Accuracy: 4, Magazine Size: 8, Fire Mode: Bolt Action
Remington | Damage: 5, Fire Rate: 1, Recoil: 3, Accuracy: 5, Magazine Size: 8, Fire Mode: Bolt Action
Ak-47 | Damage: 3, Fire Rate: 3, Recoil: 3, Accuracy: 3, Magazine Size: 30, Fire Mode: Semi/Full Auto
M4 | Damage: 3, Fire Rate: 4, Recoil: 2, Accuracy: 4, Magazine Size: 30, Fire Mode: 3 Burst/Full Auto
FAMAS | Damage: 3, Fire Rate: 4, Recoil: 3, Accuracy: 4, Magazine Size: 25, Fire Mode: Semi/Full Auto
Steyr AUG | Damage: 3, Fire Rate: 3, Recoil: 2, Accuracy: 5, Magazine Size: 30, Fire Mode: Semi/Full Auto
SCAR | Damage: 4, Fire Rate: 3, Recoil: 4, Accuracy: 3, Magazine Size: 20, Fire Mode: Semi/Full Auto
M79 | Damage: 5, Fire Rate: 1, Recoil: 2, Accuracy: 1, Magazine Size: 1, Fire Mode: Single Round
PKM | Damage: 4, Fire Rate: 3, Recoil: 4, Accuracy: 3, Magazine Size: 100, Fire Mode: Full Auto
M249 | Damage: 3, Fire Rate: 4, Recoil: 3, Accuracy: 4, Magazine Size: 200, Fire Mode: Full Auto

List of Upgrades in Dead Zed 2
Floodlights - Installs lights to illuminate the yard during the night.
Effect: Better Visibility during night time. | Cost: 150
Stronger Barricades - Use stronger material for barricades.
Effect: Barricades last longer. | Cost: 200
Explosives Lab - Set up an improvized explosives manufacturing.
Effect: Ability to build and use explosive devices. | Cost: 250
Radiostation - Set up a radio station to inform survivors of your location.
Effect: Chances of finding survivors is 25% higher. | Cost: 300

Recommended Build for Dead Zed 2
Town 1
Route
1. Warehouse
2. Residence 1
3. Residence 3
4. Residence 2
5. Residence 4
6. Restaurant
7. Mayor's Residence
8. Town Hall
9. Business Center
10. Convenience Store
11. Church

Best Weapon of Choice
- Springfield & Crossbow
- MP5 & Springfield
- MP5 & Colt Python

Town 2
Route
1. Residence 2
2. Residence 1
3. Hospital
4. Town Mall
5. Residence 5
6. Residence 3
7. Residence 4
8. Fire Station
9. Police Station
10. Weapon Store
11. Residence 6

Best Weapon of Choice
- Remington & Springfield
- Remington & M4
- M4 & AK-47

Town 3
Route
1. Motel Suit 4
2. Motel Suit 3
3. Motel Suit 2
4. Residence 2
5. Residence 1
6. Residence 7
7. Motel Suit 6
8. Residence 5
9. Motel Suit 5
10. Motel Suit 1
11. Residence 6
12. Residence 3
13. Residence 4

Best Weapon of Choice
- M79 & PKM
- M79 & M249
- PKM & M249

Dead Zed 2 Walkthrough
In Dead Zed 2, each survivor comes with 3 skills; Shooting, Melee and Searching. You can assign them into groups based on their skills. For Shooter group, it's based on Shooting skill, Melee group is based on Melee. Search Party is a little tricky here; The size and melee skill of the group determines the group visibility. If the group is spotted, shooting and Melee skill will determine the survival of each member. Search Skill determines the chance of finding valuable loot.

With this information, I can safely say the most important skill is melee! Searching skill is far less important in my opinion. Only put people with a high Melee skill in that group, ideally someone with 1/3/2 and never put more than 4 people in it. The ideal group of 4 people with 1/3/2 has 60% 80% 85%. Putting more people in that group only slightly raises the chance to find stuff, but radically lowers the chance to go unnoticed.

Only with high Melee, you can keep the survivors alive and don't take Morale penalties. Once you run into the first disastrous search where two or more people die... The game is over. The morale lost, and valuable survivors being lost, you can't recover. Why? Each civilian is worth -30 on death, and you gain about 15 from a full item haul, and what you get from searching/how efficient everyone is, is based on moral. You end up in a negative loop.

In actual shooting, for the people having difficulty aiming; try using weapons with single fire mode like Steyr AUG, AK-47, Remington. Use them to get as much headshots as possible. Also, to get a personal assistant as soon as possible it will help a lot. Just switch weapon when it's empty, don't bother reloading by yourself. Lastly, spam rage mode! >:D

Sunday, May 11, 2014

Trollface Quest 4: Winter Olympics Walkthrough Guide

Trollface Quest 4: Winter Olympics
Trollface Quest 4 Winter Olympics Logo

Play Online: Trollface Quest 4: Winter Olympics
Developer: PPLLAAYY Games
Genre: Puzzle

Trollface Quest 4: Winter Olympics Guide
Solution to Trollface Quest 4: Winter Olympics
1: Click the smile in the clouds.
2: Drag the target closer then click the shooter.
3: Drag the center cloud right to reveal the sun.
4: Spam click on the little guy.
5: Click troll, then click ice skater.
6: Click and drag him.
7: Click and hold. Click again after he stop in mid-air and drag him to the finish point.
8: Click the CD player, click the bug disk and get rid of it to the left of screen, click the CD, click troll.
9: Click on all little dope pills except the bottle with '!!!' There are 7 in total then click troll.
10: Click on crane at the middle left of screen, which extend his legs and jump through. Click troll.
11: Click on the crowd, then troll. Repeat 3 times.
12: Click on black big counter, then click on troll's head.
13: Click on Finish to changed it to Limbo, then click the troll in crowd (wearing sunglasses) then click troll.
14: Click little star in bottom right, then troll.
15: Click on the thing on his back(a Pump) then click the weight.
16: Click on SwordFish, then base of the mast(the stick) on opponents boats, repeat 3 times, then click on trolls boat.
17: Click twice on speed-o-meter then on bobsled.
18: Click on the left and right I from the III to remove them.
19: Click on the stick tree(upper right) then set the stick on fire, then click on troll.
20: Click on the feather from the troll's head.

Thursday, May 8, 2014

Trollface Quest 3 Walkthrough Guide

Trollface Quest 3
Trollface Quest 3 Logo

Play Online: Trollface Quest 3
Developer: PPLLAAYY Games
Genre: Puzzle

Trollface Quest 3 Guide
Solution to Trollface Quest 3
1: Click to move the car, click again to stop when the nuke comes. Drag the mine downwards, then click to move again.
2: Click on the 'me' at the menu button at the top right corner.
3: Click on girl then click on the guy's mouth.
4: Drag the face to flag. Then, repeat but in reverse direction.
5: Click on the guy before the bridge breaks.
6: Click on the small rock surrounded by a piles of rock around bottom right corner.
7: Drag the guy to the right. Click the man.
8: Click on the small tree branch at the top and exactly in the middle of the tree
9: Click on the hole. Then, click the bird multiple times.
10: Click the guy before he reaches the wall.
11: Click 8, 7, 6, 5 two times, then 'Call' button.
12: Click the first doll then, click the small tip at the top of the bottom part of the first doll.
13: Click the left watering can twice, then click the poison.
14: Click the right branch on the tree three times.
15: Click to open the cover. Click and hold the gears.
16: Drag the finish line to the guy.
17: Find and click on bricks, its says "I'm Dumb".
18: Click on coconut until it falls. Then, click the crab in the sea.
19: Click on the TV, then click the lowest right button in the cloud bubble.
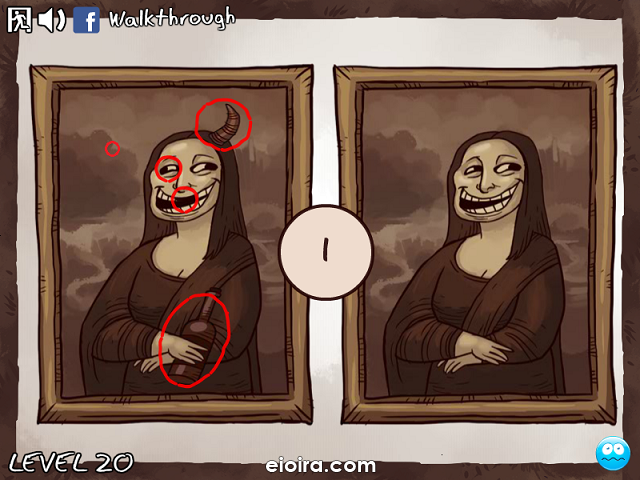
20: Click on the horn, left eye, missing teeth and bottle first. Then click on the single pixel on the left in the background scenery. (Picture below)

Trollface Quest 3 - Level 20
Trollface Quest 3 Level 20

Monday, May 5, 2014

Trollface Quest 2 Walkthrough Guide

Trollface Quest 2
Trollface Quest 2 Logo

Play Online: Trollface Quest 2
Developer: PPLLAAYY Games
Genre: Puzzle

Trollface Quest 2 Guide
Solution to Trollface Quest 2
1: Click the keyhole of the cage bottom middle.
2: Click all stars on the sign, then click on the guy.
3: Click on the guy's eyes. Click camera.
4: Click on the guy. click on moon as cloud appears.
5: Click on bottom of curtain on the right. click on knob that appears.
6: Click on the small bump near the chair leg on the roof.
7: Click on the two knobs on the side of the machine, then click on the moving part of the conveyor belt.
8: Click on the moon, the bird and the frog once. Click on the bait.
9: Drag the guy down.
10: Match all cards. In the end, click the troll face card and click on the guy's face.
11: Click on the bottom end of the toffee.
12: Click on the guy as soon as he appears.
13: Click on the black area inside the sharks mouth. Click on the guy.
14: Click on the raised part somewhere on the middle top of the digital clock. click again.
15: Click on the thermometer, when the guy is normal, click on door.
16: Click inside troll's right nostril.
17: Click and hold the guy on the washing machine.
18: Click on manual. Keep clicking on the middle of each bar until you get a troll combo.
19: Click on any one of the glasses twice. then click on the bottle with the bird picture on it.
20: Click on the guy's eyes.

Friday, May 2, 2014

Free Fred Walkthrough Guide

Free Fred
Free Fred Logo

Play Online: Free Fred
Developer: Denis Vasilev
Genre: Action, Shooter

Free Fred Guide
List of Upgrades in Free Fred
First Ship
Machine Gun
Cost: 80 / 120 / 180 / 250 / 400
Health
Cost: 80 / 120 / 180 / 250 / 400

Second Ship
Homing Missile
Cost: 300 / 400 / 500 / 700 / 1000
Machine Gun
Cost: 350 / 500 / 600 / 800 / 1100
Torpedo
Cost: 300 / 400 / 500 / 700 / 1000
Health
Cost: 300 / 400 / 500 / 700 / 1000

Third Ship
Aid Helicopter
Cost: 500 / 700 / 900 / 1100 / 1500
Homing Missile
Cost: 500 / 700 / 900 / 1100 / 1500
Machine Gun
Cost: 500 / 700 / 900 / 1100 / 1500
Cannon
Cost: 500 / 700 / 900 / 1100 / 1500
Torpedo
Cost: 500 / 700 / 900 / 1100 / 1500
Health
Cost: 500 / 700 / 900 / 1100 / 1500

Recommended Build for Free Fred
First Ship
1. Machine Gun
2. Health
3. Repeat!

Second Ship
1. Machine Gun
2. Homing Missile
3. Torpedo
4. Health
5. Repeat!

Third Ship
1. Machine Gun
2. Homing Missile
3. Torpedo
4. Cannon
5. Health
6. Aid Helicopter
7. Repeat!

Free Fred Walkthrough
Heyhey! Free Fred is a satisfying casual shooter, I completed the game in 23mins. Not much strategy, skill, or tactics required; enemies attack, new ships come in, more enemies attack, defeat is inevitable, but each contributes to the ultimate victory... Actually, you don't have to unlock every upgrade for your first and second ship. Just purchase enough upgrades for you to survive, so you can find new ships. Most of time, I'll target air units first because they are generally harder to aim. The boss at the end isn't very hard, try to aim the missile launchers and machine guns first. Everything else will be a breeze! Good luck.