Wednesday, December 25, 2013

Zombies Ate My Motherland Walkthrough Guide

Zombies Ate My Motherland
Zombies Ate My Motherland Logo

Play Online: Zombies Ate My Motherland
Developer: Ilia Matrosov & Naram
Genre: Action, Shooter

Zombies Ate My Motherland Guide
List of Weapons in Zombies Ate My Motherland
Makarov Pistol - Nice and simple.
Type: First Weapon
Cost: 1

Axe - Kills weak zombies instantly.
Type: Second Weapon
Cost: 1

Grenade - The best choice for killing groups of zombies.
Type: Third Weapon
Cost: 1

Compass - Shows the direction to the box.
Type: Optional
Cost: 10

Brown Bear - Defends the house. Ex-soviet commander.
Type: Optional
Cost: 30

Minefield - Minefield near the house.
Type: Optional
Cost: 50

AK-47 - It's the world most popular assault rifle.
Type: First Weapon
Cost: 100

Kuvalda Hammer - Damages two zombies. Kills weak zombies instantly
Type: Second Weapon
Cost: 100

Molotov Coctail - Burn em down!
Type: Third Weapon
Cost: 50

Dragunov Rile - Semi-automatic sniper developed in the soviet union. Bullets hurt three zombies.
Type: First Weapon
Cost: 200

Balalayka - Russian folk instructment. Kills weak zombie instantly. Stuns zombies around.
Type: Second Weapon
Cost: 300

Naram Bomb - Nice for covering your back.
Type: Third Weapon
Cost: 50

Matrosov - The most powerful weapon in the game. Horde isn't a problem.
Type: First Weapon
Cost: 3000

List of Upgrades in Zombies Ate My Motherland
Amount of Health - Cost: 1 / 5 / 10 / 20 / 20 / 20 / 20 / 20 / 20
Amount of Grenades - Cost: 1 / 5 / 10 / 20 / 20 / 20 / 20 / 20 / 20
Amount of Crates - Cost: 10 / 20 / 30 / 40
Crate Open Time - Cost: 1 / 50 / 100

Recommended Build in Zombies Ate My Motherland
1. Crate Open Time
2. Amount of Crates
3. Amount of Grenades
4. Amount of Health
5. Repeat 1-4 until you maxed all of them.
6. Compass
7. Brown Bear
8. MineField
9. AK-47
10. Molotov Coctail
11. Naram Bomb
12. Kuvalda Hammer
13. Balalayka
14. Dragunov Rifle
15. Matrosov

Zombies Ate My Motherland Walkthrough
A solid home defense game, even though there is almost no challenge imo. Why? Because you can earn the stars easily and within 7-10 runs, you should almost gotten all the upgrades already. Please note that all the third weapon aka grenades are capped to only hold 10 bombs. Let's say you have 8 left... When a box drops 3-in-a-one bomb, it does not pick it up. Instead, when you get lower than 8, it will then be picked up. To capitalize your star count, spend your grenades wisely then replenish.

Pro-tip: Spend all your grenades and collect the stars before entering the house, during the "THE HORDE IS COMING" phase. You should notice yourself able to slaughter zombies without any difficulty. Just be careful and not to overextend. Going back home alive will grant you another 25% stars! :)

Tuesday, December 24, 2013

The Everloom Walkthrough Guide

The Everloom
The Everloom Logo

Play Online: The Everloom
Developer: Lucas Paakh
Genre: Adventure

The Everloom Guide
Solution to The Everloom
1. String - The first thing you'll need is to find String. You can get it from Fatts McGruf located in the area left of the Weaver by the Sphinx.

2. Scythe - Next, get the scythe from Toadpad in the village area above the Weaver.

3. Tethers - Now you'll need to take a bit of a journey to get tethers from Draco. He is located at the airship area right of the Weaver where Izabel is and go all the way down. There's another exit to the left of the waterfall. That room will be a short little jaunt around and that'll take you into the airship area. You need to go all the way to the end of it to find Draco, who will tie your string into tethers.

4. Ballons - By now, you will have your strings tied into tethers. You can now harvest the little bobbing water cactus and tun them into ballons. You need 13 of them which you will give to Izabel. (If you already wiped out the water cactus population - don't worry, they spawn like rabbits.)

5. Izabel Hair - Izabel will drop a strand of hair and you bring that to Cadmus, who is in the area above the Weaver.

6. Confidence - Cadmus will give you confidence, which you can now use to get past the Sphinx.

7. Fire Gate Key - Search for the Bad Cultist above the sphinx hiding behind the trees who will give you a key to the fire gates down south of the Weaver.

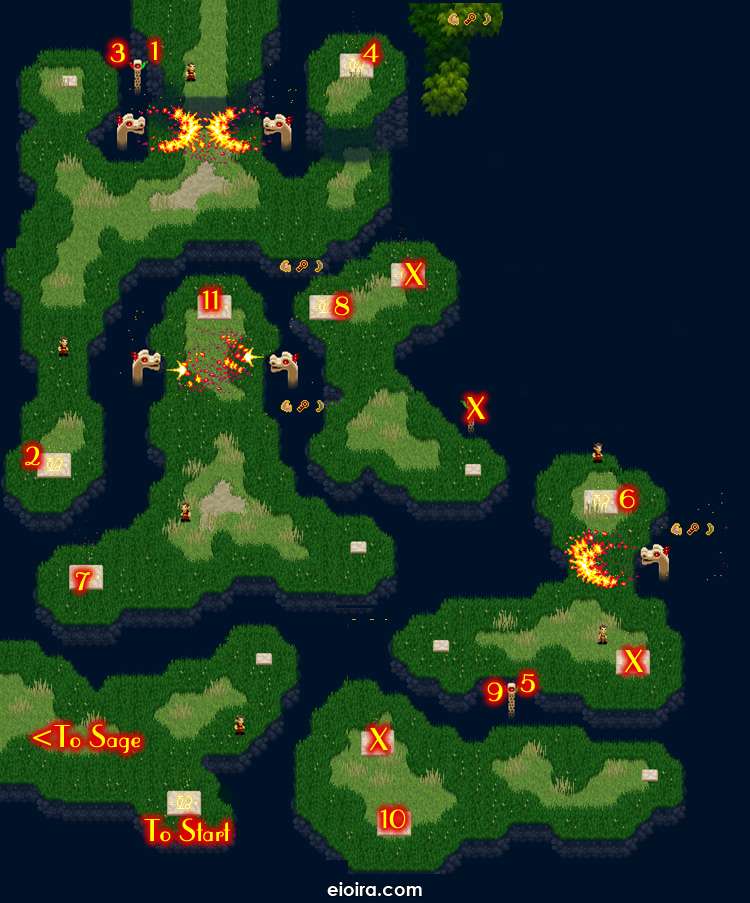
8. Solving Fire Gate Maze - Follow the numbers in the picture below and those marked with X must be avoided. Some things need to be done twice.

9. Egg - After completing the maze, proceed left and go to the very bottom until you find the meditating sage. The Sage will give you an Egg after getting all philosophical for a bit.

10. Revealing Eye - You want to go back to the area above the weaver. Go back to the fire gate maze and enter the last teleporter to be taken back to the beginning of the maze, from there just head up. Now go back to the area above the Weaver until you reach the tall building then go left and then up where the Cultist are doing the rituals. Talk to Lazarus and he'll take the egg and and in return he will let you use his Revealing Eye. To get to the eye, go to the right of the Weaver then go all the way down and to the left. It's standing on the cliff there.

11. Ring Hunt - Now you can use the eye to find the ring. It's in 4 pieces to make a complete set. The first fragment is just right below the revealing eye. The second is located in a puddle in the pathway to the airship area. The third is on the pathway below the cultists in the area above the Weaver. The fourth and final fragment is on the scenic overlook above the Sphinx.

12. Cash - Upon getting the last fragment the ring will be restored. You can now give it to Rich Uptight von Wealthson located left of the Weaver. The guy right below the Sphynx. You will receive Cash from him.

13. Ice Cream - Buy ice cream from the ice cream truck parked on a cliff near the airship.

14. Stone - Bring the ice cream to Martha by Toadpad in the area above the Weaver. You will get a rock.

15. Switch - Head towards the Sphinx and find the switch. The switch to open the lighting barrier above the Sphinx and to the right.

16. Blue Fire Puzzle - Get past the lighting gate... After a few more cinematics, you'll have to solve a puzzle with blue fire. The easy way to solve it is to simply touch each rune once in a circle. If you've already triggered some, don't worry, just keep hitting them.

The Everloom Fire Gate Maze

Sunday, December 22, 2013

Upgradaroids Walkthrough Guide

Upgradaroids
Upgradaroids TripLogo

Play Online: Upgradaroids
Developer: CuriousGaming
Genre: Shooter, Upgrades

Upgradaroids Guide
List of Upgrades in Upgradaroids
Multishot
No. of Bullets: 1 / 2 / 3
Cost: $ 0 / 2000 / 4500

Extra Lives
No. of Lives: 2 / 3 / 4 / 5 / 6
Cost: $ 0 / 500 / 900 / 1500 / 2100

Rate of Fire
Rate: 150 / 180 / 200 / 220 / 250 / 275 / 300
Cost: $ 0 / 300 / 800 / 1600 / 2500 / 3500 / 5000

Coin Magnet Range
Range: 40 / 60 / 80 / 100 / 120 / 150
Cost: $ 0 / 200 / 500 / 1000 / 1400 / 1800

Shield Duration
Duration: 2.0 / 3.0 / 4.0 / 6.0 / 8.0 Secs
Cost: $ 0 / 250 / 600 / 1100 / 2000

Recommended Build for Upgradaroids
1. Rate of Fire
2. Coin Magnet Range
3. Rate of Fire
4. Coin Magnet Range
5. Multishot
6. Rate of Fire
7. Extra Lives
8. Extra Lives
9. Multishot
10. Coin Magnet Range
11. Rate of Fire
12. Coin Magnet Range
13. Rate of Fire
14. Coin Magnet Range
15. Shield Duration
16. Shield Duration
17. Shield Duration
18. Rate of Fire
19. Shield Duration
20. Extra Lives
21. Extra Lives

Upgradaroids Walkthrough
Upgradaroids is a good and a fun little flash game, however I find the control a little awkward. The best way to overcome the control is not to move around a lot. Generally I'll shoot at a direction and your bullets will clear a path for you, then move forward to gather all the coins. Don't worry if you fail to collect all the coins. The truth is coins don't disappear and you'll collect them automatically when the level ends. Basically, destroying as many asteroids and surviving the level is all you need to do. ^^

Take note of the red alien ship too. They love to come fires directly at you, so shoot them down quickly. They always drop a shield or rapid fire after being destroyed. Pick them up and use them wisely especially the shield! Pro-Tip: Use up your shield first before picking another shield, since it refreshes every time.

Thursday, December 19, 2013

Deadly Road Trip Walkthrough Guide

Deadly Road Trip
Deadly Road TripLogo

Play Online: Deadly Road Trip
Developer: NoNameLab
Genre: Shooter, Upgrades

Deadly Road Trip Guide
List of Upgrades in Deadly Road Trip
Armor - Increases players vehicle hit points.
Cost: 0 / 200 / 350 / 950 / 1500 / 2800
Hit Points: 47 / 60 / 80 / 96 / 108 / 116
+ 50% hit points to captured enemy transport

Weapons - Increases players weapons damage.
Cost: 0 / 200 / 350 / 900 / 1500 / 2800
Hit Points: 6 / 7 / 10 / 11 / 13 / 15
+ 100% damage to picked weapons

Hook - Increases chances to capture enemy's transport.
Cost: 0 / 200 / 400 / 950 / 1600 / 2900
Chance to capture Transport: 10 / 15 / 20 / 25 / 40 / 50

Luck - Increases chances to find bonuses and weapons.
Cost: 0 / 200 / 350 / 900 / 1400 / 2600
Bonus Drop Chance: 15 / 20 / 25 / 30 / 37 / 44

Expansion - Increases number of equipment slots.
Cost: 0 / 150 / 280 / 600 / 1100 / 1800
Expansion Slots: 0 / 1 / 2 / 3 / 4 / 5

Transport - Buy new vehicles.
Cost: 0 / 400 / 800 / 1400 / 2000 / 10000
Base Hit Points: 40 / 50 / 70 / 80 / 230 / 200
Speed: 8 / 9 / 10 / 11.5 / 15 / 16
Fuel Capacity: 30 / 40 / 60 / 65 / 80 / 80

List of Expansion Perks in Deadly Road Trip
+ 20% Main weapon damage. Cost: 1500
- 15% Fuel consumption. Cost: 1000
+ 15% Driving speed. Cost: 1000
+ 30% Nitro effect time. Cost: 1000
+ 10% Collected gold. Cost: 3000
- 20% Damage received from enemies. Cost: 2000
Nuetralizes land mines. Cost: 5000
+ 15% coins collecting radius. Cost: 1500
Allows to capture trucks. Cost: 7000

Recommended Build for Deadly Road Trip
Upgrades
1. Weapon
2. Transport
3. Armor
4. Luck
5. Hook
6. Expansion
7. Repeat!

Perks
1. - 20% Damage received from enemies.
2. + 20% Main weapon damage.
3. + 15% Driving speed.
4. Nuetralizes land mines.
5. Allows to capture trucks.

Deadly Road Trip Walkthrough
Deadly Road Trip is a fairly challenging flash game, but progressively gets easier as you upgrade your character. The number one rule is to dodge the land mines as much as possible. It normally comes in four or five and can deal quite a ton of damage to your vehicle. I suggest getting Neutralizes Land Mine expansion as soon as possible if it troubles you. Otherwise, the game is pretty straightforward; dodge bullets, pickup fuel & bonuses, and with a little perseverance you'll win the game! :D

Saturday, December 14, 2013

Flash Element TD Walkthrough Guide

Flash Element TD
Flash Element TD Logo

Play Online: Flash Element TD
Developer: David Scott
Genre: Defense

Flash Element TD Guide
List of Towers in Flash Element TD
Basic Towers
Arrow
Description: Low damage but very fast fire rate.
Type: Land + Air
Cost: 7 / 13 / 32 Gold
Dmg: 6 / 16 / 39
Range: 100 / 110 / 125
Rate: Very fast / Very fast / Very fast

Cannon
Description: Slow but with good damage and splash.
Type: Land only
Cost: 9 / 15 / 26 Gold
Dmg: 9 / 24 / 50
Range: 70 / 70 / 70
Rate: Very fast / Very fast / Very fast

Air
Description: Good damage and rate and range.
Type: Air only
Cost: 12 / 20 / 56 Gold
Dmg: 20 / 35 / 50
Range: 120 / 120 / 120
Rate: Very fast / Very fast / Very fast

Elemental Towers
Water
Description: Medium damage with high fire rate, slows, can be upgraded to splash.
Type: Land + Air
Cost: 50 / 25 / 25 / 25 Gold
Dmg: 25 / 30 / 35 / 40
Range: 75 / 75 / 75 / 75
Rate: Very fast/ Very fast / Very fast / Very fast

Earth
Description: Huge damage, slow fire rate.
Type: Land only
Cost: 50 / 75 / 100 / 150 Gold
Dmg: 144 / 288 / 576 / 1152
Range: 100 / 110 / 120 / 130
Rate: Very slow / Very slow / Very slow / Very slow

Fire
Description: Large damage, slow fire rate, splash.
Type: Land + Air
Cost: 50 / 75 / 100 / 150 Gold
Dmg: 75 / 175 / 300 / 400
Range: 100 / 100 / 100 / 100
Rate: Fast / Fast / Fast / Fast

Combo Towers
Rocket
Description: Fire + Earth + Water. Huge range and damage.
Type: Land + Air
Cost: 200 / 190 Gold
Dmg: 2000 / 2000
Range: 170 / 170
Rate: Slow / Fast

List of Research in Flash Element TD
Water Element
Description: Buy to build water towers.
Cost: 1 Wood

Earth Element
Description: Buy to build warth towers.
Cost: 1 Wood

Fire Element
Description: Buy to build fire towers.
Cost: 1 Wood

+5% Interest rate
Description: Buy to increase your interest rate to 15%.
Cost: 1 Wood

PANIC! Buy 1 extra life
Description: Buy to increase your lives by 1
Cost: 40 Gold

List of Levels in Flash Element TD
Level 1 Sheep - 10 HP, worth 1g each.
Level 2 Rabid Dogs - 42 HP, worth 1g each.
Level 3 Small Boys - 65 HP, worth 1g each.
Level 4 Peasants - 75 HP, worth 1g each.
Level 5 Firework Throwers - 101 HP, worth 1g each.
Level 6 Drug Runners [Fast] - 87 HP, worth 1g each.
Level 7 Greedy Pigs - 136 HP, worth 2g each.
Level 8 Flying Machines [Air] - 158 HP, worth 1g each.
Level 9 Stags - 189 HP, worth 1g each.
Level 10 Trolls [Immune] - 212 HP, worth 2g each.
Level 11 Angry Critters [Boss] - 2000 HP, worth 45g each.
Level 12 Water Elementals - 246 HP, worth 2g each.
Level 13 Drug Runners [Fast] - 212 HP, worth 2g each.
Level 14 Lizards - 331 HP, worth 2g each.
Level 15 Battle Goldems - 284 HP, worth 2g each.
Level 16 Harpy Rogue - 445 HP, worth 2g each.
Level 17 Albatross [Air] - 580 HP, worth 2g each.
Level 18 Fat Pigs - 695 HP, worth 2g each.
Level 19 Drug Runners [Fast] - 599 HP, worth 2g each.
Level 20 Goblins again - 806 HP, worth 3g each.
Level 21 Trolls [Immune] - 1125 HP, worth 2g each.
Level 22 Angry Critters [Boss] - 14000 HP, worth 55g each.
Level 23 Goblins Again?! - 1075 HP, worth 3g each.
Level 24 Dark Minions - 1265 HP, worth 4g each.
Level 25 Cannons - 1468 HP, worth 4g each.
Level 26 Drug Runners [Fast] - 1265 HP, worth 4g each.
Level 27 Albatross [Air] - 1615 HP, worth 4g each.
Level 28 Cryptic Fiends - 1935 HP, worth 4g each.
Level 29 Sludge Monstrosity - 2165 HP, worth 5g each.
Level 30 Ghouls - 2405 HP, worth 5g each.
Level 31 Goblins - 2655 HP, worth 5g each.
Level 32 Trolls [Immune] riding Drug Runners [Fast] - 2500 HP, worth 2g each.
Level 33 Angry Critters [Boss] - 35000 HP, worth 100g each.
Level 34 Damn hard - 5000 HP, worth 5g each.
Level 35 OMG, so hard! - 7000 HP, worth 10g each.
Level 36 gg - 10000 HP, worth 15g each.
Level 37 HOW ARE YOU STILL ALIVE?! - 15000 HP, worth 20g each.
Level 38 THE LAST LEVEL - 20000 HP, worth 25g each.
Level 39 U B PRO - 250001 HP, worth 30g each.

Flash Element TD Walkthrough
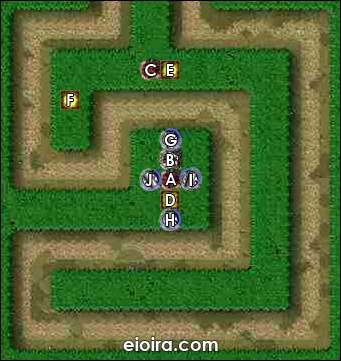
Note: Every tower is given a alphabet within the square brackets. Please refer to the picture below for tower placement.
Level 1 - Build 1 Arrow Tower[A] and Cannon Tower[B]. Upgrade Cannon Tower[B] to Lv 2.
Level 2 - Upgrade Arrow Tower[A] to Lv 2.
Level 3 - Upgrade Canon Tower[B] to Lv 3.
Level 4 - Build 1 Arrow Tower[C] and upgrade to Lv 2.
Level 5 - Sit back and start level.
Level 6 - Upgrade Arrow Tower[C] to Lv 3
Level 7 - Sit back and start level.
Level 8 - Research on Fire Element. Build 1 Fire Tower [D].
Level 9 - Sit back and start level.
Level 10 - Sit back and start level.
Level 11 - Build 1 Fire Tower[E].
Level 12 - Sit back and start level.
Level 13 - Build 1 Fire Tower[F].
Level 14 - Sit back and start level.
Level 15 - Research on Water Element. Upgrade 1 Fire Tower[E] to Lv 2.
Level 16 - Sit back and start level.
Level 17 - Sit back and start level.
Level 18 - Upgrade 1 Fire Tower[D] to Lv 2.
Level 19 - Sit back and start level.
Level 20 - Upgrade 1 Fire Tower[F] to Lv 2.
Level 21 - Sit back and start level.
Level 22 - Research on Earth Element. Build 1 Combo Tower[G].
Level 23 - Sit back and start level.
Level 24 - Sit back and start level.
Level 25 - Sit back and start level.
Level 26 - Build 1 Combo Towers[H].
Level 27 - Sit back and start level.
Level 28 - Sit back and start level.
Level 29 - Research on +5% Interest Rate.
Level 30 - Sit back and start level.
Level 31 - Sit back and start level.
Level 32 - Build 2 Combo Towers[I,J].
Level 33 - Sit back and start level.
Level 34 - Upgrade all Combo Towers[G,H,I,J] to Lv 2.
Level 35 - Build as many Combo Towers as you like! :D
Level 36 - Research on +5% Interest Rate. Build as many Combo Towers as you like! :D
Level 37 - Build as many Combo Towers as you like! :D
Level 38 - Build as many Combo Towers as you like! :D
Level 39 - Build as many Combo Towers as you like! :D

Flash Element TD Recommended Placement
Flash Element TD Map Build

Tuesday, December 10, 2013

Battalion Commander 2 Walkthrough Guide

Battalion Commander
Battalion Commander 2 Logo

Play Online: Battalion Commander 2
Developer: Iriysoft
Genre: Upgrades, Action

Battalion Commander 2 Guide
List of Upgrades in Battalion Commander 2
Private
Weapon: Double Pistols - The leader wields two pistols.
Ally: Rifleman - Unlocks allied Rifleman. Riflemen shoot bullets straight forward.
Skill: Adrenaline Injection - Makes enemies and enemy bullets move slower.

Corporal
Weapon: Double SMGs - The leader wields two sub machine guns.
Ally: Grenadier - Unlocks allied Grenadier. Grenadiers throw grenades which explode either when hitting the enemy or after the timeout.
Logistics - + 100% to the money and XP magnet radius.

Sergeant
Skill: Napalm Wave - Every ally launches a burst of fire straight forward.
Ally Upgrade: Automatic Rifleman - Equops Riflemen with Automatic Rifles. Automatic Rifle shoots burst fire.
Fireteam: Rifleman - The game starts with one Rifleman in the squad.

Master Sergeant
Weapon: Shotgun - The leader shots 7 bullets.
Ally: Marksman - Unlocks allied Marksman. Marksmen shoot right in the target.
Fireteam: Grenadier - The game starts with one Grenadier in the squad.

2nd Lieutenant
Weapon: Jackhammer - The leader shots bursts of bullets.
Ally Upgrade: Flamethrower - Equips Grenadiers with Flamethrowers. Flamethrowers spray out burning fuel.
Battle Experience - Enemies drop 20% more money and XP.

1st Lieutenant
Weapon: Minigun - The leader fires 6-bullets bursts.
Ally: Rocketeer - Unlocks allied Rocketeer. Rocketeers launch rockets straight forward.
Fireteam: Marksman - The game starts with one Marksman in the squad.

Captain
Skill: Airstrike - Launches deadly air strike which hits every enemy on the screen.
Ally Upgrade: Advanced Sniper Rifle - Marksmen shoot two bullets.
Inspiration - Skills reload 30% faster.

Major
Weapon: Heavy Minigun - The leader fires 6-bullets bursts and throws grenades.
Weapon Training - All weapons reload 30% faster.
Fireteam: Rocketeer - The game starts with one Rocketeer in the squad

Lieutenant Colonel
Weapon: Rocket Launcher - The leader launches 3 rockets.
Ally Upgrade: Homing Missiles - Rocketeers launch homing missiles.
War Supplies - + 30% to bonuses drop rate.

Colonel
Weapon: Missile Launcher - The leader launches 1 rocket and 2 homing missiles.
Skill: AirSupport: Allied battle helicopter comes to support your squad.
Drilling - All the allies get 50% fire rate boost.

List of Perks in Battalion Commander 2
Complete those brown current missions to unlock perks.
Splinter Shells - Explosives produce Splinters.
APC Vehicle - The squad starts the game in the car.
Uranium Core Bullets - Bullets cause more damage.
Fire Bullets - Bullets set fire to target.
Napalm Core - Explosives are loaded with napalm.
Medi Kit - Leader can heal allies.
Fireproof Spray - Squad members do not burn.
Armor - Reduces damage.
U.A.V - UAVs will support the team.
Military Boots - + 20% squad movement speed.
Nano Bots - Leader regenerates.
Salvation - Restores 50% health when skill is activated.
M.R.E Pack - + 100% to all allies.
Grenades - Allies throw grenades.
Energy Shield - Grants temporary shield when skill is activated.
X-Ray Glasses - Unveils hidden enemies.

Recommended Build for Battalion Commander 2
Upgrades
1. Weapon: Double SMGs
2. Logistics
3. Ally: Grenadier
4. Ally Upgrade: Automatic Rifleman
5. Skill: Napalm Wave
6. Weapon: Shotgun
7. Ally: Marksman
8. Battle Experience
9. Weapon: Jackhammer
10. Ally Upgrade: Flamethrower
11. Ally: Rocketeer
12. Inspiration
13. Ally Upgrade: Advance Sniper Rifle
14. Weapon Training
15. War Supplies
16. Ally Upgrade: Homing Missiles
17. Drilling
18. Weapon: Missile Launcher
19. Fireteam: Rifleman
20. Fireteam: Grenadier
21. Fireteam: Marksman
22. Fireteam: Rocketeer
23. Skill: AirStrike
24. Weapon: Rocket Launcher
25. Weapon: Heavy Minigun
26. Skill: AirSupport
27. Weapon: Minigun

Perks
1. Military Boots
2. Armor
3. Uranium Core Bullets
4. Energy Shield or Fireproof Spray

Battalion Commander 2 Walkthrough
Battalion Commander 2 is pretty much similar if compared to the very first game, Battalion Commander. My strategy and guide are almost the same except there are slight changes. This time round, I will equip myself with Jackhammer and Napalm Wave for the most part. Jackhammer is an upgraded version of a shotgun that shoots 3 bursts of bullets in a spread effect. Super effective in killing when the map is wide and do tons of damage! Napalm Wave destroys anything in a straight path which is good at clearing clustering and perfect for its fairly short cooldown time.

The recommended build worked well for me, I completed the game after upgrading War Supplies. I'd only unlock those upgrades, I feel is necessary... Like Jackhammer, Advance Sniper Rifle and Weapon Training. These are very overpowered upgrades; Definitely must get as soon as you can! While Minigun, AirSupport and Rocket Launcher are kinda useless imho. They don't feel right for me.

For the final boss, it can be divided into three parts/stage. The first stage should be easy, basically activate napalm and start running around with a full squad. Second stage is the flamethrower and missiles part. The simplest way to counter is to pick fireproof spray perk. Just laugh when it dealt no damage to you and your squad. >:D In the third stage, since the bullets are in a patter just dodging them by moving back and forth. Your allies will most likely die but don't stop here! Keep dodging and launch napalm whenever possible. Tada, you win!

Sunday, December 8, 2013

Idle Mine Walkthrough Guide

Idle Mine
Idle Mine Flash Game Logo

Play Online: Idle Mine
Developer: Crovie
Genre: Simulation, Upgrades

Idle Mine Guide
List of Mines in Idle Mine
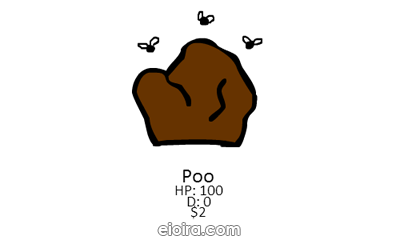
Poo - HP: 100 | D: 0 | $2
Paper - HP: 400 | D:2 | $10
Salt - HP:700 | D:15 | $22
Clay - HP:1400 | D:35 | $50
Rock - HP:2200 | D:90 | $120
Coal - HP:4000 | D:200 | $275
Bone - HP:7000 | D:380 | $580
Lead - HP:12,400 | D:700 | $1,100
Iron - HP:16,000 | D:1,140 | $1,850
Copper - HP:25,000 | D:1,600 | $3,200
Carbonite - HP:40,000 | D:2,500 | $5,200
Quartz - HP:64,000 | D:3,800 | $8,600
Spooky Bone - HP:92,000 | D:5,400 | $14,000
Silver - HP:128,000 | D:7,200 | $20,000
Crystal - HP:200,000 | D:9,999 | $42,000
Topaz - HP:500,000 | D:13,500 | $140,000
Amethyst - HP:1,400,000 | D:18,000 | $480,000
Aquamarine - HP:4,800,000 | D:24,500 | $2,200,000
Emerald - HP:13,000,000 | D:34,000 | $7,200,000
Ruby - HP:42,000,000 | D:50,000 | $25,500,000
Sapphire - HP:120,000,000 | D:80,000 | $85,000,000
Haunted Bone - HP:200,000,000 | D:130,000 | $190,000,000
Gold - HP:360,000,000 | D:200,000 | $400,000,000
Platinum - HP:500,000,000 | D:295,000 | $760,000,000
Diamond - HP:700,000,000 | D:440,000 | $1,600,000,000
Mithril - HP:1,000,000,000 | D:680,000 | $2,800,000,000
Obsidian - HP:1,400,000,000 | D:1,050,000 | $4,800,000,000
Earth Essence - HP:2,000,000,000 | D:1,400,000 | $8,200,000,000
Orbium - HP:2,600,000,000 | D:2,000,000 | $13.50b
Novalite - HP:3,500,000,000 | D:2,800,000 | $24.50b
Magic Crystal - HP:4,900,000,000 | D:4,000,000 | $42.00b
Darkstone - HP:7,200,000,000 | D:5,800,000 | $70.00b
Adamantium - HP:10.00b | D:8,500,000 | $125.00b
Fire Essence - HP:14.00b | D:12,000,000 | $200.00b
Lunalite - HP:20.00b | D:17,000,000 | $340.00b
Mysterium - HP:30.00b | D:24,000,000 | $580.00b
Cursed Bone - HP:45.00b | D:33,500,000 | $1,050.00b
Wind Essence - HP:68.00b | D:48,000,000 | $1,700.00b
Unobtanium - HP:100.00b | D:69,000,000 | $3,000.00b
Sollite - HP:130.00b | D:95,000,000 | $4,800.00b
Water Essence - HP:175.00b | D:138,000,000 | $7,200.00b
Absurdium - HP:240.00b | D:205,000,000 | $12,000.00b
Cosmolite - HP:320.00b | D:300,000,000 | $20,000,00b
Shadow Essence - HP:435.00b | D:440,000,000 | $30,000.00b
Demonite - HP:590.00b | D:640,000,000 | $48,000.00b
Eternium - HP:780.00b | D:95,000,000 | $72,000.00b
Mysticite - HP:1,050.00b | D:1,400,000,000 | $110,000.00b
Light Essence - HP:1,350,00b | D:2,000,000,000 | $170,000.00b
Soulstone - HP:1,800.00b | D:3,100,000,000 | $270,000.00b
Arcanium - HP:2,400.00b | D:4,800,000,000 | $420,000.00b
Hellstone Lv. 1 - HP:3,200.00b | D:7,000,000,000 | $680,000.00b
Hellstone Lv. 2 - HP:3,840.00b | D:10.50b | $1,020,000.00b
Hellstone Lv. 3 - HP:4.608.00b | D:15.75b | $1,530,000.00b
Hellstone Lv. 4 - HP:5,529.60b | D:23.62b | $2,295,000.00b
Hellstone Lv. 5 - HP:6,635.52b | D:35.43b | $3,442,500.00b
Hellstone Lv. 6 - HP:7,962.62b | D:53.15b | $5,163,750.00b
Hellstone Lv. 7 - HP:9,555.14b | D:79.73b | $7,745,625.00b
Hellstone Lv. 8 - HP:11,466.17b | D:119.60b | $11,618,437.50b
Hellstone Lv. 9 - HP:13,759,41b | D:179.40b | $17,427,656.25b
Hellstone Lv. 10 - HP:16,511.29b | D:269.10b | $26,141,484.37b
Hellstone Lv. 11 - HP:19,813.55b | D:403.65b | $39,212,226.56b
Hellstone Lv. 12 - HP:23,776.26b | D:605.48b | $59,818,339.84b
Hellstone Lv. 13 - HP:28,531.52b | D:908.22b | $88,227,509.76b
Hellstone Lv. 14 - HP:34,237.82b | D:1,362.33b | $132,341,264.64b
Hellstone Lv. 15 - HP:41,085.39b | D:2,043.50b | $198,511,896.97b
Hellstone Lv. 16 - HP:49,301.46b | D:2,452.20b | $267,991,060.91b
Hellstone Lv. 17 - HP:59,162.96b | D:2,942.64b | $361,787,932.23b
Hellstone Lv. 18 - HP:70,995.55b | D:3,531.17b | $488,413,708.51b
Hellstone Lv. 19 - HP:85,194.66b | D:4,237.41b | $659,358,506.49b
Hellstone Lv. 20 - HP:102,233.59b | D:5,084.89b | $890,133,983.76b
Hellstone Lv. 21 - HP:122,680.31b | D:6,101.87b | $1,201,680,878.08b
Hellstone Lv. 22 - HP:147,216.38b | D:7,322.24b | $1,622,269,185.41b
Hellstone Lv. 23 - HP:176,659.66b | D:8,786.69b | $2,190,063,400.31b
Hellstone Lv. 24 - HP:211,991.59b | D:10,522.03b | $2,956,585,590.41b
Hellstone Lv. 25 - HP:254,389.91b | D:12,652.84b | $3,991,390,547.06b

Calculation for Hellstone
Here the calculations:
Multiple 1.2 to the HP of the previous, 1.2 to the previous defense and 1.35 to the previous money.

Example
1. To calculate Hellstone Lv.26, take the values from previous level.
Hellstone Lv. 25 - HP:254,389.91b | D:12,652.84b | $3,991,390,547.06b

2. Multiply Accordingly
Hellstone Lv. 26 - HP:254,389.91b * 1.2 | D:12,652.84b * 1.2 | $3,991,390,547.06b * 1.35

3. Tada!
Hellstone Lv. 26 - HP:305,267.89b | D:15,183.41b | $5,388,377,238.53b

List of Upgrades in Idle Mine
Upgrade Blacksmith - Makes the blacksmith sightly better, increasing the base power of the pickaxes he produces.
Blacksmith Skill - Increases the general quality of crafted gear.
Blacksmith Expertise - Increases the likelihood of crafting with + bonuses.
Blacksmith Efficiency - Small chance the Blacksmith will not use a gem while crafting.
Gem Waster - Allows you to use several gems at once to ensure crafting a higher tier of pic. But it's not really worth it.
Manual Click Power - Increases the power of manual clicking.
Auto-Click Power - Increases the power of automatic clicks.
Auto-Click Faster - Increases the frequency of automatic clicks.
Idle Power - Can earn gold even when the game is closed.
Gem Finder - Increases odds of finding a gem.

Recommended Build for Idle Mine
1. Upgrade Blacksmith
2. Manual Click Power
3. Repeat 1 & 2 ten times
4. Craft New Pickaxe
5. Gem Waster
6. Blacksmith Skill
7. Blacksmith Expertise
8. Gem Finder
9. Blacksmith Efficiency
10. Auto-Click Faster
11. Auto-Click Power
12. Idle Power
13. Repeat from 1

Idle Mine Walkthrough
There is no wrong/right way to upgrade in Idle Mine. In my opinion, I would prefer to craft a stronger pickaxe, therefore Upgrade Blacksmith than to slowly stack the Manual Click Power. Mainly because the power from the pickaxe is a leading factor for your overall damage output, while Manual Click Power is a percentage multiplied onto the power. The best way for me is to level up Upgrade Blacksmith first, until you are almost in the same price range as Manual Click Power. Then upgrade both Manual Click Power and Upgrade Blacksmith 7-10 times each. Here's the moment of truth... Try your luck by crafting a new pickaxe! Most of the time you will success with your first try however, craft several times to get the highest quality ones. Continue follow the recommended build above and unlock those upgrades you can afford. Finally, repeat the entire process again!

Gem waster is an extremely useful upgrade later on when you're mining high level hellstone, at least in my experience. Don't worry about wasting gems... The simple way to farm for a decent amount is by attacking the strongest mine that you can one hit auto with, and still earn a fair amount of money. Poo is just the first one you can do this at and not the best. A good way to figure out the most efficient ore to manually click is to find the one with the highest auto g/s. The g/s is more of a representation of earnings than an actual cash producer. It just calculates how long it takes to fully mine an ore, and divides the reward by the amount of seconds it take to mine that ore by idling alone. That's how it comes to that value. This should output a highest average amount of damage and earn you the most amount of gold in any second.

Pro-Tip: Hit alt-shift-num lock and activate the ease keys. Then press and hold '5' & '+' on the num pad. Every time you hit '5' it counts as one click, every time you hit the '+' it counts as two clicks... You'll save yourself from carpal tunnel syndrome and your mouse won't go bad. :D