Saturday, July 28, 2012

Seedling Game Review & Walkthrough Guide

Seedling
Seedling Adventure RPG Flash Game Logo

Play Online: Seedling
Developer: Conner Ullman
Genre: Adventure, Action

Game Review
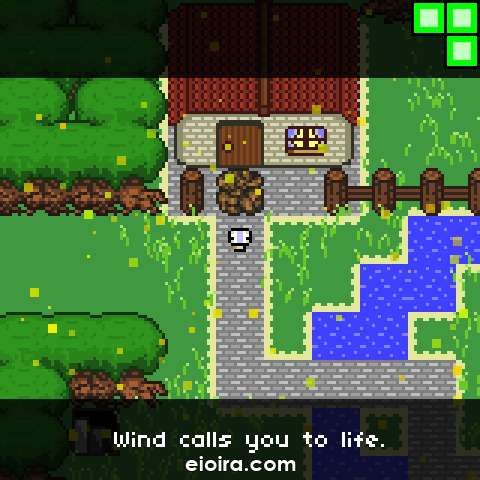
Seedling. The wind itself breathes life into a small boy who is destined to be special. Appearing in front of a house and knowing that this house holds his answers. What follows is an adventure to seek for self-discovery as you soon discover you were created with purpose.

Seedling is a 2D action-adventure game that will trigger some serious nostalgia if you remember playing the original Legend of Zelda. It is a role-playing game (RPG), as you will start off exploring an unfamiliar world and quickly gain access to a sword and shield, as well as various other treasures and keys. With what you need, you will quickly venture into various caves and dungeons, slaying huge bosses. The developer has done a great job in fabricating a wonderful and surprisingly deep story. This game is deeper than I thought. The pixel artwork and music were perfect. I noticed that there were actually fifteen different tracks for this game, which is must to highlight, especially considering that most Flash games only stick to one or two.

If you've been a gamer since the classic NES or even just an original Gameboy era, the gameplay for you will be a phenomenal one. You will know how it feels like, playing those old school NES games. Simple game mechanics as you will expect from an older game. For the most part, the game wasn’t too difficult but challenging enough to complete the entire quest. The enemies were easy to kill and most of them could only take two to three hits. Most of the bosses were fun to fight and continued to be challenging even after figuring out how to beat them. Perhaps the hardest part is finding your way around. It can be quite frustrating at the same time curious, as it takes a while to find the next dungeon.

I have finished the game in 3 hours and had lots fun, although I was quite worried that I would not get all 16 pieces. Luckily, I found the last one with little trouble. Seedling is worth checking out. Classic Zelda-esque style, loved it. One more thing, I really appreciate the fact that your health regenerates when you transition screens. :)

Seedling Guide
Boss Walkthrough For Seedling
Boss 1: Shieldspire
Stand in front of him but don't attack. After a couple of seconds, he'll move his shield to the side, and you can safely hit him. Repeat a few times to kill him.

Boss 2: The Times
The boss grabs a new weapon each time you deal a certain amount of damage to him. Your health regenerates at this point, so you can generally just spam the attack button without needing to
dodge his own attacks.

Boss 3: Totem
This boss is quite frustrating to fight, because of the constant camera shifts and his earthquake ability, which leaves you facing the other direction. Equip the wand and shoot when you get the opportunity. Stay out of the beams of light, and avoid the shots he fires on the left and right immediately after the beam, then hide in the bottom right corner and shoot at him as he gets closer. Repeat a few times to defeat him.

Boss 4: Tentacle Beast
A nice simple boss. Just simply cut off its legs as they appear. Once every leg has been chopped up, the boss is defeated.

Boss 5: The Lights
Activate the pillar, and a bunch of monsters will swarm around you. These are easy to beat—stay by the pillar, and attack outwards as they fly by you. When there's only a few remaining, they'll move in a bit nearer you. A couple of steps and some quick attacks should see you safe though.

Boss 6: King of Fire
Stand directly in front of the King of Fire, just a step or two back in the lava.
Equip the sword as the radius is useful here.mKill the two bats he throws, then deflects a fireball back at him. While he's flickering, run forward and attack him directly. Repeat a few times to win.

Boss 7: The Owl
You can only hit the owl when its moving around. It leaves its hiding place and moves in an anti clockwise direction, after the rocks stop falling. Stay one step ahead so you can attack as it comes out. Attack the owl at the direction of the lava and it only takes a few hits to kill it.

Full Treasure Location in Seedling
1. The house in the village.
2. First dungeon, after the sword.
3. Shieldspire's dungeon (pre-conch)—fall through the hole in the floor.
4. In the cave with Adnan where you get teleported to outside of the sixth dungeon.
5. In the entry of Totem's dungeon
6. Further along within Totem's dungeon, in front of the burnable tree for a switch.
7. On the southern-most ledges of the forest area, near the lava dungeon opening.
8. In a cave above from where you get the Penguin's Feather.
9. On the return to Shieldspire's dungeon (with the conch), go across the water to the chest.
10. The Times dungeon, above the area with the drills.
11. On the inside of Tentacle Beast's dungeon; in a little ice part surrounded by water.
12. Around the outside of Tentacle Beast's dungeon; right above the part where you are teleported out of the boss area.
13. In the King of Fire's dungeon (pre-dark suit), in the first big room, near the entrance to the boss area.
14. In the King of Fire's dungeon (with the dark suit), in the area where you are first pulled across a gap by an enemy.
15. Inside the Lights' dungeon (with the dark suit), across some lava, and above where you can get the health.
16. In the entry to Ghethis, to the upper-right of the first area in the tower.

Seedling Screenshot
Seedling Adventure RPG Flash Game Screenshot

Friday, July 20, 2012

Soldier Diary Game Review & Walkthrough Guide

Soldier Diary
Soldier Diary Flash Game Logo

Play Online: Soldier Diary
Developer: BeGamer & FastGames
Genre: Puzzle

Game Review
Soldier Diary is actually a point and click linear adventure puzzle game. I find them to be very straightforward but yet quite entertaining on the first try, because this type of games doesn't offer much replaying value. The plot is overall is very one direction and once you solve it, it is only so much you can do to really stand out.

However in actuality it wasn't as bad as I think it will be. So, you are a foot soldier in the heroic green army, currently detained in prison by the evil red army. In this game you actually have to take out enemies in various ways as you progress. Keep your head down, and your thinking cap on! Use your logic to click around the area, so you can alert your allies to send help, and get you out from behind enemy lines. It is very simple and quick game.

Not too challenging but it is fun watching the lil' green guy take out an entire base of the enemy. At any point of time if you are stuck, refer to our walkthrough guide below. This guy is a one man army, he should be promoted. Every time he shoots he drops the gun because he likes Fairplay, and he is too good for his foes.

Soldier Diary Guide
Solution to Soldier Diary
Scene 1
- Click the green soldier twice to break free from the chair.
- Pick up the small round stone on the ground to take out the red guard.
- Take the red soldier's gun on the ground by the radio.
- Click the lock on the gate to shoot it open, the continue right to the next scene.

Scene 2
- Click the left side of the ledge to jump up onto it.
- Click the ladder to push it onto the side of the building.
Climb up the ladder and flip the switch.
Go back down the ladder and pull the rope under the building to knock out the red soldier.
Click the rope to slide back down and continue right to the next scene.

Scene 3
- Pick up the gun on the ground by the red soldier's body.
- Click the small round stone wedged between the block and the pedestal to shoot it, dropping the block down.
- Jump up onto the platform and climb up the block.
- Click the cart behind the column to push it left, then click it again to bounce to the top of the building.
- Click the rope to continue right to the next scene.

Scene 4
- Take the hatchet sticking out from under the roof of the tower.
- Click the rope above the bridge to throw the hatchet at it, disposing of both the red soldiers.
- Go down the rope on the left of the tower to drop to the ground.
- Jump over the gap to the right platform.
- Click the pole to climb up it, then click the rope tied around the pole and the beam.
- Click the beam to push it over the pit at the right.
- Drop down and continue right to the next scene.

Scene 5
- Pick up the stone on the ground to the right of the fence.
- Click the up arrow to climb on top of the ledge.
- Click the large block beside the wall on the right to push it up.
- Put the stone in the gap between the block and the ground.
- Climb up on top of the block.
- Click the bars above the lamp to hang from the ceiling.
- Click the lamp to drop it on the ground, which will lure in the guard for you to take him out.
- Pull the lever to open the gate and continue right to the next scene.

Scene 6
- Take the grappling hook and rope at the bottom of the right wall.
- Click the top left corner of the building to throw the hook, then click the rope to climb onto the roof.
- Click the right arrow to dive down towards the right side of the roof.
- Click the red enemy soldiers to throw the grenade at them.
- Drop down to dive into the water and continue to the next scene.

Scene 7
- Click the second arrow on the left to back up.
- Click the right arrow to jump over the chasm.
- Continue right to the next scene.

Scene 8
- Lift the hatch covering the entrance to the tunnel.
- Climb down the ladder into the tunnel, then climb back up the ladder on the right side.
- Go into the building and click the lever on the right two times to lower the cannon.
- Put the cannon ball into the barrel of the cannon.
- Go back to the building and click the lever two times again to aim the cannon.
- Push the switch on the left to fire the cannon.
- Continue right to the next scene.

Scene 9
- Click the tree to drop the hammer onto the ground.
- Pick up the hammer and use it on stone at the top of the pile of rubble on the right.
- Click the ladder to lift it up to the wall.
- Climb up the ladder onto the building, then use the hammer to smash the cracked part of roof.
- Drop down into the building and drop down again onto the dock.
- Pick up the oar at the end of the dock, then click the boat to continue to the next scene.

Scene 10
- Click the bin to lift it up, then click it again to push it to the left.
- Pull the lever at the lower left to raise the elevator and take out the red guard.
- Click the poster on the wall to look at the code to contact the green army base: Black-- White-Black-White-Black-White.
- Push the button to the right of the lever four times to set the lights in the same order as the code.
- Click the lever to activate the satellite.
- Click the telephone to call the green army base.
- Pick up the red guard's gun on the floor, then shoot the window to break it.
- Continue right to the next scene.

Scene 11
- Click the green soldier twice to lift his hands and get on his knees, then click the red - soldier's gun to take him out.
- Click the pole to slide down to the ground.
- Go inside the right car to continue to the next scene.

Scene 12
- Go up the stairs and pick up the knife at the edge of the cliff.
- Push down the beam leaning against the middle column to make a ramp up the stairs.
- Climb up on top of the blocks at the left.
- Click the rope tied around the ladder at the top of the left column to cut it with the knife.
- Go up the ladder, then push over the block at the right side of the platform.
- Climb back down the ladder to the ground.
- Click the block at the top of the left pile to push it onto the back of the car.
- Click the car to go inside, then click the arrow above the car to drive it up the ramp and to the right.
- Click the block to push it out of the car, then click it again to push it over the cliff.
- Continue right to the next scene.

Scene 13
- Pick up the knife in the ground beside the stack of blocks.
- Click the red soldier to throw the knife at him.
- Take the grenade on the ground to the right of the red soldier's body.
- Do not go right yet, instead, click the area above you to throw the grenade at the enemy soldiers in the next scene.
- Pick up the gun on the ground, then continue right to the next scene.

Scene 14
- Click the red guard to shoot him with the gun.
- Push over the block covering the button panel beside the pile of rubble.
- Click both of the buttons to raise the two doors.
- Pull the lever to the right of the dead guard to lift the crane.
- Climb up the ladder onto the roof of the building.
- Click the beam on the left platform to push it over the hammer like a seesaw.
- Hop over the gap to the right platform.
- Pick up the hatchet and jump back to the left platform.
- Click the left side of the beam to stand on top of it.
- Click the crane's hook to throw the hatchet at it, which will launch you to the upper right - platform.
- Click the right arrow to call the helicopter.

Saturday, July 14, 2012

Kamikaze Pigs Game Review & Walkthrough Guide

Kamikaze Pigs
Kamikaze Pigs Game Logo

Play Online: Kamikaze Pigs
Developer: Monstro Games
Genre: Action, Upgrades

Game Review
Pigs at War, what is it good for? Bacon strips! Kamikaze Pigs is an addicting and challenging chain reaction style puzzle game. Basically the idea is there is a huge pig army comprised of helicopters, planes, foot soldiers, rocket launchers, tanks, etc. You start the action by clicking your mouse to cause an explosion that roasts a few pigs. Once, any pig unit hit will shoot their sort of weapon which can hit other pig units causing them to shoot off their weapons, hence a chain reaction. During the chain reaction, the charge meter will continue to refill. When it's full, roast’em again! Remember, every pig gives you cash. Only when you reach the red flag in the kill progress meter then the level is cleared.

What makes Kamikaze Pigs even more unique is the extensive upgrade system which is based on the stars collected to unlock higher upgrade tiers. There are some star are earned by based on how many pigs are destroyed. While another type of stars are earned by colliding into them on the screen. Achievements don’t just sit around either; they offer additional stars towards future upgrades. Kamikaze Pigs features 40 levels of gameplay and doing so unlock hidden levels including bonus Big-Boss.

This is without a doubt the most delicious quirky twist into the chain reaction genre. And one more thing, I've never played a game where the bosses were structures that just sat there. :)

Kamikaze Pigs Guide
Earning Gold in Kamikaze Pigs
The reason it seems so hard to get money is because each replay earns you less money. You only get more money when your score for a level is above what your best record for a level is. Therefore, the money upgrades should always take priority. Once you have gotten a higher level money upgrade, go back and try for the best combo for each stage. With the +150% money upgrade, and going through all the stages with the highest combo. The hidden levels are the best ones to replay; some of them give you $40,000 on the first try. Doing this strategy I maxed out my upgrades and got 6 stars on all maps.

Upgrades Build in Kamikaze Pigs
Pro-Tip: If you can't afford the last upgrade, you can consider selling away the most useless upgrade. So in the case of Kamikaze Pigs, the most useless upgrade will be the +% money upgrade. I won the game without the last 150% money upgrade. As long as you have most of the weapon upgrades, the money upgrade isn't needed to clear the hidden boss.

Kamikaze Pigs Upgrades
Kamikaze Pigs Upgrade Build

Kamikaze Pigs Map
Kamikaze Pigs Map

Kamikaze Pigs Achievements

Saturday, July 7, 2012

Trollface Quest Game Review & Walkthrough Guide

Trollface Quest
Trollface Quest Game Logo

Play Online: Trollface Quest
Developer: PiterGames
Genre: Puzzle

Game Review
DO YOU LIKE GAAMES?? I WANT TO PLAY A GAME WITH YOUUU.

After playing this online flash game, all I have to say is "WTF IS THIS!". This is clearly not appropriate for normal individual like me. It is much like an idiot test, making people think right out of the box and fooling us. I got trolled so many times; Here's one example, I really don't know if the game is taking a long time to load, or I'm just being trolled. I am so embarrassed to admit it but this is definitely quite refreshingly stupid. It is going to be something out of my school years. It had me laughing hard every time I solved a puzzle. It is just too random for me. Alright, talking about Trollface Quest is the latest game based on the beloved Internet meme. Trollface Quest is a ridiculous puzzle solving game where, you are going to solve 20 seemingly simple puzzles. The whole idea is to do it correctly and don’t get caught by Trolls.

To be honest, none of the puzzle is obvious except first level but still made it to the end. I love how my option post-last level was "Restart" and "Play Again" towards the end. I mean what if I don't want to play this game again? Mustn't... Feed... The... TROLLS! *ASCII comics style* They are dangerous and has a skinny dick. Be careful. :)

Trollface Quest Guide

Trollface Quest Screenshot
Trollface Quest Game First Level

Solution to Trollface Quest
1: Click the light red button on the TV.
2: Click the left guy's eyes.
3: Click the triangle on the green door, then click the door itself.
4: Click the guy five times, then click the pipe segments to make one connected run.
5: Click the group of three people, then click the leaves of any one of them.
6: Click the zipper pull right behind the bull's horns.
7: Click the wand when you're a human.
8: Click the car 18 times, then wait.
9: Click the guy 19 times.
10: Click the word "Trollface" 10 times.
11: Click the small black "minimize" button on the "lifelines" window in the upper-right twice, then click the "win" button.
12: Drag the piece of candy through the maze to the trollface, drag it up and outside of the puzzle, then click on the "next level" button.
13: Click the green triangle to move the car down, click the triangle to move the car up (after you pass the first black box), then click on one of the two black boxes as they approach the car.
14: Click on the boulder right before it hits the man.
15: Click the green button on the left 99 times, then click the green button on the right once.
16: Let the walls close in on the man, and when the blades almost hit him, click the small button on the upper-right corner of the right wall.
17: Click the nine trollfaces, then click the trollface on the "level failed!" window next to the "restart" button.
18: Click the "jump" button so you jump over the first two spike traps, but walk over the third.
19: Click the following notes: third from the left, leftmost, fourth from the left, second from the left, then click on the man.
20: Click the wires, then click the light red button on the TV.